Z4の取扱説明書・マニュアル [全120ページ 3.82MB]


5


89 / 120 ページ
89 / 120 ページ


現在のページURL
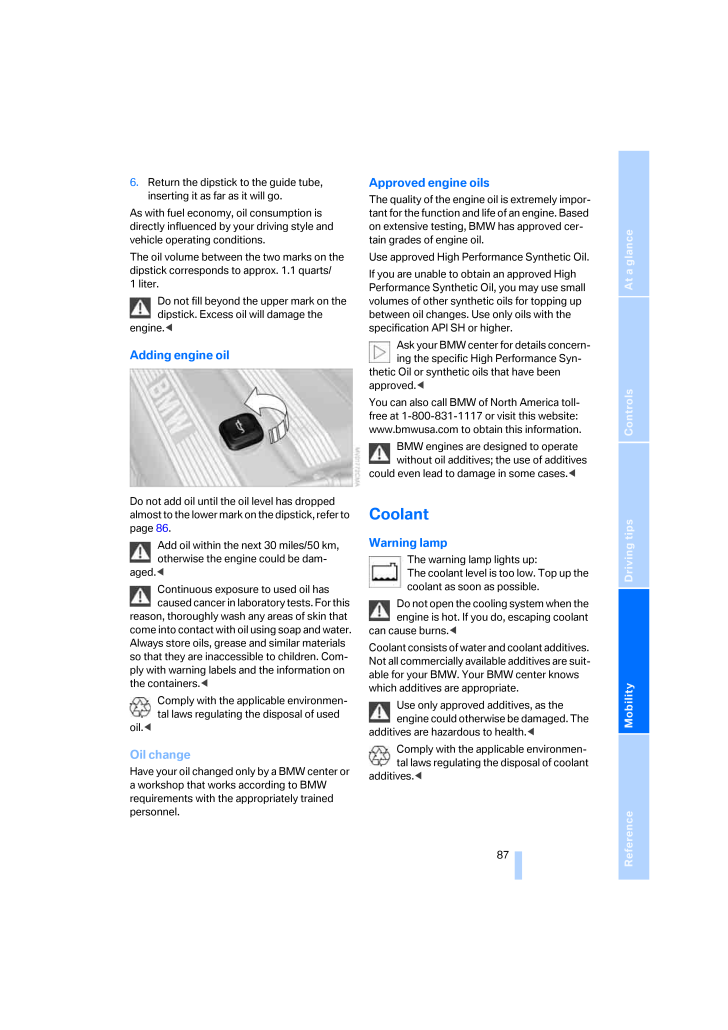
ReferenceAt a glanceControlsDriving tipsMobility 876.Return the dipstick to the guide tube, inserting it as far as it will go.As with fuel economy, oil consumption is directly influenced by your driving style and vehicle operating conditions.The oil volume between the two marks on the dipstick corresponds to approx. 1.1 quarts/1 liter.Do not fill beyond th e upper mark on the dipstick. Excess oil will damage the engine.<Adding engine oilDo not add oil until th e oil level has dropped almost to the lower mark on the dipstick, refer to page86.Add oil within the next 30 miles/50 km, otherwise the engine could be dam-aged.<Continuous exposure to used oil has caused cancer in labora tory tests. For this reason, thoroughly wash any areas of skin that come into contact with oil using soap and water.Always store oils, grease and similar materials so that they are inaccessible to children. Com-ply with warning labels and the information on the containers.<Comply with the app licable environmen-tal laws regulating th e disposal of used oil.<Oil changeHave your oil changed only by a BMW center or a workshop that works according to BMW requirements with the appropriately trained personnel.Approved engine oils The quality of the engine oil is extremely impor-tant for the function and life of an engine. Based on extensive testing, BMW has approved cer-tain grades of engine oil.Use approved High Performance Synthetic Oil.If you are unable to obtain an approved High Performance Synthetic Oil, you may use small volumes of other synthetic oils for topping up between oil changes. Us e only oils with the specification API SH or higher.Ask your BMW center for details concern-ing the specific Hi gh Performance Syn-thetic Oil or synthetic oils that have been approved.<You can also call BMW of North America toll-free at 1-800-831-1117 or visit this website: www.bmwusa.com to obtain this information.BMW engines are designed to operate without oil additives; the use of additives could even lead to damage in some cases. <Coolant Warning lampThe warning lamp lights up:The coolant level is too low. Top up the coolant as soon as possible.Do not open the cooling system when the engine is hot. If you do, escaping coolant can cause burns.<Coolant consists of wate r and coolant additives. Not all commercially availa ble additives are suit-able for your BMW. Your BMW center knows which additives are appropriate.Use only approved additives, as the engine could otherwise be damaged. The additives are hazardous to health.<Comply with the app licable environmen-tal laws regulating the disposal of coolant additives.<
参考になったと評価  5人が参考になったと評価しています。


このマニュアルの目次
-
2 .2 ページ目のマニュアル
-
3 .Z4 2.5iZ4 3.0iCongratulat...Z4 2.5iZ4 3.0iCongratulations, and than k you for choosing a BMW.Thorough familiarity with your vehicle will provide you with enhanced control and security when you drive it. Therefore, we have one request:Please take the time to read th is Owner's Manual...
-
4 .(C) 2004 Bayerische Motor...(C) 2004 Bayerische Motoren Werke AktiengesellschaftMunich, GermanyReprinting, including excerpts, only with thewritten consent of BMW AG, Munich. Order No. 01 41 0 158 704US English IX/04Printed in GermanyPrinted on environmentally friendly paper,bleached...
-
5 .ReferenceAt a glanceContr...ReferenceAt a glanceControlsDriving tipsMobilityContentsThe fastest way to find information on special topics is by using the index starting on page106.Using this Owner's Manual4NotesAt a glance10CockpitControls16Opening and closing27Adjustments33Transport...
-
6 .Notes4NotesAbout this Own...Notes4NotesAbout this Owner's ManualWe have made every effort to ensure that you are able to find what yo u need in this Owner's Manual as quickly as possible. The fastest way to find certain topics is by using the detailed index at the end. If you wish to...
-
7 .ReferenceAt a glanceContr...ReferenceAt a glanceControlsDriving tipsMobility 5Your individual vehicleOn buying your BMW, you have decided in favor of a model with individualized equipment and features. This Owner's Manual describes all models and equipment that BMW offers within the ...
-
8 .Notes6For your own safety...Notes6For your own safetyMaintenance and repairAdvanced technology, e.g. the use of modern materials and high-performance electronics, requires sp ecially adapted mainte-nance and repair methods. Therefore, only have corresponding work on your BMW carried ...
-
9 .ReferenceAt a glanceContr...ReferenceAt a glanceControlsDriving tipsMobility 7Service and warrantyThis manual is supplem ented by a Service and Warranty Information Booklet for US models, Warranty and Service Guide Booklet for Cana-dian models.We recommend that you read this publicat...
-
10 .10 ページ目のマニュアル
-
11 .At a glanceThe overviews ...At a glanceThe overviews of buttons, switches anddisplays presented in th is chapter will help youfind your way around your vehicle.You will also be familia rized with the conceptsbehind the operation of the featuresavailable to you.At a glance
-
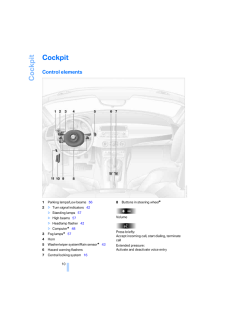
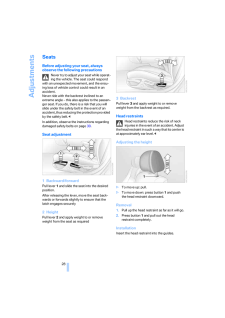
12 .Cockpit10CockpitControl e...Cockpit10CockpitControl elements 1Parking lamps/Low beams 562>Turn signal indicators 42>Standing lamps57>High beams57>Headlamp flasher 42>Computer* 483Fog lamps* 574Horn5Washer/wiper system/Rain sensor* 436Hazard warning flashers7Central locking system 168...
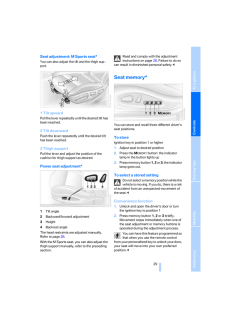
-
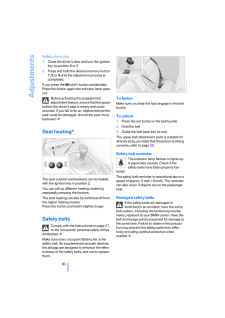
13 .At a glanceControlsDrivin...At a glanceControlsDriving tipsMobility Reference 11Display/hide telephone book. Display the entries one after another with the forward/back-ward buttonsFast forward/rewind>RadioPress briefly: next station storedExtended pressure: station search>CDPress b...
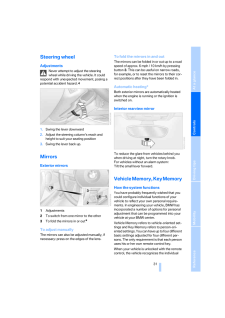
-
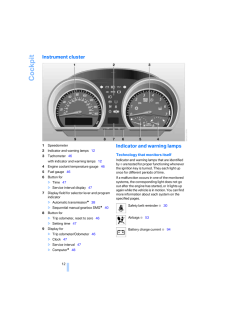
14 .Cockpit12Instrument clust...Cockpit12Instrument cluster1Speedometer2Indicator and warning lamps 123Tachometer46with indicator and warning lamps124Engine coolant temperature gauge 465Fuel gauge466Button for>Time47>Service interval display 477Display field for selector lever and progra...
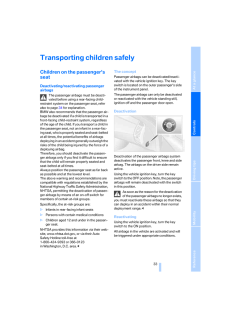
-
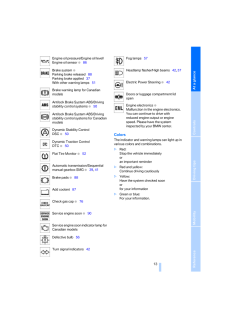
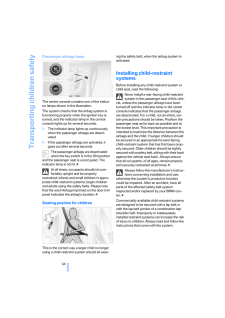
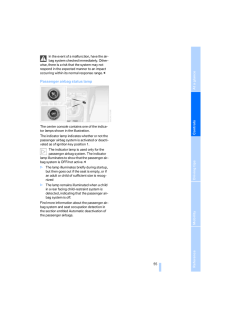
15 .At a glanceControlsDrivin...At a glanceControlsDriving tipsMobility Reference 13ColorsThe indicator and warning lamps can light up in various colors and combinations.>Red:Stop the vehicle immediatelyoran important reminder>Red and yellow:Continue driving cautiously>Yellow:Have the sy...
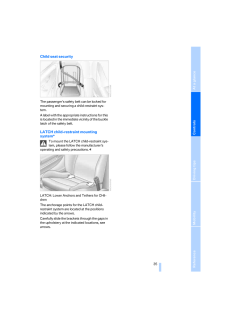
-
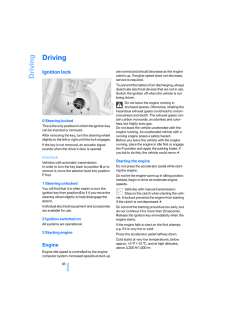
16 .16 ページ目のマニュアル
-
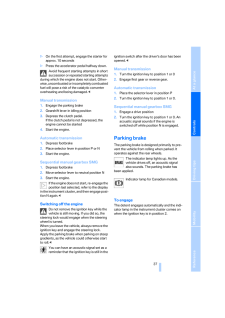
17 .ControlsThis chapter prov...ControlsThis chapter provides you with the informationyou need for complete control over yourvehicle. It describes all features used for drivingand for ensuring your safety and comfort.Controls
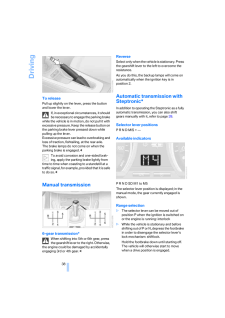
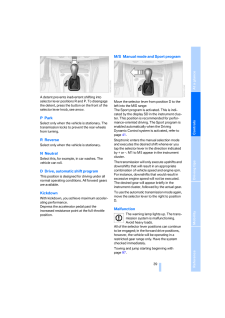
-
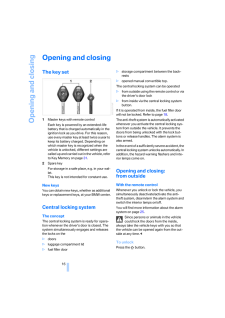
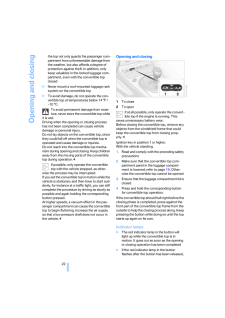
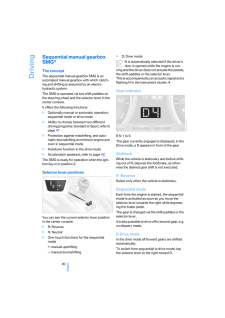
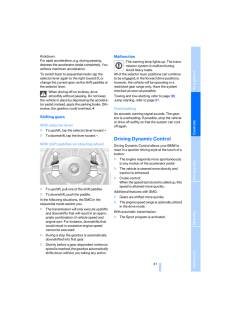
18 .Opening and closing16Open...Opening and closing16Opening and closingThe key set1Master keys with remote controlEach key is powered by an extended-life battery that is charge d automatically in the ignition lock as you drive. For this reason, use every master key at least twice a yea...
-
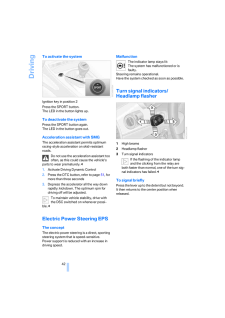
19 .ReferenceAt a glanceContr...ReferenceAt a glanceControlsDriving tipsMobility 17Press the button once to unlock the driver's door and the fuel filler door; press a second time to disengage all vehicle locks.Convenience opening modeKeep the button pressed:The windows and the fu lly a...
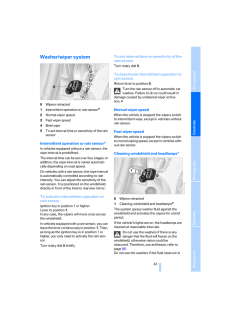
-
20 .Opening and closing18Conv...Opening and closing18Convenience operationYou can also operate the windows and the fully automatic convertible to p via the door lock.>To open: With the door closed, hold the key in the Unlock position>To close:With the door closed, hold the key in the L...
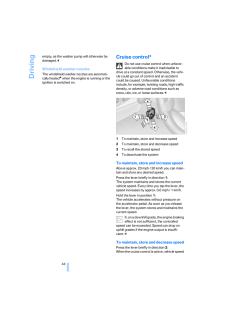
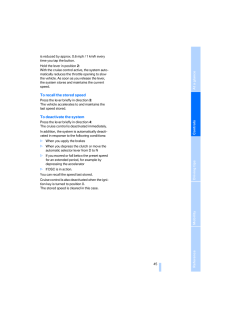
-
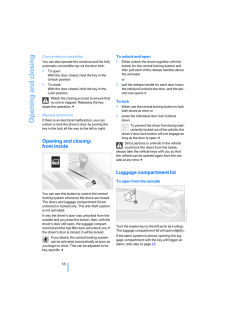
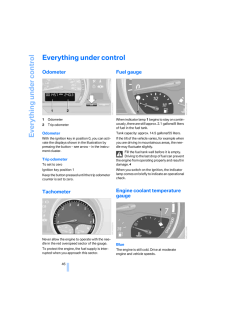
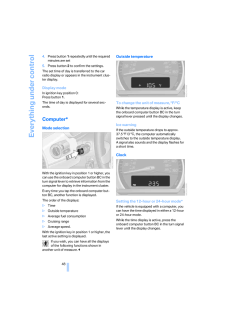
21 .ReferenceAt a glanceContr...ReferenceAt a glanceControlsDriving tipsMobility 19To open from inside the vehicleIf the luggage compartment lid has not been locked separately, you can open it with this but-ton in the footwell on the driver's side when the vehicle is stationary.To close...
-
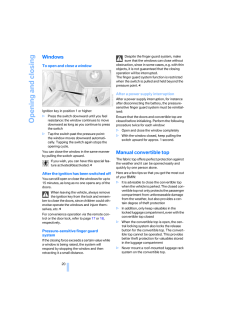
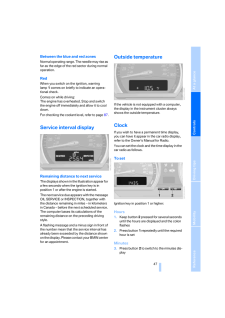
22 .Opening and closing20Wind...Opening and closing20WindowsTo open and close a windowIgnition key in position 1 or higher:>Press the switch down ward until you feel resistance: the window continues to move downward as long as you continue to press the switch>Tap the switch past the pres...
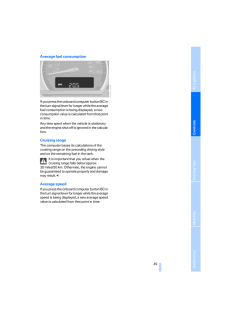
-
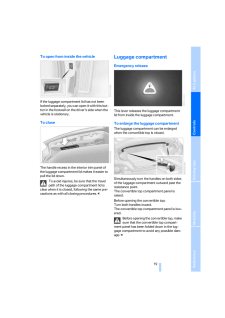
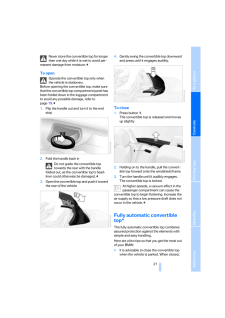
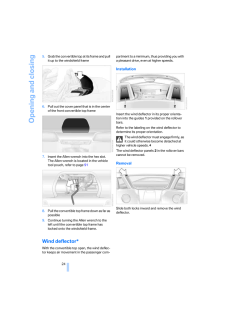
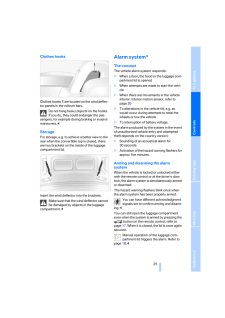
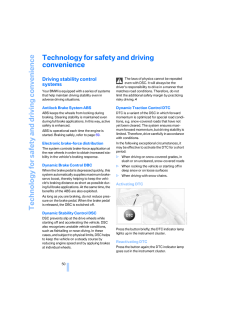
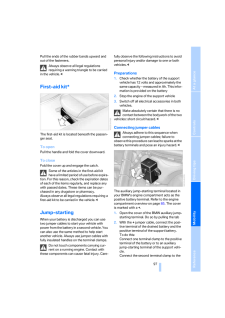
23 .ReferenceAt a glanceContr...ReferenceAt a glanceControlsDriving tipsMobility 21Never store the convertible top for longer than one day while it is wet to avoid per-manent damage from moisture.24 .Opening and closing22the ...Opening and closing22the top not only guards the passenger com-partment from unforeseeable damage from the weather, but also affords a degree of protection against theft. In addition, only keep valuables in the locked luggage com-partment, even with the co...25 .ReferenceAt a glanceContr...ReferenceAt a glanceControlsDriving tipsMobility 23then the opening or closing operation has not yet been completed. The sequence can be continued in the desired direction by pressing this button>If the yellow indicato r lamp in the button lights up conti...26 .Opening and closing245.Gr...Opening and closing245.Grab the convertible top at its frame and pull it up to the windshield frame6.Pull out the cover panel th at is in the center of the front convertible top frame7.Insert the Allen wrench into the hex slot. The Allen wrench is lo cate...27 .ReferenceAt a glanceContr...ReferenceAt a glanceControlsDriving tipsMobility 25Clothes hooksClothes hooks1 are located on the wind deflec-tor panels in the rollover bars.Do not hang heavy objects on the hooks. If you do, they could endanger the pas-sengers, for example during braking...28 .Opening and closing26Stop...Opening and closing26Stopping the alarm>Unlock the vehicle with the remote control, refer to page16>or turn the ignition key to position 1, refer to page36.Indicator lamp displays>The indicator lamp beneath the interior mir-ror flashes continuously:The sy...29 .ReferenceAt a glanceContr...ReferenceAt a glanceControlsDriving tipsMobility 27AdjustmentsSafe seating positionFor relaxed driving with as little fatigue as pos-sible, you should select a seating position that reflects your personal requirements. In combi-nation with the safety belts...30 .Adjustments28Seats Before...Adjustments28Seats Before adjusting your seat, always observe the following precautionsNever try to adjust yo ur seat while operat-ing the vehicle. The seat could respond with an unexpected movement, and the ensu-ing loss of vehicle control could result in...31 .ReferenceAt a glanceContr...ReferenceAt a glanceControlsDriving tipsMobility 29Seat adjustment: M Sports seat*You can also adjust the tilt and the thigh sup-port.1 Tilt upwardPull the lever repeatedly un til the desired tilt has been reached.2 Tilt downwardPush the lever repeatedly ...32 .Adjustments30Safety funct...Adjustments30Safety function1.Close the driver's door and turn the ignition key to position 0 or 22.Press and hold the desired memory button 1, 2 or 3 until the adjustment process is completed.If you press the MEMORY button accidentally: Press the button ...33 .ReferenceAt a glanceContr...ReferenceAt a glanceControlsDriving tipsMobility 31Steering wheelAdjustmentsNever attempt to adjust the steering wheel while driving the vehicle. It could respond with unexpected movement, posing a potential accident hazard. <1.Swing the lever downward2.Ad...34 .Adjustments32user by mean...Adjustments32user by means of a data exchange with the key, and makes adjustments accordingly.Colored decals were prov ided with the keys to help you distinguish be tween the different per-sonal remote control keys.What the system can doYou can learn abou...35 .ReferenceAt a glanceContr...ReferenceAt a glanceControlsDriving tipsMobility 33Transporting children safelyChildren on the passenger's seatDeactivating/reactivating passenger airbagsThe passenger airbags must be deacti-vated before using a rear-facing child-restraint system on the pa...36 .Transporting children saf...Transporting children safely34Passenger airbags lampThe center console contai ns one of the indica-tor lamps shown in the illustration.The system checks that the airbag system is functioning properly when the ignition key is turned, and the indicator lamp...37 .ReferenceAt a glanceContr...ReferenceAt a glanceControlsDriving tipsMobility 35Child seat securityThe passenger's safety belt can be locked for mounting and securing a child-restraint sys-tem.A label with the appropriate instructions for this is located in the immediat e vicinity of ...38 .Driving36DrivingIgnition ...Driving36DrivingIgnition lock 0 Steering locked This is the only position in which the ignition key can be inserted or removed.After removing the key, turn the steering wheel slightly to the left or ri ght until the lock engages.If the key is not removed...39 .ReferenceAt a glanceContr...ReferenceAt a glanceControlsDriving tipsMobility 37>On the first attempt, engage the starter for approx. 10 seconds>Press the accelerator pedal halfway down.Avoid frequent starting attempts in short succession or repeated starting attempts during which ...40 .Driving38To releasePull u...Driving38To releasePull up slightly on the lever, press the button and lower the lever.If, in exceptional circ umstances, it should be necessary to engage the parking brake while the vehicle is in motion, do not pull it with excessive pressure. Keep the r...41 .ReferenceAt a glanceContr...ReferenceAt a glanceControlsDriving tipsMobility 39A detent prevents inadvertent shifting into selector lever positions R and P. To disengage the detent, press the button on the front of the selector lever knob, see arrow.PParkSelect only when the ve hicle...42 .Driving40Sequential manua...Driving40Sequential manual gearbox SMG*The conceptThe sequential manual gearbox SMG is an automated manual gearbox with which clutch-ing and shifting is assumed by an electro-hydraulic system.The SMG is operated via two shift paddles on the steering wheel ...43 .ReferenceAt a glanceContr...ReferenceAt a glanceControlsDriving tipsMobility 41Kickdown:For rapid acceleration, e.g. during passing, depress the accelerator pedal completely. You achieve maximum acceleration.To switch back to se quential mode: tap the selector lever again to the ri...44 .Driving42To activate the ...Driving42To activate the system Ignition key in position 2Press the SPORT button.The LED in the button lights up.To deactivate the systemPress the SPORT button again.The LED in the button goes out.Acceleration assistant with SMGThe acceleration assistant p...45 .ReferenceAt a glanceContr...ReferenceAt a glanceControlsDriving tipsMobility 43Washer/wiper system0Wipers retracted1Intermittent operation or rain sensor*2Normal wiper speed3Fast wiper speed4Brief wipe5To set interval time or sensitivity of the rain sensorIntermittent operation or ra...46 .Driving44empty, as the wa...Driving44empty, as the washer pump will otherwise be damaged.47 .ReferenceAt a glanceContr...ReferenceAt a glanceControlsDriving tipsMobility 45is reduced by approx. 0.6 mph / 1 km/h every time you tap the button.Hold the lever in position 2:With the cruise control active, the system auto-matically reduces the th rottle opening to slow the vehicle...48 .Everything under control4...Everything under control46Everything under controlOdometer 1Odometer2Trip odometerOdometerWith the ignition key in position 0, you can acti-vate the displays shown in the illustration by pressing the button - see arrow - in the instru-ment cluster.Trip o...49 .ReferenceAt a glanceContr...ReferenceAt a glanceControlsDriving tipsMobility 47Between the blue and red zonesNormal operating range. The needle may rise as far as the edge of the red sector during normal operation.RedWhen you switch on the ignition, warning lamp1 comes on briefly to ...50 .Everything under control4...Everything under control484.Press button1 repeatedly until the required minutes are set5.Press button2 to confirm the settings.The set time of day is transferred to the car radio display or appears in the instrument clus-ter display.Display modeIn igniti...51 .ReferenceAt a glanceContr...ReferenceAt a glanceControlsDriving tipsMobility 49Average fuel consumptionIf you press the onboard computer button BC in the turn signal lever for longer while the average fuel consumption is being displayed, a new consumption value is calculated from tha...52 .Technology for safety and...Technology for safety and driving convenience50Technology for safety and driving convenienceDriving stability control systems Your BMW is equipped with a series of systems that help maintain driving stability even in adverse driving situations.Antilock Bra...53 .ReferenceAt a glanceContr...ReferenceAt a glanceControlsDriving tipsMobility 51Deactivating DTC an d DSC at the same timePress and hold the button for at least 3 seconds; the DSC indicator lamp lights up in the instrument cluster. No more interventions to increase stability and forw...54 .Technology for safety and...Technology for safety and driving convenience52Brake force displayThe Brake force display lig hts up in two stages depending on how stro ngly you are braking.>Normal braking:The brake lamps and the center brake lamp light up>Hard braking or braking with AB...55 .ReferenceAt a glanceContr...ReferenceAt a glanceControlsDriving tipsMobility 53Flat tire warningThe warning lamp in the instrument cluster lights up in red. This visual alert is accompanied by an acoustic warning signal. There is a flat tire or a signficant loss of tire pressure.1.C...56 .Technology for safety and...Technology for safety and driving convenience54For information on the correct seating position, refer to page27.Do not apply adhesive materials to the cover panels of the airbags, cover them or modify them in any other way. Do not attempt to remove the ai...57 .ReferenceAt a glanceContr...ReferenceAt a glanceControlsDriving tipsMobility 55In the event of a malfunction, have the air-bag system checked immediately. Other-wise, there is a risk that the system may not respond in the expected manner to an impact occurring within its normal respo...58 .Lamps56LampsParking lamps...Lamps56LampsParking lamps/Low beams Parking lampsThe front, rear and side vehicle lighting is switched on. You can use the parking lamps to signal the position of the vehi-cle when it is parked. For information on lighting on one side of the vehicle for pa...59 .ReferenceAt a glanceContr...ReferenceAt a glanceControlsDriving tipsMobility 57High beams/Standing lamps 1High beams2Headlamp flasher3Standing lampsLeft or right standing lamps*As an additional feature, you can illuminate your vehicle on either side for parking:1.Turn the ignition k...60 .Controlling the climate f...Controlling the climate for pleasant driving58Controlling the climate for pleasant drivingAir conditioning 1Air onto the windshield and the side win-dows2Air for the upper body area 593Air for the footwell4Air distribution595Air conditioning596Outside air/...61 .ReferenceAt a glanceContr...ReferenceAt a glanceControlsDriving tipsMobility 59Air distribution You can direct airflow onto the win-dows , toward the upper body and into the footwell . All interme-diate settings are possible.Air supply/blower Turn the rotary control to adjust the...62 .Controlling the climate f...Controlling the climate for pleasant driving60To defrost windows and remove condensation1Turn the rotary control to 2Turn the rotary blower control for the air supply completely to the right3Turn the rotary temp erature control com-pletely to the right4To ...63 .ReferenceAt a glanceContr...ReferenceAt a glanceControlsDriving tipsMobility 61Automatic climate control* 1Air onto the windshield and the side win-dows2Air for the upper body area 633Air for the footwell4Individual air distribution 625To defrost windows and remove condensation626Aut...64 .Controlling the climate f...Controlling the climate for pleasant driving62Tips for pleasant drivingUse the automatic system - switch on with AUTO button 6. Select the desired interior tem-perature.Detailed setting options are described for you below.Automatic air distribution and sup...65 .ReferenceAt a glanceContr...ReferenceAt a glanceControlsDriving tipsMobility 63By repeatedly pressing the button, you can select one of three different operating modes.>Indicator lamps off: outs ide air flows into the vehicle>Left-hand indicator lamp on, AUC mode: the system detects ...66 .Interior conveniences64In...Interior conveniences64Interior conveniencesGlove compartment To openPress the two push buttons together.To closeSwing the door up.To prevent injury in the event of an acci-dent, close the glove compartment immediately after use.67 .ReferenceAt a glanceContr...ReferenceAt a glanceControlsDriving tipsMobility 651.Press the trim piece beneath the air outlets; see arrow12.Place the beverage into the holder3.Adjust the holder to fi t the size of the bever-age container; see arrow 2.Do not place glass co ntainers int...68 .68 ページ目のマニュアル69 .Driving tipsDriving tips ...Driving tipsDriving tips provides you with information youwill need in certain driving situations and whenusing special operating modes.Driving tips70 .Special operating instruc...Special operating instructions68Special operating instructionsBreak-in procedures Moving parts need to be given some time until they can interact smoothly with one another. To ensure that your vehicle provides maximum economy throughout a long service lif...71 .ReferenceAt a glanceContr...ReferenceAt a glanceControlsDriving tipsMobility 691.Close all windows2.Increase the air supply from the air condi-tioner or automatic clim ate control to a high level. Refer to page 58 or61.Hot exhaust system High temperatures occur with every vehi-cle eq...72 .Special operating instruc...Special operating instructions70sure which must be exerted by the pads to clean the rotors by brake applications is not reached.If the brake rotors are co rroded, they will tend to respond to braking with a pulsating effect which even extended application ...73 .ReferenceAt a glanceContr...ReferenceAt a glanceControlsDriving tipsMobility 71LoadThe permissible load is the sum of the occu-pants' weights and the weight of the cargo. The greater the weight of th e occupants, the less cargo can be transported.Stowing cargo >Load heavy cargo as fa...74 .Special operating instruc...Special operating instructions72Hardtop preparation* Pull covers off, see arrow 1.The brackets for attaching the hardtop are located underneath the covers; see arrow 2.For instructions on how to install the hardtop, please read the accompanying assembly in...76 .76 ページ目のマニュアル77 .MobilityTo ensure that yo...MobilityTo ensure that you st ay mobile, the followingchapter provides you with importantinformation on fuels and fluids, tires andwheels, maintenance procedures and steps totake in the event of a breakdown.Mobility78 .Refueling76RefuelingFuel ...Refueling76RefuelingFuel filler door 1.Open fuel filler door2.Turn the gas cap in a counter-clockwise direction3.Place the cap in the bracket on the filler door.Releasing manuallyIf an electrical malfunction occurs, you can unlock the fuel filler door man...79 .ReferenceAt a glanceContr...ReferenceAt a glanceControlsDriving tipsMobility 77Minimum Octane Rating corresponds to the Anti Knock Index AKI and is determined by the so-called (R+M)/2 method.Do not use leaded gasoline, as otherwise the lambda probe and catalytic converter will be per...80 .Wheels and tires78Wheels ...Wheels and tires78Wheels and tires Tire inflation pressure Information for your safetyIt is not merely the tire's service life, but also driving safety and drivin g comfort that largely depend on the conditio n of the tires and the maintenance of the speci...81 .ReferenceAt a glanceContr...ReferenceAt a glanceControlsDriving tipsMobility 79Z4 2.5iZ4 3.0i Tire size Pressure specifications in psi/kPaAll pressure specificat ions in the table are indicated in psi/kilopascal with cold tires, cold = ambient temperature225/50 R 16 92 V225/45 R 17 9...82 .Wheels and tires80Tire co...Wheels and tires80Tire codingUnderstanding the lettering on the tire sidewall makes it easier to iden tify and choose the cor-rect tires.Tire sizee.g. 225/50 R 16 92 VNominal width in mmCross-sectionalratio in %Radial belt constructionRim diameter in inche...83 .ReferenceAt a glanceContr...ReferenceAt a glanceControlsDriving tipsMobility 81TemperatureThe temperature grades are A, the highest, B and C, representing the tire's resistance to the generation of heat and its ability to dissipate heat when tested under controlled conditions on a sp...84 .Wheels and tires82Run Fla...Wheels and tires82Run Flat tires fittedRun Flat tires are labele d on the sidewall with a circular symbol containing the letters RSC. Run Flat tires consist of self-supporting tires and special rims. The tire reinforcement ensures that driving re mains p...85 .ReferenceAt a glanceContr...ReferenceAt a glanceControlsDriving tipsMobility 83can lead to damage and accidents. Have this work performed by skilled professionals only. The technicans at your BMW center will be glad to assist you with the required professional knowledge and speciali...86 .In the engine compartment...In the engine compartment84In the engine compartmentDo not attempt to serv ice your vehicle if you do not have the required technical background. If you are not familiar with the reg-ulations to be observed, have your vehicle ser-viced only by a BMW cente...87 .ReferenceAt a glanceContr...ReferenceAt a glanceControlsDriving tipsMobility 85Engine compartment 1Reservoir for the head lamp and windshield washer system862Engine oil filler neck 873Auxiliary terminal for jump-starting 974Reservoir for brake fluid 885Chassis ground, negative termin...88 .In the engine compartment...In the engine compartment86Washer fluids for washer systems Headlamp* and windshield washer systemCapacity of windshield washer system: approx. 3.2 quarts/3 liters.Capacity when equi pped with headlamp washer system: approx. 5.3 quarts/5 liters.Fill with ...89 .ReferenceAt a glanceContr...ReferenceAt a glanceControlsDriving tipsMobility 876.Return the dipstick to the guide tube, inserting it as far as it will go.As with fuel economy, oil consumption is directly influenced by your driving style and vehicle operating conditions.The oil volum...90 .In the engine compartment...In the engine compartment88Checking the coolant level 1.The engine must be at ambient tempera-ture2.Open the cap of the expansion tank by turn-ing it slightly counterclockwise to allow accumulated pressure to escape, then open completely3.The coolant leve...91 .ReferenceAt a glanceContr...ReferenceAt a glanceControlsDriving tipsMobility 89MaintenanceThe BMW Maintenance System The BMW Maintenance Sy stem helps maintain the road safety and oper ating reliability of your BMW.Please keep in mind that regular maintenance is not only necessary f...92 .Maintenance90OBD interfac...Maintenance90OBD interface socket The Onboard Diagnostic OBD interface socket is located on the left of the driver's side under the instrument panel and under a cover.The cover has the letters OBD on it.The purpose of the OBD system is to ensure proper op...93 .ReferenceAt a glanceContr...ReferenceAt a glanceControlsDriving tipsMobility 91Replacement proceduresOnboard tool kitThe onboard tool kit is stor ed in a tool pouch. It is located in the luggage compartment beneath the floor panel.Windshield wiper blades 1.Swich off the ignition2.Fol...94 .Replacement procedures921...Replacement procedures921.Open the caps with a suitable object, e.g. a coin or screwdriver2.Fold up the protective cover in the wheel well.Headlamp cover1.Pull the wire clamp out straight2.Pull the wire clamp past the catches, see arrows, and fold it down...95 .ReferenceAt a glanceContr...ReferenceAt a glanceControlsDriving tipsMobility 93Front turn signal indicators21 watt bulb1.Insert a Phillips-head screwdriver from the onboard toolkit into the appropriate open-ing, arrows12.Turn the screwdriver to the left, arrows 23.Use the Phillips-h...96 .Replacement procedures94P...Replacement procedures94Please contact a BMW center in case of a mal-function.License plate lamps 5 watt bulb1.Push out the lamp with a suitable object and remove it2.Replace the bulb.Snap the lamp back into place.Light-emitting diodes LEDsControl elements...97 .ReferenceAt a glanceContr...ReferenceAt a glanceControlsDriving tipsMobility 95Charging the batteryCharge the battery in the vehicle only when the engine has been switched off. Terminals, refer to Jump starting, page 97.Battery disposalAfter changing a batte ry, have the used battery...98 .Giving and receiving assi...Giving and receiving assistance96Giving and receiving assistanceReceiving assistanceThe BMW Group's Mobile Service offers you 24-hour assistance in the event of a breakdown, even on weekends and holidays.The telephone number of the Mobile Service control c...99 .ReferenceAt a glanceContr...ReferenceAt a glanceControlsDriving tipsMobility 97Pull the ends of the rubber bands upward and out of the fasteners.Always observe all legal regulations requiring a warning tria ngle to be carried in the vehicle.100 .Giving and receiving assi...Giving and receiving assistance98positive terminal of th e battery or to an aux-iliary jump-starting termin al of the vehicle to be jump-started.Your BMW is equipped with a special nut, refer also to the engi ne compartment over-view on page853.With the- ...
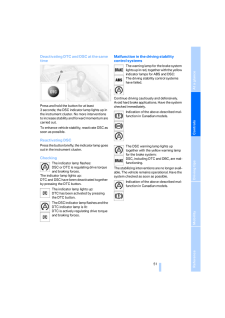
Copyright © 2013 Gizport.jp All Rights Reserved.
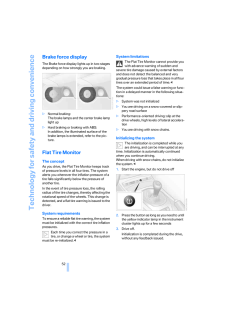
ログイン


ファイルをアップロードしています。
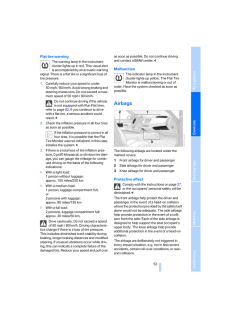
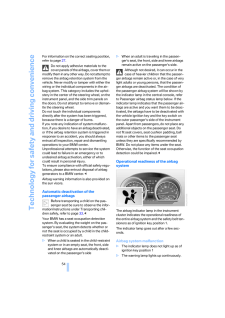
しばらくお待ちください。
しばらくお待ちください。