MINIの取扱説明書・マニュアル [全283ページ 9.38MB]


5


1 / 283 ページ
1 / 283 ページ


現在のページURL
OWNER'S MANUALMINI COUPEMINI ROADSTERMINI CONVERTIBLEContents A - Z
参考になったと評価  5人が参考になったと評価しています。


このマニュアルの目次
-
2 .CooperCooper SJohn Cooper...CooperCooper SJohn CooperWorksCongratulations on your new MINIThis Owner's Manual should be considered a permanent part of this vehicle. It should stay with the vehicle when sold to provide the next owner with important operating, safety and mainte-nance i...
-
3 .(C) 2012 Bayerische Motor...(C) 2012 Bayerische Motoren WerkeAktiengesellschaftMunich, GermanyReprinting, including excerpts, only with thewritten consent of BMW AG, Munich.US English II/12, 03 12 500Printed on environmentally friendly paper,bleached without chlorine , suitable for r...
-
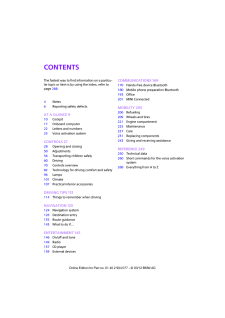
4 .ContentsThe fastest way t...ContentsThe fastest way to find information on a particu-lar topic or item is by using the index, refer to page268.4Notes6Reporting safety defectsAT A GLANCE 910Cockpit17Onboard computer22Letters and numbers23Voice activation systemCONTROLS 2728Opening and...
-
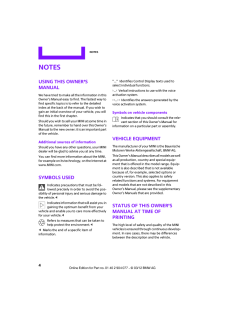
5 .Notes4NotesUsing this Own...Notes4NotesUsing this Owner's ManualWe have tried to make a ll the information in this Owner's Manual easy to find. The fastest way to find specific topics is to refer to the detailed index at the back of the manual. If you wish to gain an initial overvie...
-
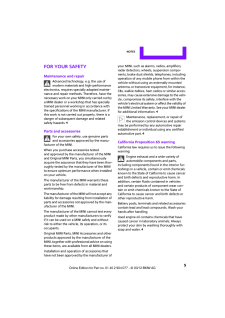
6 .Notes 5For your safetyMai...Notes 5For your safetyMaintenance and repairAdvanced technology, e.g. the use of modern materials an d high-performance electronics, requires specially adapted mainte-nance and repair methods. Therefore, have the necessary work on your MI NI only carried o...
-
7 .Notes6Service and warrant...Notes6Service and warrantyWe recommend that you read this publication thoroughly.Your MINI is covered by the following warranties:>New Vehicle Limited Warranty>Rust Perforation Limited Warranty>Federal Emissions Syst em Defect Warranty>Federal Emissions P...
-
10 .CONTROLSDRIVING TIPSNAVIG...CONTROLSDRIVING TIPSNAVIGATIONENTERTAINMENTCOMMUNICATIONSMOBILITYREFERENCEAT A GLANCE
-
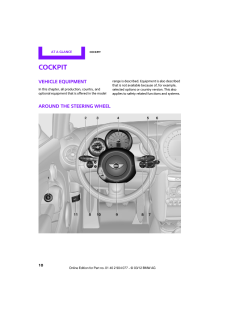
11 .AT A GLANCE Cockpit10Cock...AT A GLANCE Cockpit10CockpitVehicle equipmentIn this chapter, all production, country, and optional equipment that is offered in the model range is described. Equi pment is also described that is not available because of, for example, selected options or c...
-
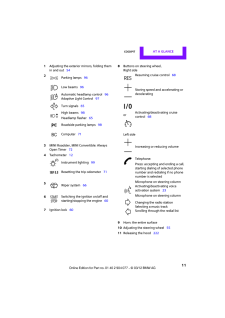
12 .Cockpit AT A GLANCE 111Ad...Cockpit AT A GLANCE 111Adjusting the exterior mirrors, folding them in and out543MINI Roadster, MINI Convertible: Always Open Timer727Ignition lock608Buttons on steering wheel,Right sideLeft side9Horn: the entire surface10Adjusting the steering wheel 5511R...
-
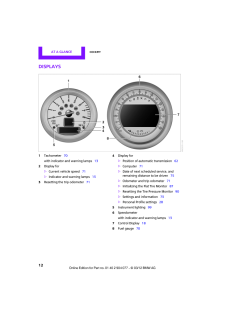
13 .AT A GLANCE Cockpit12Disp...AT A GLANCE Cockpit12Displays1Tachometer70with indicator and warning lamps 132Display for>Current vehicle speed 71>Indicator and warning lamps 133Resetting the trip odometer 714Display for>Position of automatic transmission 62>Computer71>Date of next sched...
-
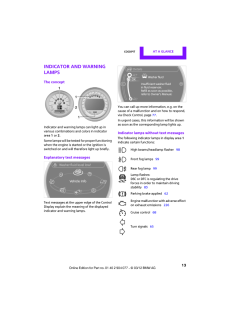
14 .Cockpit AT A GLANCE 13Ind...Cockpit AT A GLANCE 13Indicator and warning lampsThe conceptIndicator and warning lamps can light up in various combinations an d colors in indicator area1 or2.Some lamps will be tested for proper functioning when the engine is started or the ignition is s...
-
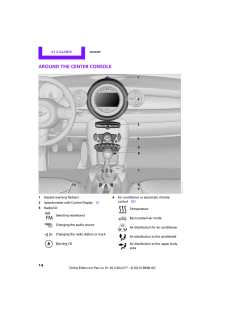
15 .AT A GLANCE Cockpit14Arou...AT A GLANCE Cockpit14Around the center console1Hazard warning flashers2Speedometer with Control Display 123Radio/CD4Air conditioner or automatic climate control101Selecting wavebandChanging the audio sourceChanging the radio station or trackEjecting CDTem...
-
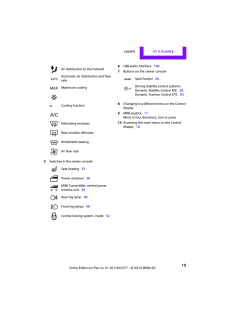
16 .Cockpit AT A GLANCE 155Sw...Cockpit AT A GLANCE 155Switches in the center console6USB audio interface 1607Buttons on the center console8Changing to a differen t menu on the Control Display9MINI joystick17 Move in four directions, turn or press10Accessing the main me nu on the Control...
-
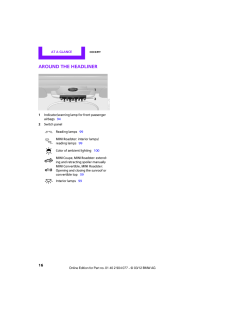
17 .AT A GLANCE Cockpit16Arou...AT A GLANCE Cockpit16Around the headliner1Indicator/warning lamp for front passenger airbags942Switch panelReading lamps99MINI Roadster: interior lamps/reading lamps99Color of ambient lighting 100MINI Coupe, MINI Roadster: extend-ing and retracting spoiler...
-
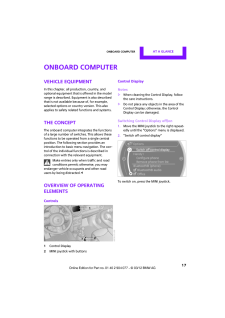
18 .Onboard computer AT A GLA...Onboard computer AT A GLANCE 17Onboard computerVehicle equipmentIn this chapter, all production, country, and optional equipment that is offered in the model range is described. Equipment is also described that is not available be cause of, for example, se...
-
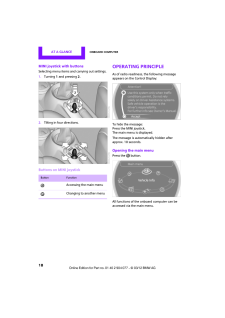
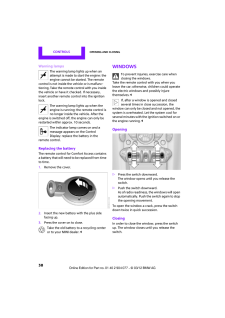
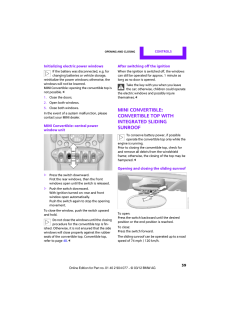
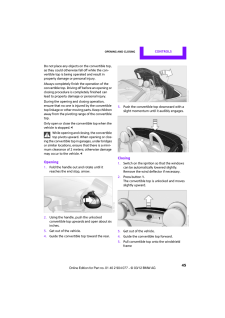
19 .AT A GLANCE Onboard compu...AT A GLANCE Onboard computer18MINI joystick with buttonsSelecting menu items and carrying out settings.1.Turning 1 and pressing 2.2.Tilting in four directions.Buttons on MINI joystickOperating principleAs of radio readiness, the following message appears...
-
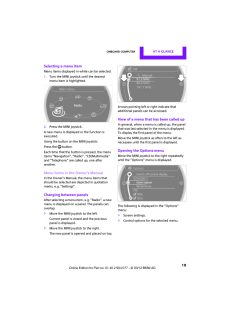
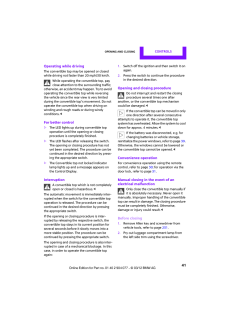
20 .Onboard computer AT A GLA...Onboard computer AT A GLANCE 19Selecting a menu itemMenu items displayed in white can be selected.1.Turn the MINI joystick until the desired menu item is highlighted.2.Press the MINI joystick.A new menu is displayed or the function is executed.Using the bu...
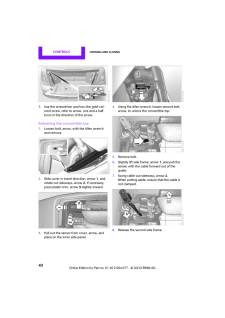
-
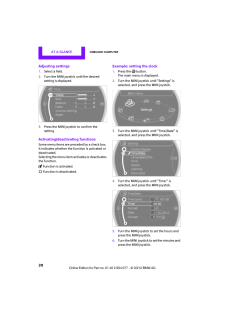
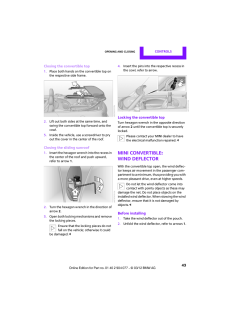
21 .AT A GLANCE Onboard compu...AT A GLANCE Onboard computer20Adjusting settings1.Select a field.2.Turn the MINI joystick until the desired setting is displayed.3.Press the MINI joystick to confirm the setting.Activating/deactivating functionsSome menu items are preceded by a check box. ...
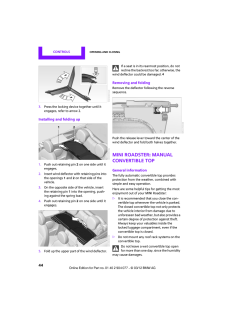
-
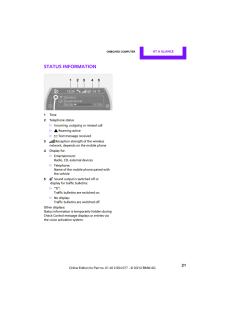
22 .Onboard computer AT A GLA...Onboard computer AT A GLANCE 21Status information1Time2Telephone status>Incoming, outgoing or missed call>Roaming active>Text message received3Reception strength of the wireless network, depends on the mobile phone4Display for:>Entertainment:Radio, CD, ex...
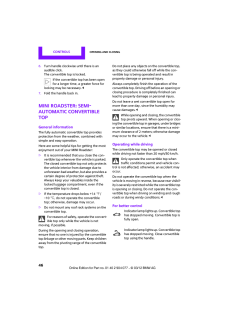
-
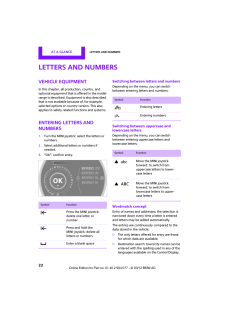
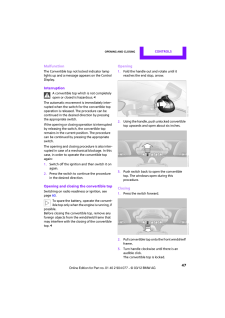
23 .AT A GLANCE Letters and n...AT A GLANCE Letters and numbers22Letters and numbersVehicle equipmentIn this chapter, all production, country, and optional equipment that is offered in the model range is described. Equi pment is also described that is not available because of, for exampl...
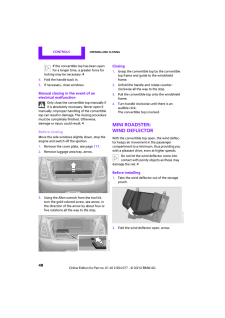
-
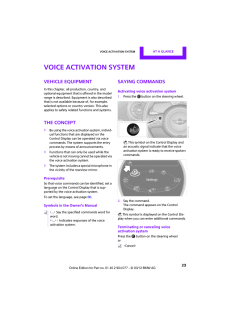
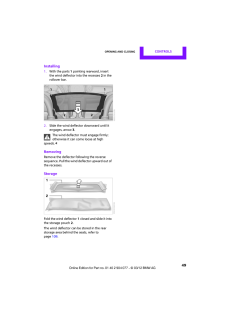
24 .Voice activation system A...Voice activation system AT A GLANCE 23Voice activation systemVehicle equipmentIn this chapter, all production, country, and optional equipment that is offered in the model range is described. Equipment is also described that is not available be cause of, f...
-
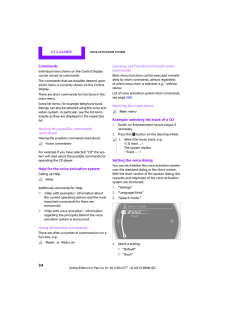
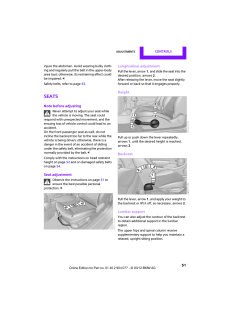
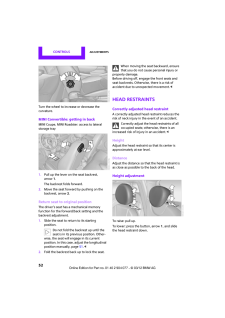
25 .AT A GLANCE Voice activat...AT A GLANCE Voice activation system24CommandsIndividual menu items on the Control Display can be voiced as commands.The commands that are possible depend upon which menu is currently shown on the Control Display.There are short commands for functions in th...
-
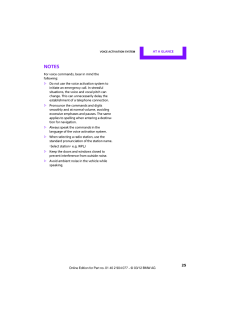
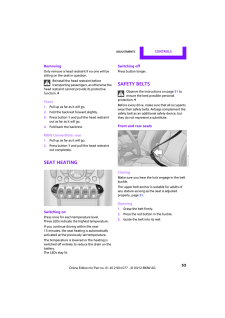
26 .Voice activation system A...Voice activation system AT A GLANCE 25NotesFor voice commands, bear in mind the following:>Do not use the voice activation system to initiate an emergency call. In stressful situations, the voice and vocal pitch can change. This can unnecessarily delay th...
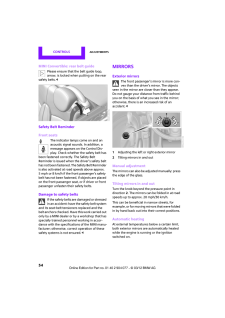
-
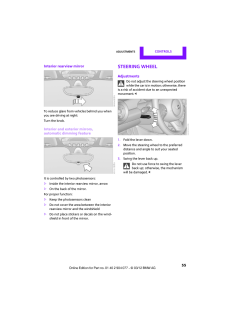
28 .AT A GLANCEDRIVING TIPSNA...AT A GLANCEDRIVING TIPSNAVIGATIONENTERTAINMENTCOMMUNICATIONSMOBILITYREFERENCECONTROLS
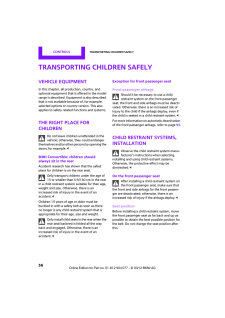
-
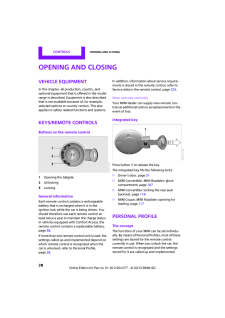
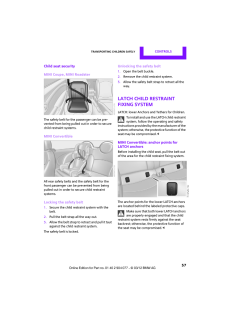
29 .CONTROLS Opening and clos...CONTROLS Opening and closing28Opening and closingVehicle equipmentIn this chapter, all production, country, and optional equipment that is offered in the model range is described. Equi pment is also described that is not available because of, for example, ...
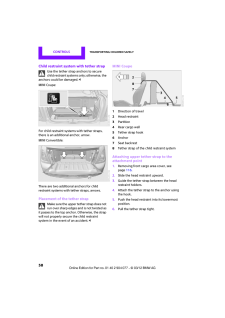
-
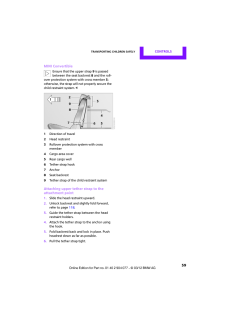
30 .Opening and closing CONTR...Opening and closing CONTROLS 29This means that your sett ings will be activated for you, even if in the meantime your car was used by someone else with another remote control and the corresponding settings.At most three remote co ntrols can be set for thre...
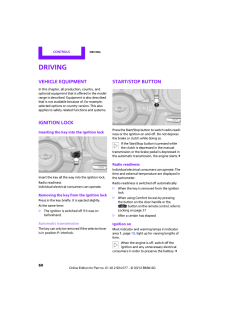
-
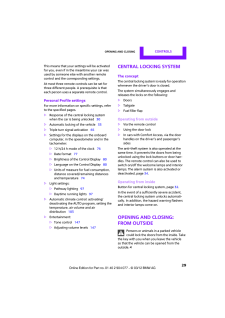
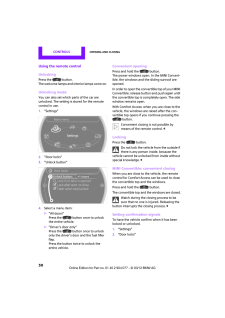
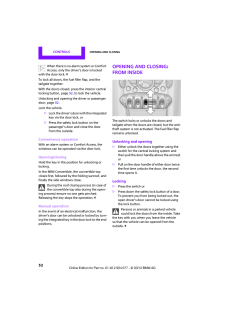
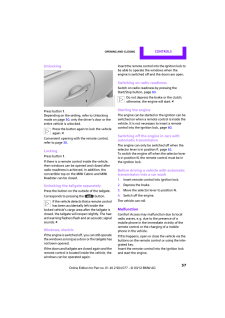
31 .CONTROLS Opening and clos...CONTROLS Opening and closing30Using the remote controlUnlockingPress the button.The welcome lamps and interior lamps come on.Unlocking modeYou can also set which parts of the car are unlocked. The setting is stored for the remote control in use.1."Setting...
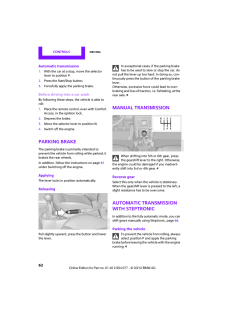
-
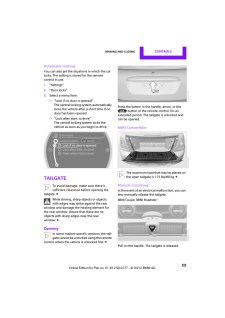
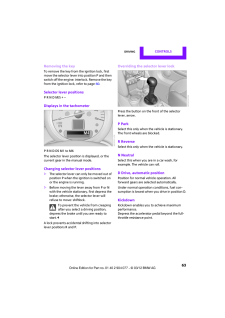
32 .Opening and closing CONTR...Opening and closing CONTROLS 313."Flash when lock/unlock"4.Press the MINI joystick.Switching on interior lampsWhile the car is locked:Press the button. You can also use this function to locate your vehicle in parking garages, etc.Unlocking the tailgatePre...
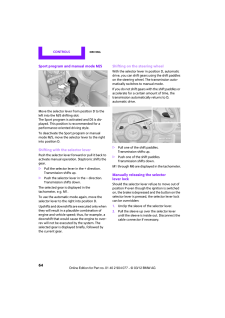
-
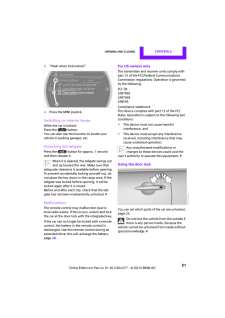
33 .CONTROLS Opening and clos...CONTROLS Opening and closing32When there is no alarm system or Comfort Access, only the driver's door is locked with the door lock.34 .Opening and closing CONTR...Opening and closing CONTROLS 33Automatic lockingYou can also set the situ ations in which the car locks. The setting is stored for the remote control in use.1."Settings"2."Door locks"3.Select a menu item:>"Lock if no door is opened"The central locking syst...35 .CONTROLS Opening and clos...CONTROLS Opening and closing34MINI Convertible:1.Use the integrated key and open the back-rest lock1.2.Press button2 and fold down backrest together with the belt strap.3.Pull the handle, refer to arrow. The tailgate is released.MINI Convertible, MINI Roa...36 .Opening and closing CONTR...Opening and closing CONTROLS 35>The car's inclination changes, for example if an attempt is made to jack it up and steal the wheels or to raise it prior to towing it away>There is an interruption in the power supply from the batteryThe alarm system briefly...37 .CONTROLS Opening and clos...CONTROLS Opening and closing36MINI Convertible, MINI RoadsterThe passenger compartment is monitored up to the height of the seat's surface. This way, the anti-theft alarm system including the interior motion sensor are armed, even if the convertible top is...38 .Opening and closing CONTR...Opening and closing CONTROLS 37UnlockingPress button 1.Depending on the setting, refer to Unlocking mode on page30, only the driver's door or the entire vehicle is unlocked.Press the button again to lock the vehicle again.39 .CONTROLS Opening and clos...CONTROLS Opening and closing38Warning lampsThe warning lamp lights up when an attempt is made to start the engine: the engine cannot be started. The remote control is not inside the vehicle or is malfunc-tioning. Take the remote control with you inside the...40 .Opening and closing CONTR...Opening and closing CONTROLS 39Initializing electric power windowsIf the battery was disconnected, e.g. for changing batteries or vehicle storage, reinitialize the power wi ndows; otherwise, the windows will not be lowered. MINI Convertible: opening the co...41 .CONTROLS Opening and clos...CONTROLS Opening and closing40Power convertible topThe fully automatic convertible top provides protection from the weather, combined with simple and easy operation.Here are some helpful tips for getting the most enjoyment out of your MINI Convertible:>It ...42 .Opening and closing CONTR...Opening and closing CONTROLS 41Operating while drivingThe convertible top may be opened or closed while driving not faster than 20 mph/30 km/h.While operating the convertible top, pay close attention to the surrounding traffic; otherwise, an accident may ...43 .CONTROLS Opening and clos...CONTROLS Opening and closing423.Use the screwdriver and turn the gold-col-ored screw, refer to arrow, one and a half turns in the direction of the arrow.Releasing the convertible top1.Loosen bolt, arrow, with the Allen wrench and remove.2.Slide cover in tr...44 .Opening and closing CONTR...Opening and closing CONTROLS 43Closing the convertible top1.Place both hands on the convertible top on the respective side frame.2.Lift out both sides at the same time, and swing the convertible top forward onto the cowl.3.Inside the vehicle, use a screwdr...45 .CONTROLS Opening and clos...CONTROLS Opening and closing443.Press the locking device together until it engages, refer to arrow 2.Installing and folding up1.Push out retaining pin 2 on one side until it engages.2.Insert wind deflector wi th retaining pins into the openings1 and2 on th...46 .Opening and closing CONTR...Opening and closing CONTROLS 45Do not place any objects on the convertible top, as they could otherwise fall off while the con-vertible top is being op erated and result in property damage or personal injury.Always completely finish the operation of the co...47 .CONTROLS Opening and clos...CONTROLS Opening and closing466.Turn handle clockwise until there is an audible click. The convertible top is locked.If the convertible top has been open for a longer time, a greater force for locking may be necessary. <7.Fold the handle back in.MINI Roads...48 .Opening and closing CONTR...Opening and closing CONTROLS 47MalfunctionThe Convertible top not locked indicator lamp lights up and a message appears on the Control Display.InterruptionA convertible top which is not completely open or closed is hazardous.49 .CONTROLS Opening and clos...CONTROLS Opening and closing48If the convertible top has been open for a longer time, a greater force for locking may be necessary. <4.Fold the handle back in.5.If necessary, close windows.Manual closing in the event of an electrical malfunctionOnly close ...50 .Opening and closing CONTR...Opening and closing CONTROLS 49Installing1.With the parts1 pointing rearward, insert the wind deflector into the recesses 2 in the rollover bar.2.Slide the wind deflector downward until it engages, arrow3.The wind deflector must engage firmly; otherwise it...51 .CONTROLS Adjustments50Adj...CONTROLS Adjustments50AdjustmentsVehicle equipmentIn this chapter, all production, country, and optional equipment that is offered in the model range is described. Equi pment is also described that is not available because of, for example, selected options...52 .Adjustments CONTROLS 51in...Adjustments CONTROLS 51injure the abdomen. Av oid wearing bulky cloth-ing and regularly pull the belt in the upper-body area taut; otherwise, its restraining effect could be impaired.53 .CONTROLS Adjustments52Tur...CONTROLS Adjustments52Turn the wheel to increase or decrease the curvature.MINI Convertible: getting in backMINI Coupe, MINI Roadster: access to lateral storage tray1.Pull up the lever on the seat backrest, arrow1.The backrest folds forward.2.Move the seat...54 .Adjustments CONTROLS 53Re...Adjustments CONTROLS 53RemovingOnly remove a head restraint if no one will be sitting on the seat in question.Reinstall the head restraint before transporting passengers, as otherwise the head restraint cannot provide its protective function.55 .CONTROLS Adjustments54MIN...CONTROLS Adjustments54MINI Convertible: rear belt guidePlease ensure that the belt guide loop, arrow, is locked when putting on the rear safety belts.56 .Adjustments CONTROLS 55In...Adjustments CONTROLS 55Interior rearview mirrorTo reduce glare from vehicles behind you when you are driving at night:Turn the knob.Interior and exterior mirrors, automatic dimming featureIt is controlled by two photosensors:>Inside the interior rearview m...57 .CONTROLS Transporting chi...CONTROLS Transporting children safely56Transporting children safelyVehicle equipmentIn this chapter, all production, country, and optional equipment that is offered in the model range is described. Equi pment is also described that is not available because...58 .Transporting children saf...Transporting children safely CONTROLS 57Child seat securityMINI Coupe, MINI RoadsterThe safety belt for the passenger can be pre-vented from being pulled out in order to secure child restraint systems.MINI ConvertibleAll rear safety belts and the safety be...59 .CONTROLS Transporting chi...CONTROLS Transporting children safely58Child restraint system with tether strapUse the tether strap anchors to secure child restraint systems only; otherwise, the anchors could be damaged.60 .Transporting children saf...Transporting children safely CONTROLS 59MINI ConvertibleEnsure that the upper strap 9 is passed between the seat backrest 8 and the roll-over protection syst em with cross member 3; otherwise, the strap will not properly secure the child restraint system.<...61 .CONTROLS Driving60Driving...CONTROLS Driving60DrivingVehicle equipmentIn this chapter, all production, country, and optional equipment that is offered in the model range is described. Equi pment is also described that is not available because of, for example, selected options or coun...62 .Driving CONTROLS 61Radio ...Driving CONTROLS 61Radio readiness and ignition offAll indicator and warning lamps in the displays go out.The ignition switches off automatically if the driver's door is opened. Pressing the Start/Stop button again switches the ignition back on.The ignitio...63 .CONTROLS Driving62Automat...CONTROLS Driving62Automatic transmission1.With the car at a stop, move the selector lever to position P.2.Press the Start/Stop button.3.Forcefully apply the parking brake.Before driving into a car washBy following these steps, the vehicle is able to roll:1...64 .Driving CONTROLS 63Removi...Driving CONTROLS 63Removing the keyTo remove the key from the ignition lock, first move the selector lever into position P and then switch off the engine: interlock. Remove the key from the ignition lock, refer to page 60.Selector lever positionsP R N D M/...65 .CONTROLS Driving64Sport p...CONTROLS Driving64Sport program and manual mode M/SMove the selector lever from position D to the left into the M/S shifting slot:The Sport program is activated and DS is dis-played. This position is recommended for a performance-oriented driving style.To ...66 .Driving CONTROLS 653.Inse...Driving CONTROLS 653.Insert extractor hook 1 from the toolkit into the loop on the passenger's side.4.Pull the loop up.5.Move the selector le ver into the desired position by pressing the button on the front of the selector lever.Before manually unlocking ...67 .CONTROLS Driving66Wiper s...CONTROLS Driving66Wiper systemDo not turn on the wipers when they are frozen; otherwise, th e wiper blades and the windshield wiper motor may be damaged.68 .Driving CONTROLS 675.Pres...Driving CONTROLS 675.Press and hold the butt on until the display changes.6.Press the button to select the desired sensitivity.7.Wait, or press and hold the button until the display changes.The settings are stored.Deactivating intermittent wipe or rain sen...69 .CONTROLS Driving68Cruise ...CONTROLS Driving68Cruise controlThe conceptCruise control is available at vehicle speeds of at least approx. 20 mph or 30 km/h. The car then stores and maintains the speed that you specify using the button on the steering wheel.Do not use cruise control wh...70 .Driving CONTROLS 69Displa...Driving CONTROLS 69Display on tachometerSelected speed is displayed briefly.If --- mph or --- km/h is displayed briefly in the tachometer, the conditions necessary for operation may not be fulfilled.71 .CONTROLS Controls overvie...CONTROLS Controls overview70Controls overviewVehicle equipmentIn this chapter, all production, country, and optional equipment that is offered in the model range is described. Equi pment is also described that is not available because of, for example, sele...72 .Controls overview CONTROL...Controls overview CONTROLS 71Displays in tachometer1Current vehicle speed2Odometer in kilometers, trip recorder, external temperature, time3Resetting the trip odometerPress button on turn signal indicator to call up information in the display area2.The fol...73 .CONTROLS Controls overvie...CONTROLS Controls overview72Average fuel consumptionCalculated for the time the engine has been running.With the trip computer, page 73, you can have the average fuel consum ption for another trip displayed.To reset average fuel consumption: press the butt...74 .Controls overview CONTROL...Controls overview CONTROLS 73Displays on the Control Display1."Vehicle Info"2."Onboard info" or "Trip computer"Displays in the "Onboard info":>Cruising range>Distance from destination>Probable arrival time when a destination has been input into the naviga...75 .CONTROLS Controls overvie...CONTROLS Controls overview741Button for:>Selecting display>Setting values>Confirming selected display or set values>Calling up computer information 71Exiting displays1.Press the button in the turn signal lever repeatedly until "HOME" is displayed.2.Press t...76 .Controls overview CONTROL...Controls overview CONTROLS 75Service requirementsThe remaining driving dist ance and the date of the next scheduled service are briefly displayed immediately after you start the engine or switch on the ignition.The extent of service work required can be re...77 .CONTROLS Controls overvie...CONTROLS Controls overview764." Vehicle inspection"5.Open the deadline entry menu.6."Date:"7.Create the settings.8.Press the MINI joystick to apply the setting. The year is highlighted.9.Turn the MINI joystick to make the adjustment.10.Press the MINI joyst...78 .Controls overview CONTROL...Controls overview CONTROLS 77Setting time zone1."Settings"2."Time/Date"3."Time zone:"4.Turn MINI joystick until the desired time zone is set and press the MINI joystick.The time zone is stored.DateSetting date1."Settings"2."Time/Date"3."Date:"4.Turn MINI j...79 .CONTROLS Controls overvie...CONTROLS Controls overview78Supplemental text messagesFor most Check Control messages, you can view more information later, e.g. regarding the cause of a malfunction and how to respond, refer to page79.In urgent cases, this information will be shown as s...80 .Controls overview CONTROL...Controls overview CONTROLS 794.Press and hold the button.If there are no Check Control messages, then "CHECK OK" is displayed.If a Check Control messa ge has been stored, the corresponding message is displayed. In addition, the text message appears on the ...81 .CONTROLS Controls overvie...CONTROLS Controls overview80Activating/deactivating the limit1."Settings"2."Speed"3."Warning"4.Press the MINI joystick.Altering settingsLanguage on the Control DisplayYou can set the language on the Control Display.1."Settings"2."Language/Units"3."Language...82 .Controls overview CONTROL...Controls overview CONTROLS 814.Turn the MINI joystick until the desired setting is reached.5.Press the MINI joystick.The setting is stored for the remote control cur-rently in use. In bright conditions, for example, the brightness control may not be clear...83 .CONTROLS Technology for d...CONTROLS Technology for driving comfort and safety82Technology for driving comfort and safetyVehicle equipmentIn this chapter, all production, country, and optional equipment that is offered in the model range is described. Equi pment is also described tha...84 .Technology for driving co...Technology for driving comfort and safety CONTROLS 83enter the sensors' blind spots before or after a continuous audible signal is given. Higher, pro-truding objects, such as wall ledges, may not be detectable. Therefore, always drive cautiously; otherwis...85 .CONTROLS Technology for d...CONTROLS Technology for driving comfort and safety84Activating DSCPress the button again: the DSC indicator lamps in the display elements go out.For better controlThe indicator lamp on the tachometer is flashing: DSC controls the driving and braking forces...86 .Technology for driving co...Technology for driving comfort and safety CONTROLS 85Deactivating both DTC and DSCPress the button for at least 3 seconds; the indi-cator lamp DSC OFF on the speedometer comes on and DSC OFF is displayed on the tachometer.The Dynamic Traction Co ntrol DTC ...87 .CONTROLS Technology for d...CONTROLS Technology for driving comfort and safety86Do not push on the rear spoiler; otherwise, it may be damaged.For information on car washing facilities and care, see page227 and following.Automatic modeWhen starting the engine, a retracted rear spoiler...88 .Technology for driving co...Technology for driving comfort and safety CONTROLS 87Flat Tire Monitor FTMThe conceptThe system does not measure the actual inflation pressure in the tires.The system detects a pre ssure loss in a tire by comparing the rotational speeds of the individ-ual ...89 .CONTROLS Technology for d...CONTROLS Technology for driving comfort and safety88The initialization is completed during driv-ing, which can be interrupted at any time. When driving resumes, the initialization is continued automatically.90 .Technology for driving co...Technology for driving comfort and safety CONTROLS 89Vibrations or loud noises while driving can indicate final failure of the tire. Reduce your speed and bring the vehicle to a stop; oth-erwise, pieces of tire may come off, which could result in an accide...91 .CONTROLS Technology for d...CONTROLS Technology for driving comfort and safety90Resetting the systemReset the system again af ter each correction of the tire inflation pressure and after every tire or wheel change.1."Vehicle Info"2."Vehicle status"3."Reset"4.Start the engine - do not...92 .Technology for driving co...Technology for driving comfort and safety CONTROLS 91Continued driving with a flat tireWhen driving with a damaged tire:1.Avoid sudden braking and steering maneuvers.2.Do not exceed a speed of 50 mph/80 km/h.3.At the next opportunity, check the air pressur...93 .CONTROLS Technology for d...CONTROLS Technology for driving comfort and safety92Declaration according to NHTSA/FMVSS 138 Tire Pressure Monitoring SystemsEach tire, including the spare, should be checked monthly when cold and inflated to the inflation pressure recommended by the vehi...94 .Technology for driving co...Technology for driving comfort and safety CONTROLS 93Airbags1Front airbags2Side/head airbags in the backrestsProtective actionObserve the instructions on page 50 to ensure the best possible personal protection.95 .CONTROLS Technology for d...CONTROLS Technology for driving comfort and safety94so that the front passeng er airbags are activated and the indicator lamp goes out. If the desired airbag status cannot be achieved by changing the sitting position, transport the relevant pas-senger on ...96 .Technology for driving co...Technology for driving comfort and safety CONTROLS 95MINI Convertible: Rollover protection systemThe rollover protection system is automatically activated in the event of a sufficiently severe accident or with an ex treme inclination in the longitudinal ax...97 .CONTROLS Lamps96LampsVehi...CONTROLS Lamps96LampsVehicle equipmentIn this chapter, all production, country, and optional equipment that is offered in the model range is described. Equi pment is also described that is not available because of, for example, selected options or coun try...98 .Lamps CONTROLS 97Welcome ...Lamps CONTROLS 97Welcome lampsIf you leave the light switch in the low beam or automatic headlamp control position when you switch off the ignition, the parking lamps and interior lamps come on fo r a certain time as soon as the vehicle is unlocked.Pathway...99 .CONTROLS Lamps98Activatin...CONTROLS Lamps98Activating Adaptive Light ControlWith the ignition switched on, turn the light switch to position 3, refer to page96.Standstill function: to avoid blinding oncoming traffic, the Adaptive Light Control does not pivot toward the driver's side...100 .Lamps CONTROLS 99>Turn on...Lamps CONTROLS 99>Turn on rear fog lamps:Press the switch downwardTo switch them off, pre ss the switch upward or downward again.Front fog lampsThe parking lamps or low beams must be switched on for the fog lamps to operate. The green indicator lamp lights...ログイン

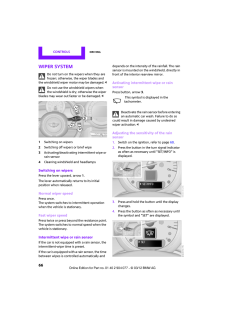
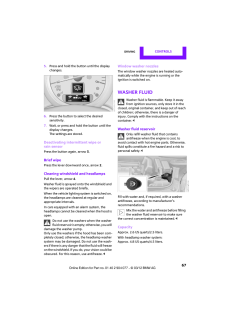
 ファイルをアップロードしています。
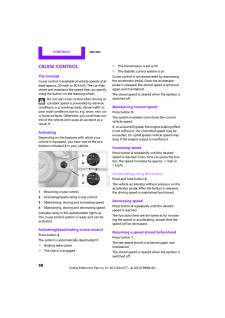
しばらくお待ちください。