シボレーサバーバンの取扱説明書・マニュアル [全578ページ 3.04MB]


9


251 / 578 ページ
251 / 578 ページ


現在のページURL
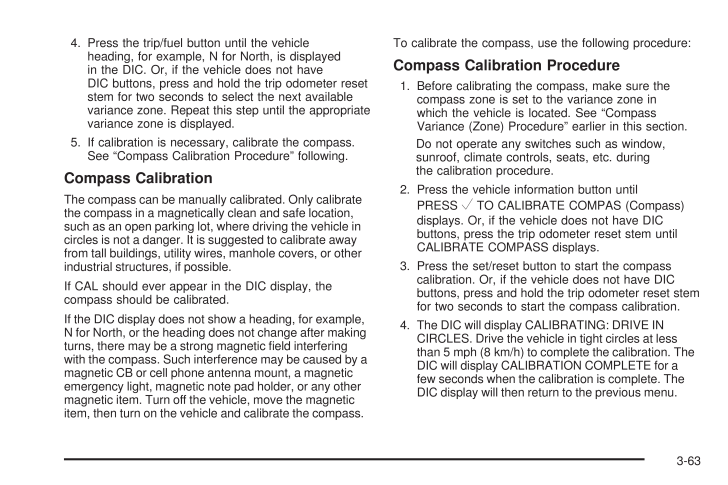
4. Press the trip/fuel button until the vehicleheading, for example, N for North, is displayedin the DIC. Or, if the vehicle does not haveDIC buttons, press and hold the trip odometer resetstem for two seconds to select the next availablevariance zone. Repeat this step until the appropriatevariance zone is displayed.5. If calibration is necessary, calibrate the compass.See Compass Calibration Procedure following.Compass CalibrationThe compass can be manually calibrated. Only calibratethe compass in a magnetically clean and safe location,such as an open parking lot, where driving the vehicle incircles is not a danger. It is suggested to calibrate awayfrom tall buildings, utility wires, manhole covers, or otherindustrial structures, if possible.If CAL should ever appear in the DIC display, thecompass should be calibrated.If the DIC display does not show a heading, for example,N for North, or the heading does not change after makingturns, there may be a strong magnetic field interferingwith the compass. Such interference may be caused by amagnetic CB or cell phone antenna mount, a magneticemergency light, magnetic note pad holder, or any othermagnetic item. Turn off the vehicle, move the magneticitem, then turn on the vehicle and calibrate the compass.To calibrate the compass, use the following procedure:Compass Calibration Procedure1. Before calibrating the compass, make sure thecompass zone is set to the variance zone inwhich the vehicle is located. See CompassVariance (Zone) Procedure earlier in this section.Do not operate any switches such as window,sunroof, climate controls, seats, etc. duringthe calibration procedure.2. Press the vehicle information button untilPRESSV TO CALIBRATE COMPAS (Compass)displays. Or, if the vehicle does not have DICbuttons, press the trip odometer reset stem untilCALIBRATE COMPASS displays.3. Press the set/reset button to start the compasscalibration. Or, if the vehicle does not have DICbuttons, press and hold the trip odometer reset stemfor two seconds to start the compass calibration.4. The DIC will display CALIBRATING: DRIVE INCIRCLES. Drive the vehicle in tight circles at lessthan 5 mph (8 km/h) to complete the calibration. TheDIC will display CALIBRATION COMPLETE for afew seconds when the calibration is complete. TheDIC display will then return to the previous menu.3-63
参考になったと評価  33人が参考になったと評価しています。
その他の取扱説明書

897 view

2986 view

773 view
.pdf")
754 view
このマニュアルの目次
-
1 .Seats and Restraint Syste...Seats and Restraint System............................. 1-1Head Restraints......................................... 1-2Front Seats............................................... 1-4Rear Seats.............................................. 1-14Safety Belts.....
-
2 .Appearance Care.............Appearance Care................................... 5-106Vehicle Identification............................... 5-114Electrical System.................................... 5-114Capacities and Specifications...................5-122Maintenance Schedule............
-
3 .GENERAL MOTORS, GM, the G...GENERAL MOTORS, GM, the GM Emblem,CHEVROLET, the CHEVROLET Emblem, and thenames TAHOE, SUBURBAN, and Z71 are registeredtrademarks of General Motors Corporation.This manual includes the latest information at the time itwas printed. GM reserves the right to ...
-
4 .IndexTo quickly locate in...IndexTo quickly locate information about the vehicle, use theindex in the back of the manual. It is an alphabeticallist of what is in the manual and the page number whereit can be found.Safety Warnings and SymbolsA circle with a slashthrough it is a safety...
-
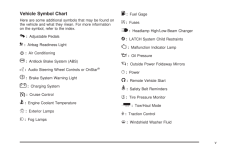
5 .Vehicle Symbol ChartHere ...Vehicle Symbol ChartHere are some additional symbols that may be found onthe vehicle and what they mean. For more informationon the symbol, refer to the index.0 :Adjustable Pedals9 :Airbag Readiness Light# :Air Conditioning! :Antilock Brake System (ABS)g :...
-
7 .Head Restraints.............Head Restraints.............................................. .1-2Front Seats..................................................... .1-4Manual Seats............................................... .1-4Power Seats.................................................
-
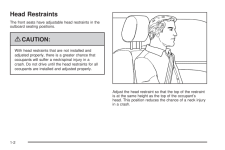
8 .Head RestraintsThe front ...Head RestraintsThe front seats have adjustable head restraints in theoutboard seating positions.{ CAUTION:With head restraints that are not installed andadjusted properly, there is a greater chance thatoccupants will suffer a neck/spinal injury in acrash. ...
-
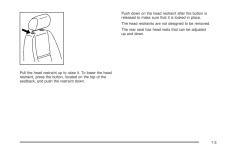
9 .Pull the head restraint u...Pull the head restraint up to raise it. To lower the headrestraint, press the button, located on the top of theseatback, and push the restraint down.Push down on the head restraint after the button isreleased to make sure that it is locked in place.The hea...
-
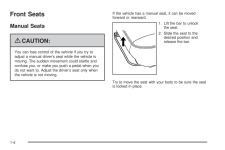
10 .Front SeatsManual Seats{ ...Front SeatsManual Seats{ CAUTION:You can lose control of the vehicle if you try toadjust a manual drivers seat while the vehicle ismoving. The sudden movement could startle andconfuse you, or make you push a pedal when youdo not want to. Adjust the drivers...
-
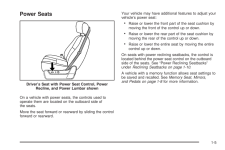
11 .Power SeatsOn a vehicle w...Power SeatsOn a vehicle with power seats, the controls used tooperate them are located on the outboard side ofthe seats.Move the seat forward or rearward by sliding the controlforward or rearward.Your vehicle may have additional features to adjust yourvehi...
-
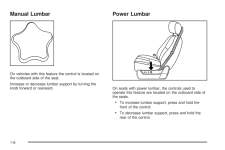
12 .Manual LumbarOn vehicles ...Manual LumbarOn vehicles with this feature the control is located onthe outboard side of the seat.Increase or decrease lumbar support by turning theknob forward or rearward.Power LumbarOn seats with power lumbar, the controls used tooperate this feature ar...
-
13 .The vehicle may have addi...The vehicle may have additional features to adjust yourvehicles power seat: To raise the height of the lumbar support, pressand hold the top of the control. To lower the height of the lumbar support, pressand hold the bottom of the control.Release the cont...
-
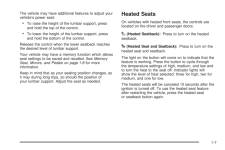
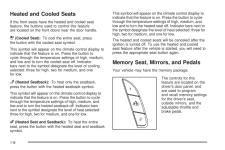
14 .Heated and Cooled SeatsIf...Heated and Cooled SeatsIf the front seats have the heated and cooled seatfeature, the buttons used to control this featureare located on the front doors near the door handle.{ (Cooled Seat):To cool the entire seat, pressthe button with the cooled seat symb...
-
15 .To save seating positions...To save seating positions in memory:1. Adjust the drivers seat, including the seatbackrecliner and lumbar, both outside mirrors, andthe throttle and brake pedals to a comfortableposition.SeeOutside Power Mirrors on page 2-53 andAdjustable Throttle and Brak...
-
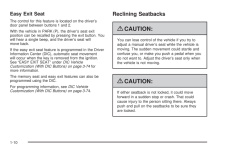
16 .Easy Exit SeatThe control...Easy Exit SeatThe control for this feature is located on the driversdoor panel between buttons 1 and 2.With the vehicle in PARK (P), the drivers seat exitposition can be recalled by pressing the exit button. Youwill hear a single beep, and the drivers seat...
-
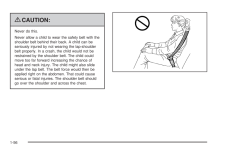
17 .{ CAUTION:Sitting in a re...{ CAUTION:Sitting in a reclined position when your vehicle isin motion can be dangerous. Even if you buckleup, your safety belts cannot do their job when youare reclined like this.The shoulder belt cannot do its job. In a crash,you could go into it, receiv...
-
18 .Manual Reclining Seatback...Manual Reclining SeatbacksOn seats with manual reclining seatbacks, the leverused to operate them is located on the outboard side ofthe seat(s).To recline the seatback:1. Lift the recline lever.2. Move the seatback to the desired position, thenrelease the ...
-
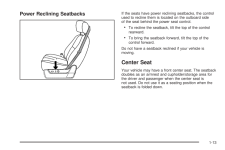
19 .Power Reclining Seatbacks...Power Reclining SeatbacksIf the seats have power reclining seatbacks, the controlused to recline them is located on the outboard sideof the seat behind the power seat control. To recline the seatback, tilt the top of the controlrearward. To bring the seatb...
-
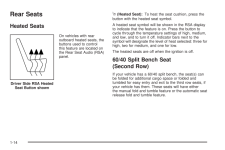
20 .Rear SeatsHeated SeatsOn ...Rear SeatsHeated SeatsOn vehicles with rearoutboard heated seats, thebuttons used to controlthis feature are located onthe Rear Seat Audio (RSA)panel.M (Heated Seat):To heat the seat cushion, press thebutton with the heated seat symbol.A heated seat symbol...
-
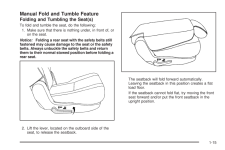
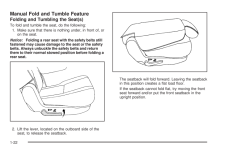
21 .Manual Fold and Tumble Fe...Manual Fold and Tumble FeatureFolding and Tumbling the Seat(s)To fold and tumble the seat, do the following:1. Make sure that there is nothing under, in front of, oron the seat.Notice:Folding a rear seat with the safety belts stillfastened may cause damage...
-
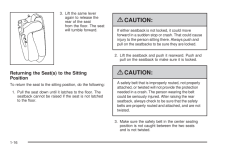
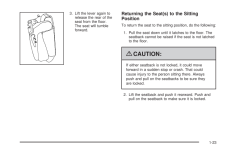
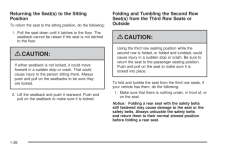
22 .3. Lift the same leveraga...3. Lift the same leveragain to release therear of the seatfrom the floor. The seatwill tumble forward.Returning the Seat(s) to the SittingPositionTo return the seat to the sitting position, do the following:1. Pull the seat down until it latches to the flo...
-
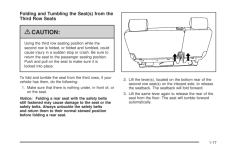
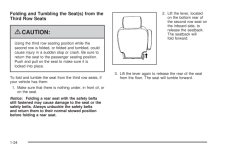
23 .Folding and Tumbling the ...Folding and Tumbling the Seat(s) from theThird Row Seats{ CAUTION:Using the third row seating position while thesecond row is folded, or folded and tumbled, couldcause injury in a sudden stop or crash. Be sure toreturn the seat to the passenger seating pos...
-
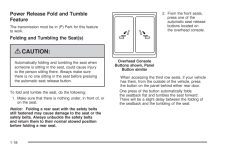
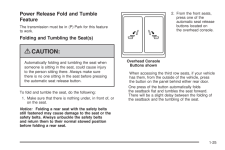
24 .Power Release Fold and Tu...Power Release Fold and TumbleFeatureThe transmission must be in (P) Park for this featureto work.Folding and Tumbling the Seat(s){ CAUTION:Automatically folding and tumbling the seat whensomeone is sitting in the seat, could cause injuryto the person sitti...
-
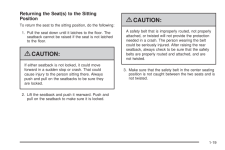
25 .Returning the Seat(s) to ...Returning the Seat(s) to the SittingPositionTo return the seat to the sitting position, do the following:1. Pull the seat down until it latches to the floor. Theseatback cannot be raised if the seat is not latchedto the floor.{ CAUTION:If either seatback i...
-
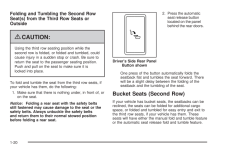
26 .Folding and Tumbling the ...Folding and Tumbling the Second RowSeat(s) from the Third Row Seats orOutside{ CAUTION:Using the third row seating position while thesecond row is folded, or folded and tumbled, couldcause injury in a sudden stop or crash. Be sure toreturn the seat to the ...
-
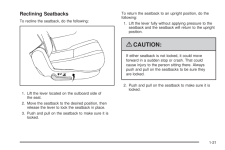
27 .Reclining SeatbacksTo rec...Reclining SeatbacksTo recline the seatback, do the following:1. Lift the lever located on the outboard side ofthe seat.2. Move the seatback to the desired position, thenrelease the lever to lock the seatback in place.3. Push and pull on the seatback to mak...
-
28 .Manual Fold and Tumble Fe...Manual Fold and Tumble FeatureFolding and Tumbling the Seat(s)To fold and tumble the seat, do the following:1. Make sure that there is nothing under, in front of, oron the seat.Notice:Folding a rear seat with the safety belts stillfastened may cause damage...
-
29 .3. Lift the lever again t...3. Lift the lever again torelease the rear of theseat from the floor.The seat will tumbleforward.Returning the Seat(s) to the SittingPositionTo return the seat to the sitting position, do the following:1. Pull the seat down until it latches to the floor. T...
-
30 .Folding and Tumbling the ...Folding and Tumbling the Seat(s) from theThird Row Seats{ CAUTION:Using the third row seating position while thesecond row is folded, or folded and tumbled, couldcause injury in a sudden stop or crash. Be sure toreturn the seat to the passenger seating pos...
-
31 .Power Release Fold and Tu...Power Release Fold and TumbleFeatureThe transmission must be in (P) Park for this featureto work.Folding and Tumbling the Seat(s){ CAUTION:Automatically folding and tumbling the seat whensomeone is sitting in the seat, could cause injuryto the person sitti...
-
32 .Returning the Seat(s) to ...Returning the Seat(s) to the SittingPositionTo return the seat to the sitting position, do the following:1. Pull the seat down until it latches to the floor. Theseatback cannot be raised if the seat is not latchedto the floor.{ CAUTION:If either seatback i...
-
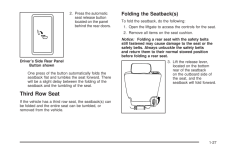
33 .2. Press the automaticsea...2. Press the automaticseat release buttonlocated on the panelbehind the rear doors.One press of the button automatically folds theseatback flat and tumbles the seat forward. Therewill be a slight delay between the folding of theseatback and the tumbling of...
-
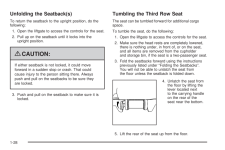
34 .Unfolding the Seatback(s)...Unfolding the Seatback(s)To return the seatback to the upright position, do thefollowing:1. Open the liftgate to access the controls for the seat.2. Pull up on the seatback until it locks into theupright position.{ CAUTION:If either seatback is not locked,...
-
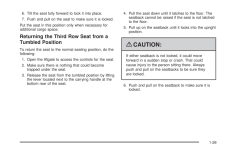
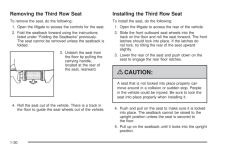
35 .6. Tilt the seat fully fo...6. Tilt the seat fully forward to lock it into place.7. Push and pull on the seat to make sure it is locked.Put the seat in this position only when necessary foradditional cargo space.Returning the Third Row Seat from aTumbled PositionTo return the seat to...
-
36 .Removing the Third Row Se...Removing the Third Row SeatTo remove the seat, do the following:1. Open the liftgate to access the controls for the seat.2. Fold the seatback forward using the instructionslisted under Folding the Seatbacks previously.The seat cannot be removed unless the ...
-
37 .{ CAUTION:If either seatb...{ CAUTION:If either seatback is not locked, it could moveforward in a sudden stop or crash. That couldcause injury to the person sitting there. Alwayspush and pull on the seatbacks to be sure theyare locked.6. Push and pull on the seatback to make sure it ...
-
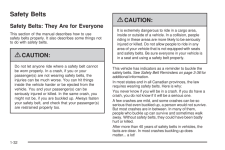
38 .Safety BeltsSafety Belts:...Safety BeltsSafety Belts: They Are for EveryoneThis section of the manual describes how to usesafety belts properly. It also describes some things notto do with safety belts.{ CAUTION:Do not let anyone ride where a safety belt cannotbe worn properly. In a ...
-
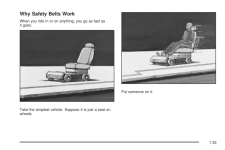
39 .Why Safety Belts WorkWhen...Why Safety Belts WorkWhen you ride in or on anything, you go as fast asit goes.Take the simplest vehicle. Suppose it is just a seat onwheels.Put someone on it.1-33
-
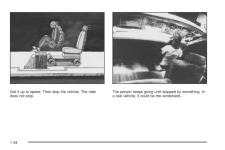
40 .Get it up to speed. Then ...Get it up to speed. Then stop the vehicle. The riderdoes not stop.The person keeps going until stopped by something. Ina real vehicle, it could be the windshield...1-34
-
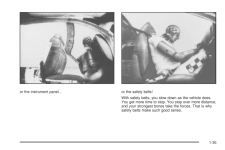
41 .or the instrument panel.....or the instrument panel... or the safety belts!With safety belts, you slow down as the vehicle does.You get more time to stop. You stop over more distance,and your strongest bones take the forces. That is whysafety belts make such good sense.1-35
-
42 .Questions and Answers Abo...Questions and Answers About SafetyBeltsQ: Will I be trapped in the vehicle after a crash if Iam wearing a safety belt?A: Youcouldbe whether you are wearing a safetybelt or not. But your chance of being consciousduring and after an accident, so you canunbu...
-
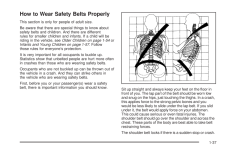
43 .How to Wear Safety Belts ...How to Wear Safety Belts ProperlyThis section is only for people of adult size.Be aware that there are special things to know aboutsafety belts and children. And there are differentrules for smaller children and infants. If a child will beriding in the veh...
-
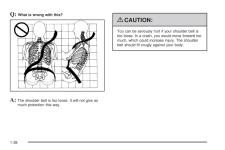
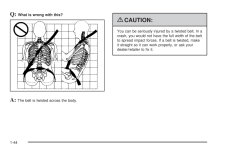
44 .Q: What is wrong with thi...Q: What is wrong with this?A: The shoulder belt is too loose. It will not give asmuch protection this way.{ CAUTION:You can be seriously hurt if your shoulder belt istoo loose. In a crash, you would move forward toomuch, which could increase injury. The sh...
-
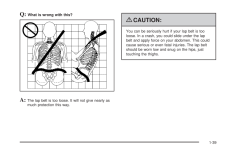
45 .Q: What is wrong with thi...Q: What is wrong with this?A: The lap belt is too loose. It will not give nearly asmuch protection this way.{ CAUTION:You can be seriously hurt if your lap belt is tooloose. In a crash, you could slide under the lapbelt and apply force on your abdomen. Thi...
-
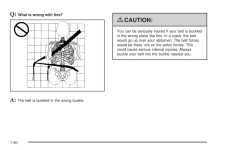
46 .Q: What is wrong with thi...Q: What is wrong with this?A: The belt is buckled in the wrong buckle.{ CAUTION:You can be seriously injured if your belt is buckledin the wrong place like this. In a crash, the beltwould go up over your abdomen. The belt forceswould be there, not on the p...
-
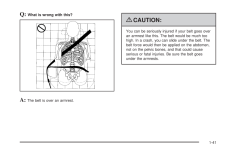
47 .Q: What is wrong with thi...Q: What is wrong with this?A: The belt is over an armrest.{ CAUTION:You can be seriously injured if your belt goes overan armrest like this. The belt would be much toohigh. In a crash, you can slide under the belt. Thebelt force would then be applied on th...
-
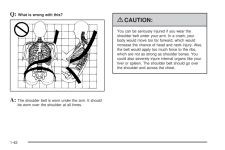
48 .Q: What is wrong with thi...Q: What is wrong with this?A: The shoulder belt is worn under the arm. It shouldbe worn over the shoulder at all times.{ CAUTION:You can be seriously injured if you wear theshoulder belt under your arm. In a crash, yourbody would move too far forward, whic...
-
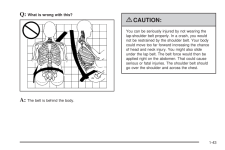
49 .Q: What is wrong with thi...Q: What is wrong with this?A: The belt is behind the body.{ CAUTION:You can be seriously injured by not wearing thelap-shoulder belt properly. In a crash, you wouldnot be restrained by the shoulder belt. Your bodycould move too far forward increasing the c...
-
50 .Q: What is wrong with thi...Q: What is wrong with this?A: The belt is twisted across the body.{ CAUTION:You can be seriously injured by a twisted belt. In acrash, you would not have the full width of the beltto spread impact forces. If a belt is twisted, makeit straight so it can wor...
-
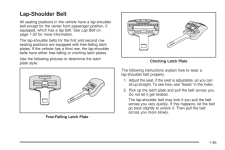
51 .Lap-Shoulder BeltAll seat...Lap-Shoulder BeltAll seating positions in the vehicle have a lap-shoulderbelt except for the center front passenger position, ifequipped, which has a lap belt. See Lap Belt onpage 1-52for more information.The lap-shoulder belts for the first and second row...
-
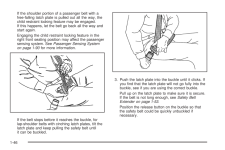
52 .If the shoulder portion o...If the shoulder portion of a passenger belt with afree-falling latch plate is pulled out all the way, thechild restraint locking feature may be engaged.If this happens, let the belt go back all the way andstart again.Engaging the child restraint locking fe...
-
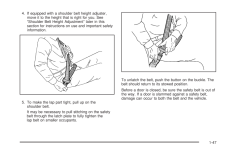
53 .4. If equipped with a sho...4. If equipped with a shoulder belt height adjuster,move it to the height that is right for you. SeeShoulder Belt Height Adjustment later in thissection for instructions on use and important safetyinformation.5. To make the lap part tight, pull up on thesh...
-
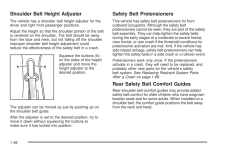
54 .Shoulder Belt Height Adju...Shoulder Belt Height AdjusterThe vehicle has a shoulder belt height adjuster for thedriver and right front passenger positions.Adjust the height so that the shoulder portion of the beltis centered on the shoulder. The belt should be awayfrom the face and n...
-
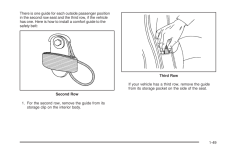
55 .There is one guide for ea...There is one guide for each outside passenger positionin the second row seat and the third row, if the vehiclehas one. Here is how to install a comfort guide to thesafety belt:1. For the second row, remove the guide from itsstorage clip on the interior bod...
-
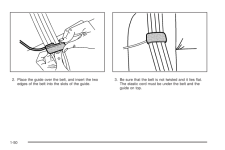
56 .2. Place the guide over t...2. Place the guide over the belt, and insert the twoedges of the belt into the slots of the guide.3. Be sure that the belt is not twisted and it lies flat.The elastic cord must be under the belt and theguide on top.1-50
-
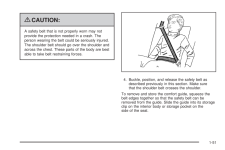
57 .{ CAUTION:A safety belt t...{ CAUTION:A safety belt that is not properly worn may notprovide the protection needed in a crash. Theperson wearing the belt could be seriously injured.The shoulder belt should go over the shoulder andacross the chest. These parts of the body are bestable...
-
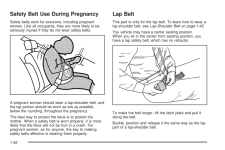
58 .Safety Belt Use During Pr...Safety Belt Use During PregnancySafety belts work for everyone, including pregnantwomen. Like all occupants, they are more likely to beseriously injured if they do not wear safety belts.A pregnant woman should wear a lap-shoulder belt, andthe lap portion s...
-
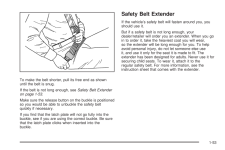
59 .To make the belt shorter,...To make the belt shorter, pull its free end as shownuntil the belt is snug.If the belt is not long enough, see Safety Belt Extenderon page 1-53.Make sure the release button on the buckle is positionedso you would be able to unbuckle the safety beltquickly ...
-
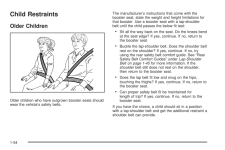
60 .Child RestraintsOlder Chi...Child RestraintsOlder ChildrenOlder children who have outgrown booster seats shouldwear the vehicles safety belts.The manufacturers instructions that come with thebooster seat, state the weight and height limitations forthat booster. Use a booster seat wit...
-
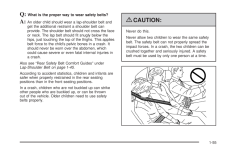
61 .Q: What is the proper way...Q: What is the proper way to wear safety belts?A: An older child should wear a lap-shoulder belt andget the additional restraint a shoulder belt canprovide. The shoulder belt should not cross the faceor neck. The lap belt should fit snugly below thehips, j...
-
62 .{ CAUTION:Never do this.N...{ CAUTION:Never do this.Never allow a child to wear the safety belt with theshoulder belt behind their back. A child can beseriously injured by not wearing the lap-shoulderbelt properly. In a crash, the child would not berestrained by the shoulder belt. Th...
-
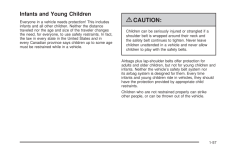
63 .Infants and Young Childre...Infants and Young ChildrenEveryone in a vehicle needs protection! This includesinfants and all other children. Neither the distancetraveled nor the age and size of the traveler changesthe need, for everyone, to use safety restraints. In fact,the law in eve...
-
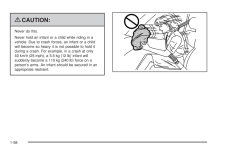
64 .{ CAUTION:Never do this.N...{ CAUTION:Never do this.Never hold an infant or a child while riding in avehicle. Due to crash forces, an infant or a childwill become so heavy it is not possible to hold itduring a crash. For example, in a crash at only40 km/h (25 mph), a 5.5 kg (12 lb) i...
-
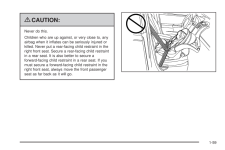
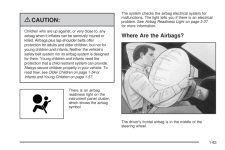
65 .{ CAUTION:Never do this.C...{ CAUTION:Never do this.Children who are up against, or very close to, anyairbag when it inflates can be seriously injured orkilled. Never put a rear-facing child restraint in theright front seat. Secure a rear-facing child restraintin a rear seat. It is a...
-
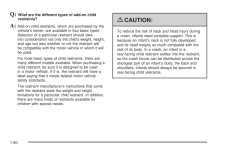
66 .Q: What are the different...Q: What are the different types of add-on childrestraints?A: Add-on child restraints, which are purchased by thevehicles owner, are available in four basic types.Selection of a particular restraint should takeinto consideration not only the childs weight, ...
-
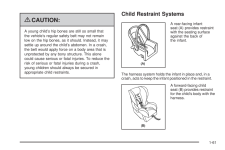
67 .{ CAUTION:A young childs ...{ CAUTION:A young childs hip bones are still so small thatthe vehicles regular safety belt may not remainlow on the hip bones, as it should. Instead, it maysettle up around the childs abdomen. In a crash,the belt would apply force on a body area that isunp...
-
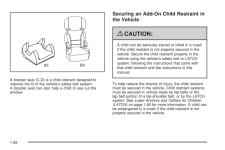
68 .A booster seat (C-D) is a...A booster seat (C-D) is a child restraint designed toimprove the fit of the vehicles safety belt system.A booster seat can also help a child to see out thewindow.Securing an Add-On Child Restraint inthe Vehicle{ CAUTION:A child can be seriously injured or ...
-
69 .When securing an add-on c...When securing an add-on child restraint, refer to theinstructions that come with the restraint which may be onthe restraint itself or in a booklet, or both, and to thismanual. The child restraint instructions are important, soif they are not available, obt...
-
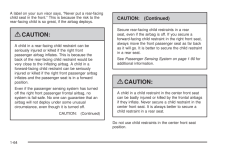
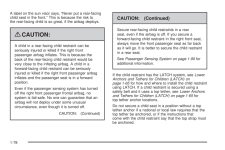
70 .A label on your sun visor...A label on your sun visor says, Never put a rear-facingchild seat in the front. This is because the risk to therear-facing child is so great, if the airbag deploys.{ CAUTION:A child in a rear-facing child restraint can beseriously injured or killed if the ...
-
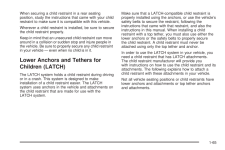
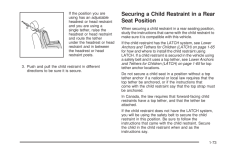
71 .When securing a child res...When securing a child restraint in a rear seatingposition, study the instructions that came with your childrestraint to make sure it is compatible with this vehicle.Wherever a child restraint is installed, be sure to securethe child restraint properly.Keep...
-
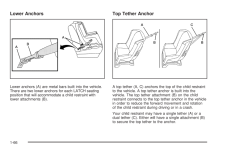
72 .Lower AnchorsLower anchor...Lower AnchorsLower anchors (A) are metal bars built into the vehicle.There are two lower anchors for each LATCH seatingposition that will accommodate a child restraint withlower attachments (B).Top Tether AnchorA top tether (A, C) anchors the top of the ch...
-
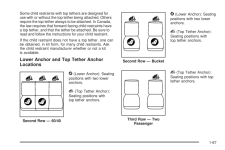
73 .Some child restraints wit...Some child restraints with top tethers are designed foruse with or without the top tether being attached. Othersrequire the top tether always to be attached. In Canada,the law requires that forward-facing child restraints havea top tether, and that the tet...
-
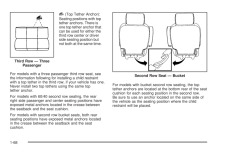
74 .i (Top Tether Anchor):Sea...i (Top Tether Anchor):Seating positions with toptether anchors. There isone top tether anchor thatcan be used for either thethird row center or driverside seating position butnot both at the same time.For models with a three passenger third row seat, seeth...
-
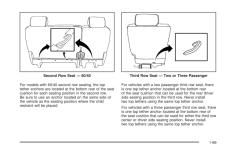
75 .For models with 60/40 sec...For models with 60/40 second row seating, the toptether anchors are located at the bottom rear of the seatcushion for each seating position in the second row.Be sure to use an anchor located on the same side ofthe vehicle as the seating position where the ...
-
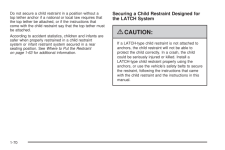
76 .Do not secure a child res...Do not secure a child restraint in a position without atop tether anchor if a national or local law requires thatthe top tether be attached, or if the instructions thatcome with the child restraint say that the top tether mustbe attached.According to accid...
-
77 .{ CAUTION:Do not attach m...{ CAUTION:Do not attach more than one child restraint to asingle anchor. Attaching more than one childrestraint to a single anchor could cause the anchoror attachment to come loose or even break duringa crash. A child or others could be injured. Toreduce t...
-
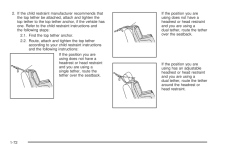
78 .2. If the child restraint...2. If the child restraint manufacturer recommends thatthe top tether be attached, attach and tighten thetop tether to the top tether anchor, if the vehicle hasone. Refer to the child restraint instructions andthe following steps:2.1. Find the top tether an...
-
79 .If the position you areus...If the position you areusing has an adjustableheadrest or head restraintand you are using asingle tether, raise theheadrest or head restraintand route the tetherunder the headrest or headrestraint and in betweenthe headrest or headrestraint posts.3. Push a...
-
80 .If more than one child re...If more than one child restraint needs to be installed inthe rear seat, be sure to read Where to Put theRestraint on page 1-63 .The vehicles lap-shoulder belts for the first and secondrow seating positions are equipped with free-fallinglatch plates. If the...
-
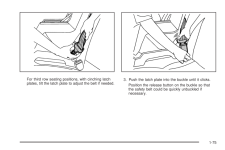
81 .For third row seating pos...For third row seating positions, with cinching latchplates, tilt the latch plate to adjust the belt if needed.3. Push the latch plate into the buckle until it clicks.Position the release button on the buckle so thatthe safety belt could be quickly unbuckle...
-
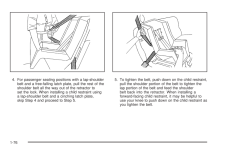
82 .4. For passenger seating ...4. For passenger seating positions with a lap-shoulderbelt and a free-falling latch plate, pull the rest of theshoulder belt all the way out of the retractor toset the lock. When installing a child restraint usinga lap-shoulder belt and a cinching latch pl...
-
83 .6. If the child restraint...6. If the child restraint has a top tether, follow the childrestraint manufacturers instructions regarding theuse of the top tether. See Lower Anchors andTethers for Children (LATCH) on page 1-65 for moreinformation.7. Push and pull the child restraint in ...
-
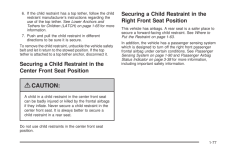
84 .A label on the sun visor ...A label on the sun visor says, Never put a rear-facingchild seat in the front. This is because the risk tothe rear-facing child is so great, if the airbag deploys.{ CAUTION:A child in a rear-facing child restraint can beseriously injured or killed if the r...
-
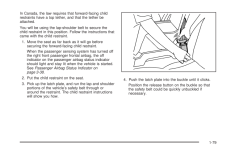
85 .In Canada, the law requir...In Canada, the law requires that forward-facing childrestraints have a top tether, and that the tether beattached.You will be using the lap-shoulder belt to secure thechild restraint in this position. Follow the instructions thatcame with the child restrai...
-
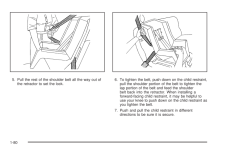
86 .5. Pull the rest of the s...5. Pull the rest of the shoulder belt all the way out ofthe retractor to set the lock.6. To tighten the belt, push down on the child restraint,pull the shoulder portion of the belt to tighten thelap portion of the belt and feed the shoulderbelt back into t...
-
87 .If the airbag is off, the...If the airbag is off, the off indicator in the passengerairbag status indicator will come on and stay on whenthe vehicle is started.If a child restraint has been installed and the onindicator is lit, see If the On Indicator is Lit for a ChildRestraint unde...
-
88 .Airbags are designed to s...Airbags are designed to supplement the protectionprovided by safety belts. Even though todays airbagsare also designed to help reduce the risk of injuryfrom the force of an inflating bag, all airbags must inflatevery quickly to do their job.Here are the mo...
-
89 .{ CAUTION:Children who ar...{ CAUTION:Children who are up against, or very close to, anyairbag when it inflates can be seriously injured orkilled. Airbags plus lap-shoulder belts offerprotection for adults and older children, but not foryoung children and infants. Neither the vehicle...
-
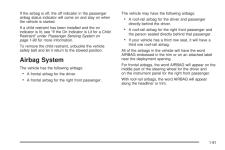
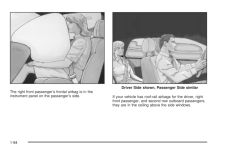
90 .The right front passenger...The right front passengers frontal airbag is in theinstrument panel on the passengers side.If your vehicle has roof-rail airbags for the driver, rightfront passenger, and second row outboard passengers,they are in the ceiling above the side windows.Driver ...
-
91 .If your vehicle has roof-...If your vehicle has roof-rail airbags and a third rowpassenger seat, the airbags are located in the ceilingabove the rear windows for the outboard passengerpositions in the third row.{ CAUTION:If something is between an occupant and anairbag, the airbag mi...
-
92 .When Should an Airbag Inf...When Should an Airbag Inflate?Frontal airbags are designed to inflate in moderate tosevere frontal or near-frontal crashes to help reduce thepotential for severe injuries mainly to the drivers orright front passengers head and chest. However, theyare only ...
-
93 .Your vehicle has a seat p...Your vehicle has a seat position sensor which enablesthe sensing system to monitor the position of thedrivers seat. The seat position sensor providesinformation that is used to determine if the airbagsshould deploy at a reduced level or at full deployment....
-
94 .How Does an Airbag Restra...How Does an Airbag Restrain?In moderate to severe frontal or near frontal collisions,even belted occupants can contact the steering wheelor the instrument panel. In moderate to severe sidecollisions, even belted occupants can contact the insideof the vehic...
-
95 .{ CAUTION:When an airbag ...{ CAUTION:When an airbag inflates, there may be dust in theair. This dust could cause breathing problems forpeople with a history of asthma or other breathingtrouble. To avoid this, everyone in the vehicleshould get out as soon as it is safe to do so. Ifyo...
-
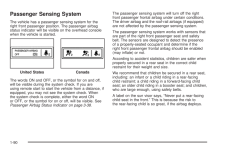
96 .Passenger Sensing SystemT...Passenger Sensing SystemThe vehicle has a passenger sensing system for theright front passenger position. The passenger airbagstatus indicator will be visible on the overhead consolewhen the vehicle is started.The words ON and OFF, or the symbol for on and...
-
97 .{ CAUTION:A child in a re...{ CAUTION:A child in a rear-facing child restraint can beseriously injured or killed if the right frontpassenger airbag inflates. This is because theback of the rear-facing child restraint would bevery close to the inflating airbag. A child in aforward-fac...
-
98 .When the passenger sensin...When the passenger sensing system has turned off theright front passenger frontal airbag, the off indicatorwill light and stay lit to remind you that the airbag is off.SeePassenger Airbag Status Indicator on page 3-38 .The passenger sensing system is desig...
-
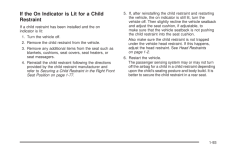
99 .If the On Indicator is Li...If the On Indicator is Lit for a ChildRestraintIf a child restraint has been installed and the onindicator is lit:1. Turn the vehicle off.2. Remove the child restraint from the vehicle.3. Remove any additional items from the seat such asblankets, cushions,...
-
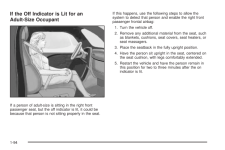
100 .If the Off Indicator is L...If the Off Indicator is Lit for anAdult-Size OccupantIf a person of adult-size is sitting in the right frontpassenger seat, but the off indicator is lit, it could bebecause that person is not sitting properly in the seat.If this happens, use the following ...
