
COOLPIX 800の取扱説明書・マニュアル [全53ページ 2.31MB]


0


7 / 53 ページ

7 / 53 ページ


現在のページURL
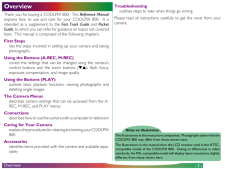
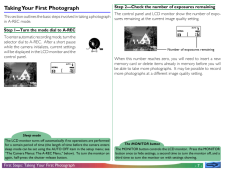
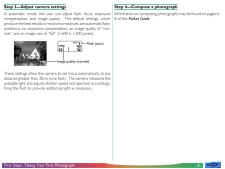
- 7 -Sleep modeThe LCD monitor turns off automatically if no operations are performedfor a certain period of time (the length of time before the camera enterssleep mode can be set using the AUTO OFF item in the setup menu; see"The Camera Menus: The A-REC Menu," below). To turn the monitor onagain, half-press the shutter-release button.The MONITOR buttonThe MONITOR button controls the LCD monitor. Press the MONITORbutton once to hide settings, a second time to turn the monitor off, and athird time to turn the monitor on with settings showing.First Steps: Taking Your First PhotographAUTONORMALAUTONORMALNumber of exposures remainingTaking Your First PhotographThis section outlines the basic steps involved in taking a photographin A-REC mode.Step 1-Turn the mode dial to A-RECTo enter automatic recording mode, turn theselector dial to A-REC. After a short pausewhile the camera initializes, current settingswill be displayed in the LCD monitor and thecontrol panel.1/125F3.8Step 2-Check the number of exposures remainingThe control panel and LCD monitor show the number of expo-sures remaining at the current image quality setting.1/125F3.8When this number reaches zero, you will need to insert a newmemory card or delete items already in memory before you willbe able to take more photographs. It may be possible to recordmore photographs at a different image quality setting.
参考になったと評価  2人が参考になったと評価しています。
このマニュアルの目次
-
1 .- 1 -Reference ManualDIGI...- 1 -Reference ManualDIGITAL CAMERACOOLPIX 800ContentsOverviewFirst StepsPutting Batteries in Your CameraInserting and Removing Memory CardsChoosing a Language for the MenusSetting the Time and DateTaking Your First PhotographUsing the Buttons (A-REC, M-RE...
-
2 .- 2 -ContentsThe Camera M...- 2 -ContentsThe Camera MenusThe A-REC MenuUsing Folders (A-REC, M-REC)LCD BrightnessAuto OffFormatting Memory CardsSEQ.XFERThe M-REC MenuVGALens Converter Settings (LENS)Black-and-White PhotographyMaking a Panorama-Tips (AE-LOCK)User SettingsRestoring Def...
-
3 .- 3 -Notes on illustratio...- 3 -Notes on illustrationsThe illustrations in this manual are composites. Photographs taken with theCOOLPIX 800 may differ from those shown here.The illustrations in this manual show the LCD monitor used in the NTSC-compatible model of the COOLPIX 800. ...
-
4 .- 4 -Important! Before i...- 4 -Important! Before inserting batteries or handlingmemory cards, be sure to read the warnings andcautions in For Your Safety.Notes on batteriesThe camera's clock-calendar is powered by a separate rechargable capaci-tor. When you put batteries in your ...
-
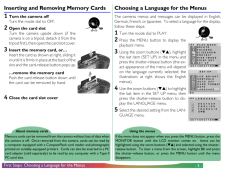
5 .- 5 -Inserting and Removi...- 5 -Inserting and Removing Memory Cards1 Turn the camera offTurn the mode dial to OFF.2 Open the card slotTurn the camera upside down (if thecamera is on a tripod, detach it from thetripod first), then open the card slot cover.3 Insert the memory card, or...
-
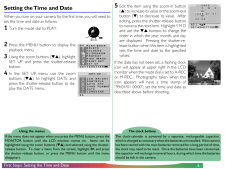
6 .- 6 -The clock batteryThe...- 6 -The clock batteryThe clock-calendar is powered by a separate, rechargeable capacitor,which is charged as necessary when the batteries are installed. If the camerahas been stored with the main batteries removed for a long period of time,the clock may ...
-
7 .- 7 -Sleep modeThe LCD mo...- 7 -Sleep modeThe LCD monitor turns off automatically if no operations are performedfor a certain period of time (the length of time before the camera enterssleep mode can be set using the AUTO OFF item in the setup menu; see"The Camera Menus: The A-REC M...
-
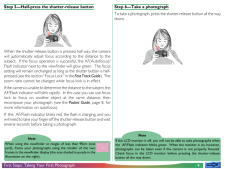
8 .- 8 -First Steps: Taking ...- 8 -First Steps: Taking Your First PhotographAUTONORMALImage quality (normal)Flash (auto)Step 3-Adjust camera settingsIn automatic mode, the user can adjust flash, focus, exposurecompensation, and image quality. The default settings, whichproduce the bes...
-
9 .- 9 -NoteIf the LCD monit...- 9 -NoteIf the LCD monitor is off, you will not be able to take photographs whenthe AF/Flash indicator blinks green. When the monitor is on, however,photographs can be taken even if the camera is not properly focused.Check focus in the LCD monitor befor...
-
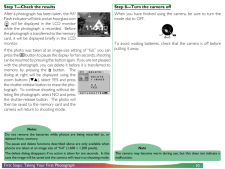
10 .- 10 -First Steps: Taking...- 10 -First Steps: Taking Your First Photograph AUTODELETE1 IMAGEDELETEYESNOSET➔SHUTTERBKNotesDo not remove the batteries while photos are being recorded to, ordeleted from, memory.The pause and delete functions described above are only available whenphoto...
-
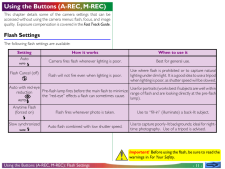
11 .- 11 -Using the Buttons (...- 11 -Using the Buttons (A-REC, M-REC)This chapter details some of the camera settings that can beaccessed without using the camera menus: flash, focus, and imagequality. Exposure compensation is covered in the Fast Track Guide.Flash SettingsThe followin...
-
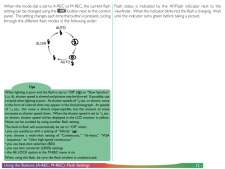
12 .- 12 -When the mode dial ...- 12 -When the mode dial is set to A-REC or M-REC, the current flashsetting can be changed using the button next to the controlpanel. The setting changes each time the button is pressed, cyclingthrough the different flash modes in the following order:SLO...
-
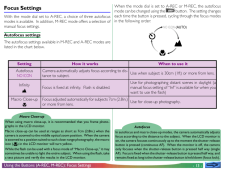
13 .- 13 -Focus SettingsWith ...- 13 -Focus SettingsWith the mode dial set to A-REC, a choice of three autofocusmodes is available. In addition, M-REC mode offers a selection ofmanual focus settings.Autofocus settingsThe autofocus settings available in M-REC and A-REC modes arelisted in...
-
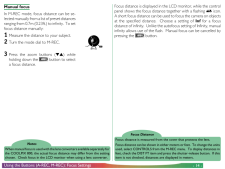
14 .- 14 -Manual focusIn M-RE...- 14 -Manual focusIn M-REC mode, focus distance can be se-lected manually from a list of preset distancesranging from 0.7m (0.23ft.) to infinity. To setfocus distance manually:1 Measure the distance to your subject.2 Turn the mode dial to M-REC.Focus Dist...
-
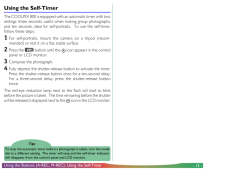
15 .- 15 -Using the Self-Time...- 15 -Using the Self-TimerThe COOLPIX 800 is equipped with an automatic timer with twosettings: three seconds, useful when making group photographs,and ten seconds, ideal for self-portraits. To use the self-timer,follow these steps:1 For self-portraits, m...
-
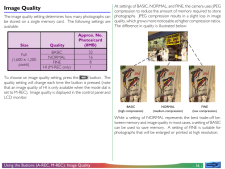
16 .- 16 -Image QualityThe im...- 16 -Image QualityThe image quality setting determines how many photographs canbe stored on a single memory card. The following settings areavailable:At settings of BASIC, NORMAL, and FINE, the camera uses JPEGcompression to reduce the amount of memory r...
-
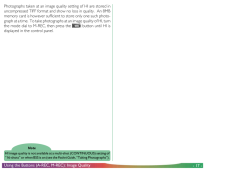
17 .- 17 -Photographs taken a...- 17 -Photographs taken at an image quality setting of HI are stored inuncompressed TIFF format and show no loss in quality. An 8MBmemory card is however sufficient to store only one such photo-graph at a time. To take photographs at an image quality of ...
-
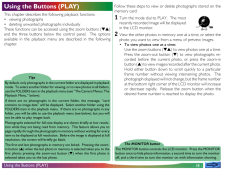
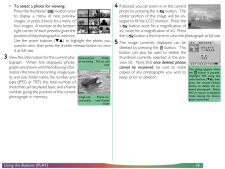
18 .- 18 -Using the Buttons (...- 18 -Using the Buttons (PLAY)This chapter describes the following playback functions:* viewing photographs* deleting unwanted photographs individuallyThese functions can be accessed using the zoom buttons ( )and the three buttons below the control panel. ...
-
19 .- 19 -*To select a photo ...- 19 -*To select a photo for viewing:Press the thumbnail () button onceto display a menu of nine previewimages, or press it twice for a menu offour images. A number at the bottomright corner of each preview gives theposition of the photograph in memory.Us...
-
20 .- 20 -The Camera MenusThi...- 20 -The Camera MenusThis chapter supplements "Other Camera Functions" in the PocketGuide, exploring the options available in the menus for eachoperating mode. The bulk of the shooting options available in theM-REC menu are described in the Pocket Guid...
-
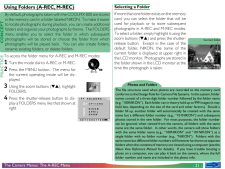
21 .- 21 -CONCEPTPRACTICEUsin...- 21 -CONCEPTPRACTICEUsing Folders (A-REC, M-REC)By default, photographs taken with the COOLPIX 800 are storedin the memory card in a folder labeled NIKON. To make it easierto locate photographs during playback, you can create additionalfolders and organi...
-
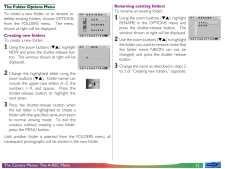
22 .- 22 -The Folder Options ...- 22 -The Folder Options MenuTo create a new folder, or to rename ordelete existing folders, choose OPTIONSfrom the FOLDERS menu. The menushown at right will be displayed.Creating new foldersTo create a new folder:1 Using the zoom buttons (), highlightNEW...
-
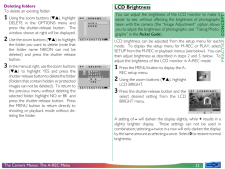
23 .- 23 -LCDBRIGHTBKDeleting...- 23 -LCDBRIGHTBKDeleting foldersTo delete an existing folder:1 Using the zoom buttons (), highlightDELETE in the OPTIONS menu andpress the shutter-release button. Thewindow shown at right will be displayed.2 Use the zoom buttons () to highlightthe folder...
-
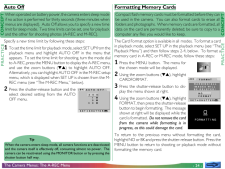
24 .- 24 -CONCEPTPRACTICECONC...- 24 -CONCEPTPRACTICECONCEPTPRACTICEThe Camera Menus: The A-REC MenuTipWhen the camera enters sleep mode, all camera functions are deactivatedand the camera itself is effectively off, consuming almost no power. Thecamera can be reactivated using the MONIT...
-
25 .- 25 -PRACTICESetting How...- 25 -PRACTICESetting How it worksResets sequential numbering to the low-est number available on the currentcard. When a new card is inserted, filenumbering will continue from the low-est number available on the previouscard.RESETWhen a new card is insert...
-
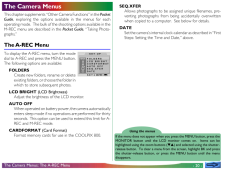
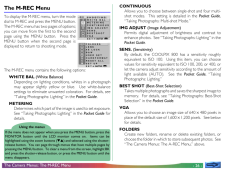
26 .- 26 -The M-REC MenuTo di...- 26 -The M-REC MenuTo display the M-REC menu, turn the modedial to M-REC and press the MENU button.The M-REC menu has two pages of options;you can move from the first to the secondpage using the MENU button. Press theMENU button when the second page isdi...
-
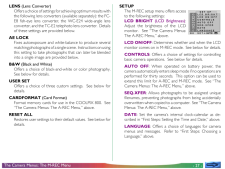
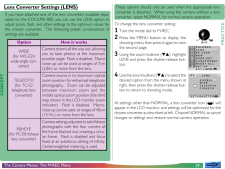
27 .- 27 -LENS (Lens Converte...- 27 -LENS (Lens Converter)Offers a choice of settings for achieving optimum results withthe following lens converters (available separately): the FC-E8 fish-eye lens converter, the WC-E24 wide-angle lensconverter, and the TC-E2 telephoto lens converter. ...
-
28 .- 28 -CONCEPTPRACTICEVGAI...- 28 -CONCEPTPRACTICEVGAIn M-REC mode, you can adjust the size of photos to suit yourpurposes. The default size of 1,600 × 1,200 pixels is suitable forprinting images at high resolution or for viewing fine details on acomputer. The VGA size of 640 × 48
-
29 .- 29 -PRACTICECONCEPTThe ...- 29 -PRACTICECONCEPTThe Camera Menus: The M-REC Menu1USER SETRESET ALLFOLDERSLENSCARDFORMATAE LOCKB&WSET UPSET➔ SHUTTERTELEFOTOFISHEYEWIDELENSNORMALSET➔SHUTTERBKLens Converter Settings (LENS)If you have attached one of the lens converters available sepa-r...
-
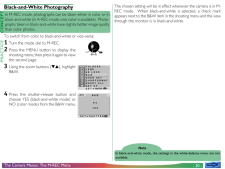
30 .- 30 -CONCEPTPRACTICEBlac...- 30 -CONCEPTPRACTICEBlack-and-White PhotographyIn M-REC mode, photographs can be taken either in color or inblack-and-white (in A-REC mode, only color is available). Photo-graphs taken in black-and-white have slightly better image qualitythan color photo...
-
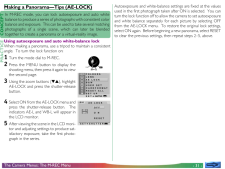
31 .- 31 -CONCEPT PRACTICEMak...- 31 -CONCEPT PRACTICEMaking a Panorama-Tips (AE-LOCK)In M-REC mode, you can lock autoexposure and auto whitebalance to produce a series of photographs with consistent colorbalance and exposure. This can be used to take several matchingphotographs of a si...
-
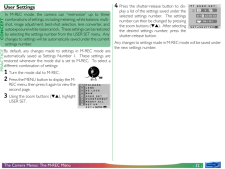
32 .- 32 -CONCEPTPRACTICEUser...- 32 -CONCEPTPRACTICEUser SettingsIn M-REC mode, the camera can "memorize" up to threecombinations of settings, including metering, white balance, multi-shot, image adjustment, best-shot selection, lens converter, andautoexposure/white-balance lock. These...
-
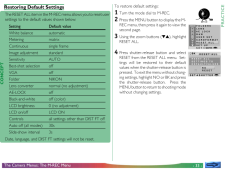
33 .- 33 -CONCEPTPRACTICERest...- 33 -CONCEPTPRACTICERestoring Default SettingsThe RESET ALL item in the M-REC menu allows you to reset usersettings to the default values shown below:Setting Default valueWhite balance automaticMetering matrixContinuous single frameImage adjustment standa...
-
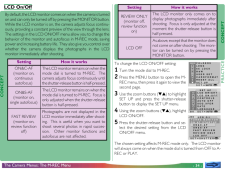
34 .- 34 -LCD On/OffBy defaul...- 34 -LCD On/OffBy default, the LCD monitor comes on when the camera is turnedon and can only be turned off by pressing the MONITOR button.While the LCD monitor is on, the camera adjusts focus continu-ously, providing a constant preview of the view through...
-
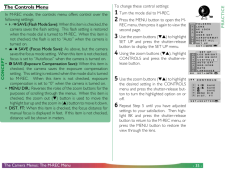
35 .- 35 -CONCEPTPRACTICEThe ...- 35 -CONCEPTPRACTICEThe Controls MenuIn M-REC mode, the controls menu offers control over thefollowing settings:* SAVE (Flash Mode Save): When this item is checked, thecamera saves the flash setting. This flash setting is restoredwhen the mode dial is tu...
-
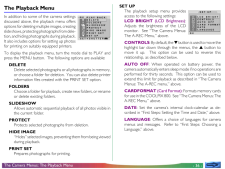
36 .- 36 -The Playback MenuIn...- 36 -The Playback MenuIn addition to some of the camera settingsdiscussed above, the playback menu offersoptions for deleting multiple images, creatingslide shows, protecting photographs from de le-tion, and hiding photographs during playback.It also incl...
-
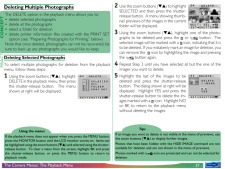
37 .- 37 -CONCEPTPRACTICEDele...- 37 -CONCEPTPRACTICEDeleting Multiple PhotographsThe DELETE option in the playback menu allows you to:* delete selected photographs* delete all the photographs* select a folder for deletion* delete printer information files created with the PRINT SEToptio...
-
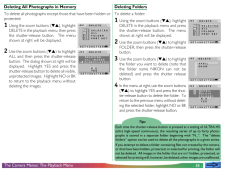
38 .- 38 -Deleting All Photog...- 38 -Deleting All Photographs in MemoryTo delete all photographs except those that have been hidden orprotected:1 Using the zoom buttons (), highlightDELETE in the playback menu, then pressthe shutter-release button. The menushown at right will be displa...
-
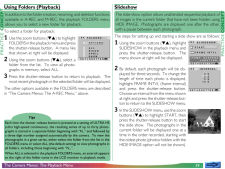
39 .- 39 -CONCEPT PRACTICESli...- 39 -CONCEPT PRACTICESlideshowThe slide-show option allows unattended sequential playback ofall images in the current folder that have not been hidden usingHIDE IMAGE. Photographs are displayed one after the other,with a pause between each photograph.The...
-
40 .- 40 -4 To pause the slid...- 40 -4 To pause the slide show, press the shut-ter-release button. The slide show willpause and the window shown at right willbe displayed. You can restart the slideshow by selecting RESTART, choose anew frame interval with FRAME INTVL,or select BK to s...
-
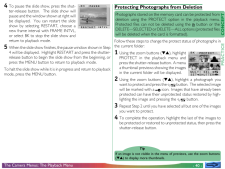
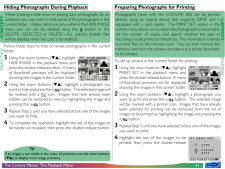
41 .- 41 -Hiding Photographs ...- 41 -Hiding Photographs During PlaybackWhen creating a slide show or playing back photographs for anaudience, you may want to hide some of the photographs in thecurrent folder. Hidden items are only visible in the HIDE IMAGEmenu and can not be deleted us...
-
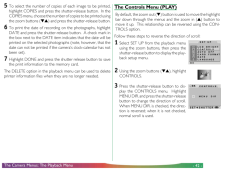
42 .- 42 -5 To select the num...- 42 -5 To select the number of copies of each image to be printed,highlight COPIES and press the shutter-release button. In theCOPIES menu, choose the number of copies to be printed usingthe zoom buttons () and press the shutter-release button.6 To print...
-
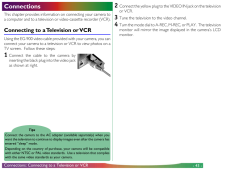
43 .- 43 -ConnectionsThis cha...- 43 -ConnectionsThis chapter provides information on connecting your camera toa computer and to a television or video-cassette recorder (VCR).Connecting to a Television or VCRUsing the EG-900 video cable provided with your camera, you canconnect your came...
-
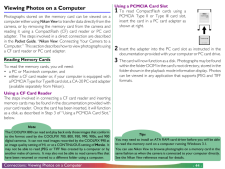
44 .- 44 -Viewing Photos on a...- 44 -Viewing Photos on a ComputerPhotographs stored on the memory card can be viewed on acomputer either using Nikon View to transfer data directly from thecamera, or by removing the memory card from the camera andreading it using a CompactFlash (CF) card...
-
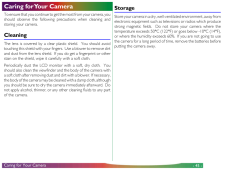
45 .- 45 -Caring for Your Cam...- 45 -Caring for Your CameraTo ensure that you continue to get the most from your camera, youshould observe the following precautions when cleaning andstoring your camera.CleaningThe lens is covered by a clear plastic shield. You should avoidtouching this...
-
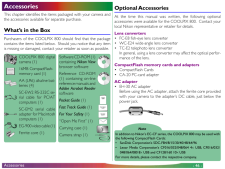
46 .- 46 -AccessoriesThis cha...- 46 -AccessoriesThis chapter identifies the items packaged with your camera andthe accessories available for separate purchase.What's in the BoxPurchasers of the COOLPIX 800 should find that the packagecontains the items listed below. Should you notice t...
-
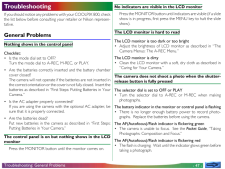
47 .- 47 -TroubleshootingIf y...- 47 -TroubleshootingIf you should notice any problems with your COOLPIX 800, checkthe list below before consulting your retailer or Nikon represen-tative.General ProblemsNothing shows in the control panelChecklist:* Is the mode dial set to OFF?Turn the mo...
-
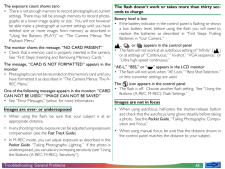
48 .- 48 -The exposure count ...- 48 -The exposure count shows zero* There is not enough memory to record photographs at currentsettings. There may still be enough memory to record photo-graphs at a lower image quality or size. You will not howeverbe able make a photograph at current se...
-
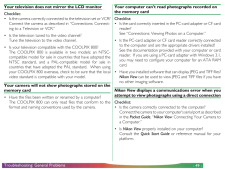
49 .- 49 -Your television doe...- 49 -Your television does not mirror the LCD monitorChecklist:* Is the camera correctly connected to the television set or VCR?Connect the camera as described in "Connections: Connect-ing to a Television or VCR."* Is the television tuned to the video chan...
-
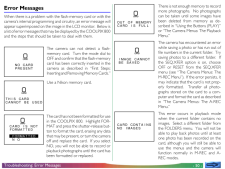
50 .- 50 -Error MessagesWhen ...- 50 -Error MessagesWhen there is a problem with the flash-memory card or with thecamera's internal programming and circuitry, an error message willappear superimposed on the image in the LCD monitor. Below isa list of error messages that may be displayed...
-
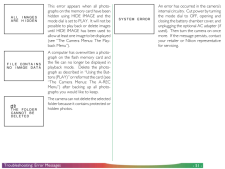
51 .- 51 -This error appears ...- 51 -This error appears when all photo-graphs on the memory card have beenhidden using HIDE IMAGE and themode dial is set to PLAY. It will not bepossible to play back or delete imagesuntil HIDE IMAGE has been used toallow at least one image to be display...
-
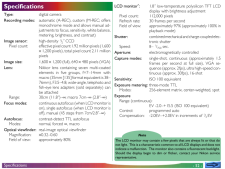
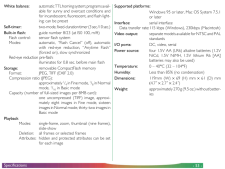
52 .- 52 -SpecificationsType:...- 52 -SpecificationsType:digital cameraRecording modes:automatic (A-REC), custom (M-REC; offersmonochrome mode and allows manual ad-justments to focus, sensitivity, white balance,metering, brightness, and contrast)Image sensor:high-density 1/2" CCDPixel co...
-
53 .- 53 -White balance:autom...- 53 -White balance:automatic TTL homing system ; programs avail-able for sunny and overcast conditions andfor incandescent, fluorescent, and flash light-ing; can be presetSelf-timer:two-mode, fixed-duration timer (3 sec./10 sec.)Built-in flash:guide numbe...
