


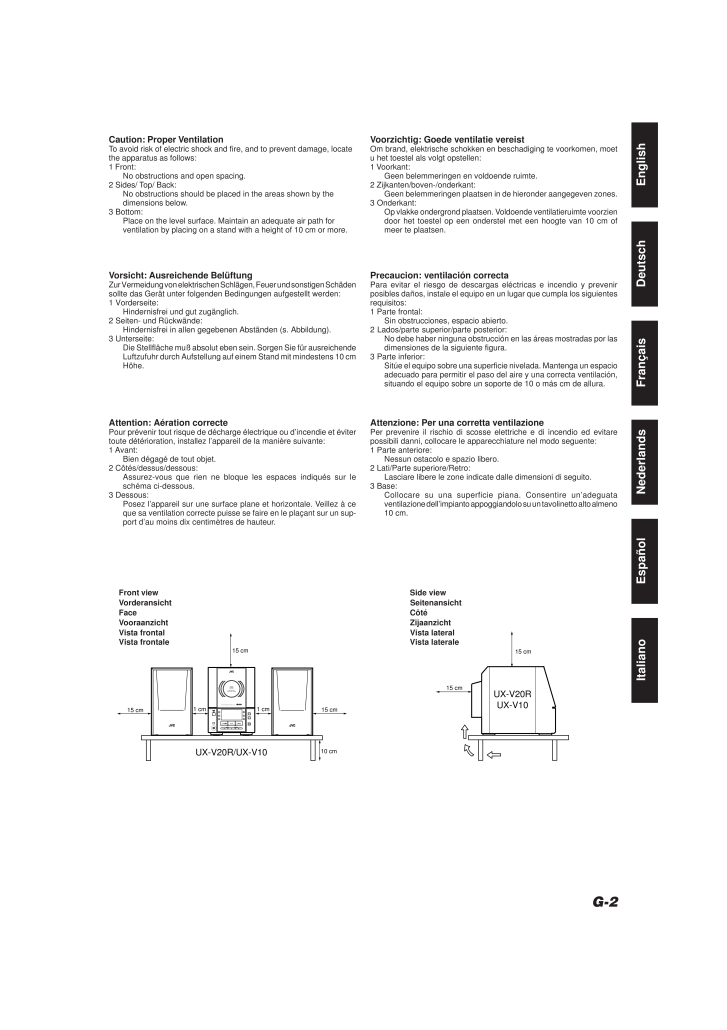


Caution: Proper VentilationTo avoid risk of electric shock and fire, and to prevent damage, locatethe apparatus as follows:1 Front:No obstructions and open spacing.2 Sides/ Top/ Back:No obstructions should be placed in the areas shown by thedimensions below.3 Bottom:Place on the level surface. Maintain an adequate air path forventilation by placing on a stand with a height of 10 cm or more.Attention: Aeration correctePour prevenir tout risque de decharge electrique ou d'incendie et evitertoute deterioration, installez l'appareil de la maniere suivante:1 Avant:Bien degage de tout objet.2 Cotes/dessus/dessous:Assurez-vous que rien ne bloque les espaces indiques sur leschema ci-dessous.3 Dessous:Posez l'appareil sur une surface plane et horizontale. Veillez a ceque sa ventilation correcte puisse se faire en le placant sur un sup-port d'au moins dix centimetres de hauteur.Vorsicht: Ausreichende BeluftungZur Vermeidung von elektrischen Schlagen, Feuer und sonstigen Schadensollte das Gerat unter folgenden Bedingungen aufgestellt werden:1 Vorderseite:Hindernisfrei und gut zuganglich.2 Seiten- und Ruckwande:Hindernisfrei in allen gegebenen Abstanden (s. Abbildung).3 Unterseite:Die Stellflache mu absolut eben sein. Sorgen Sie fur ausreichendeLuftzufuhr durch Aufstellung auf einem Stand mit mindestens 10 cmHohe.Voorzichtig: Goede ventilatie vereistOm brand, elektrische schokken en beschadiging te voorkomen, moetu het toestel als volgt opstellen:1 Voorkant:Geen belemmeringen en voldoende ruimte.2 Zijkanten/boven-/onderkant:Geen belemmeringen plaatsen in de hieronder aangegeven zones.3 Onderkant:Op vlakke ondergrond plaatsen. Voldoende ventilatieruimte voorziendoor het toestel op een onderstel met een hoogte van 10 cm ofmeer te plaatsen.Attenzione: Per una corretta ventilazionePer prevenire il rischio di scosse elettriche e di incendio ed evitarepossibili danni, collocare le apparecchiature nel modo seguente:1 Parte anteriore:Nessun ostacolo e spazio libero.2 Lati/Parte superiore/Retro:Lasciare libere le zone indicate dalle dimensioni di seguito.3 Base:Collocare su una superficie piana. Consentire un'adeguataventilazione dell'impianto appoggiandolo su un tavolinetto alto almeno10 cm.Precaucion: ventilacion correctaPara evitar el riesgo de descargas electricas e incendio y prevenirposibles danos, instale el equipo en un lugar que cumpla los siguientesrequisitos:1 Parte frontal:Sin obstrucciones, espacio abierto.2 Lados/parte superior/parte posterior:No debe haber ninguna obstruccion en las areas mostradas por lasdimensiones de la siguiente figura.3 Parte inferior:Situe el equipo sobre una superficie nivelada. Mantenga un espacioadecuado para permitir el paso del aire y una correcta ventilacion,situando el equipo sobre un soporte de 10 o mas cm de allura.G-2Front view Side viewVorderansicht SeitenansichtFace CoteVooraanzicht ZijaanzichtVista frontal Vista lateralVista frontale Vista lateraleEnglishDeutschFrancaisNederlandsEspanolItalianoUX-V20R/UX-V1010 cm15 cm15 cm15 cm1 cm 1 cmTAPE FM/AM CDVERTICAL DISCLOADING MECHANISMCOMPACTDIGITAL AUDIOMICRO COMPONENT SYSTEM UX-V20R15 cmUX-V20RUX-V1015 cmG1-G3.UX-V10/V20R[E] 00.1.20, 6:54 PM 3
参考になったと評価 12人が参考になったと評価しています。

Copyright © 2013 Gizport.jp All Rights Reserved.
