10

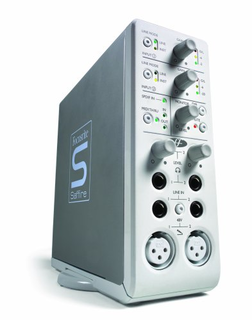
nFront panel facilities and controls 1. Line/Instrument Gain Switches for Analogue Inputs 1 (above) and 2 (below)If a 1/4" Jack (TRS or TSonnected to either of the LINE IN sockets below, thenthese switches can be used to select an appropriate gain calibration. If a Guitar isplugged in then ensure that the yellow INST LED is lit, or if recording the analogueoutput of a synthesizer or mixer for decks then make sure the green LINE LED is lit.2. Gain Controls for Analogue Inputs 1 (above) and 2 (below) with O/L (Overload) LEDsThese two knobs can be used to set the gain (level) of the analogue inputs, whether recording a mic, line or instrument source. Whilst receiving a signal fromthe source by the artist singing or playing, rotate the corresponding knob clockwiseuntil a suitable level is heard. Make sure that the O/L LED does not illuminate asthis means that the signal level is too high and will clip.3. O/L (Overload) LEDs for Inputs 3 (above) and 4 (below)These two LEDs will illuminate if the signal for the corresponding input (connected on the rear panel) is too high. Turn down the level on the connecteddevice if either of these LEDs illuminates.4. S/PDIF IN LED This LED indicates that a valid S/PDIF connection is received at the RCA Input on the rear panel.5. MONITOR (O/Ps 1/2) Level ControlThis knob provides a hardware level control for the Monitor Outputs: AnalogueOutputs 1 and 2 on the rear panel.6. Headphones Output with separate Gain DialThis 1/4" Jack socket allows Headphones to be connected for separate monitoringduring a session. This signal is the same as that sent t oAnalogue Outputs 3 and 4,the mix for which can be set using the SaffireControl LE software.7. Line/Instrument (TRS/TS Jackor channels 1 (left) and 2 (right)These 1/4" Jack sockets allow a balanced or unbalanced Line level signal or anInstrument likeaGuitar or Bassto be plugged directly into the front panel. Set an appropriate gain calibration (LINE or INSTches at the top of the fascia.8. Global Phantom Power SwitchThis switch can be used toapply +48V (Phantom Power) to a microphone connected to either of the XLR inputs below. Check the Recording using amicrophonesection for more details on Phantom Power.9. Microphone (XLRor channels 1 (left) and 2 (right)These twoinputs allowup to two microphones to be plugged into the front panel, for recording mono or stereo sources.125678934


![前ページ カーソルキー[←]でも移動](http://gizport.jp/static/images/arrow_left2.png)


