X3の取扱説明書・マニュアル [全262ページ 11.20MB]


11


95 / 262 ページ
95 / 262 ページ


現在のページURL
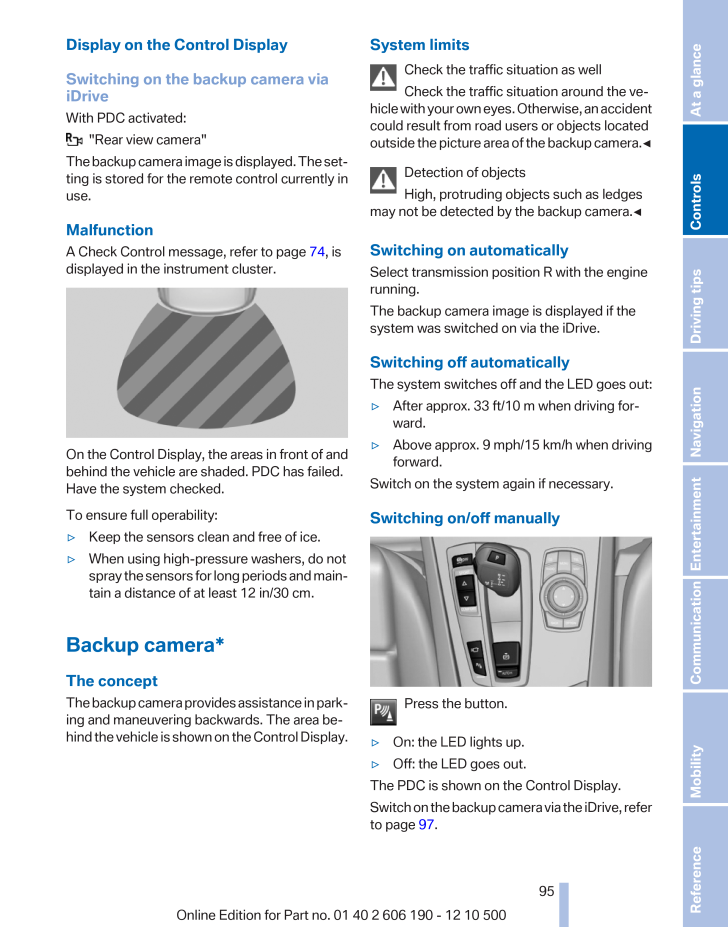
Display on the Control DisplaySwitching on the backup camera viaiDriveWith PDC activated: "Rear view camera"The backup camera image is displayed. The set‐ting is stored for the remote control currently inuse.MalfunctionA Check Control message, refer to page 74, isdisplayed in the instrument cluster.On the Control Display, the areas in front of andbehind the vehicle are shaded. PDC has failed.Have the system checked.To ensure full operability:▷Keep the sensors clean and free of ice.▷When using high-pressure washers, do notspray the sensors for long periods and main‐tain a distance of at least 12 in/30 cm.Backup camera*The conceptThe backup camera provides assistance in park‐ing and maneuvering backwards. The area be‐hind the vehicle is shown on the Control Display.System limitsCheck the traffic situation as wellCheck the traffic situation around the ve‐hicle with your own eyes. Otherwise, an accidentcould result from road users or objects locatedoutside the picture area of the backup camera. ◀Detection of objectsHigh, protruding objects such as ledgesmay not be detected by the backup camera.◀Switching on automaticallySelect transmission position R with the enginerunning.The backup camera image is displayed if thesystem was switched on via the iDrive.Switching off automaticallyThe system switches off and the LED goes out:▷After approx. 33 ft/10 m when driving for‐ward.▷Above approx. 9 mph/15 km/h when drivingforward.Switch on the system again if necessary.Switching on/off manuallyPress the button.▷On: the LED lights up.▷Off: the LED goes out.The PDC is shown on the Control Display.Switch on the backup camera via the iDrive, referto page 97.Seite 9595Online Edition for Part no. 01 40 2 606 190 - 12 10 500 ReferenceMobilityCommunicationEntertainmentNavigationDriving tipsControlsAt a glance
参考になったと評価  50人が参考になったと評価しています。


このマニュアルの目次
-
1 .Owner's Manual forVehicle...Owner's Manual forVehicleThe Ultimate DrivingMachineContentsA-ZOnline Edition for Part no. 01 40 2 606 190 - 12 10 500
-
2 .2 ページ目のマニュアル
-
3 .X3 xDrive28iX3 xDrive35iO...X3 xDrive28iX3 xDrive35iOwner's Manual for VehicleThank you for choosing a BMW.The more familiar you are with your vehicle, the better control youwill have on the road. We therefore strongly suggest:Read this Owner's Manual before starting off in your new ...
-
4 .© 2010 Bayerische Motoren...© 2010 Bayerische Motoren WerkeAktiengesellschaftMunich, GermanyReprinting, including excerpts, only with the writtenconsent of BMW AG, Munich.US English XI/10, 12 10 500Printed on environmentally friendly paper, bleachedwithout chlorine, suitable for recy...
-
5 .ContentsThe fastest way t...ContentsThe fastest way to find information on a partic‐ular topic or item is by using the index, refer topage 252 .Using this Owner's Manual6 NotesAt a glance12 Cockpit19 iDrive25 Voice activation system27 Integrated Owner's Manual in the vehicleControls...
-
6 .NotesUsing this Owner's M...NotesUsing this Owner's ManualThe fastest way to find information on a partic‐ular topic is by using the index.An initial overview of the vehicle is provided inthe first chapter.Additional sources of informationShould you have any questions, your servicece...
-
7 .If this work is not carri...If this work is not carried out properly, there isthe danger of subsequent damage and relatedsafety hazards.Parts and AccessoriesFor your own safety, use genuine parts and ac‐cessories approved by BMW. When you pur‐chase accessories tested and approved byB...
-
8 .Reporting safety defectsF...Reporting safety defectsFor US customersThe following only applies to vehicles ownedand operated in the US.If you believe that your vehicle has a defectwhich could cause a crash or could cause injuryor death, you should immediately inform the Na‐tional Hig...
-
9 .Seite 99Online Edition fo...Seite 99Online Edition for Part no. 01 40 2 606 190 - 12 10 500 ReferenceMobilityCommunicationEntertainmentNavigationDriving tipsControlsAt a glance
-
11 .At a glanceThese overview...At a glanceThese overviews of buttons, switches anddisplays are intended to familiarize you with yourvehicle. You will also become quickly acquaintedwith the available control concepts and options.Online Edition for Part no. 01 40 2 606 190 - 12 10 500
-
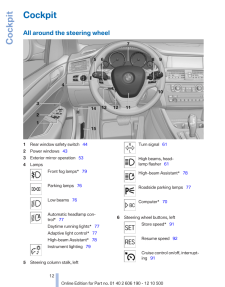
12 .CockpitAll around the ste...CockpitAll around the steering wheel1 Rear window safety switch 442 Power windows 433 Exterior mirror operation 534 LampsFront fog lamps* 79Parking lamps 76Low beams 76Automatic headlamp con‐trol* 77Daytime running lights* 77Adaptive light ...
-
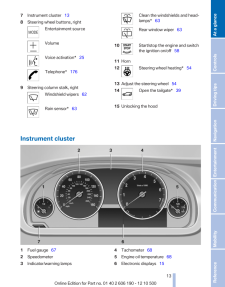
13 .7 Instrument cluster 13...7 Instrument cluster 138 Steering wheel buttons, rightEntertainment sourceVolumeVoice activation* 25Telephone* 1769 Steering column stalk, rightWindshield wipers 62Rain sensor* 63Clean the windshields and head‐lamps* 63Rear window wiper 6310 ...
-
14 .7 External temperature ...7 External temperature 69 Time 698 Miles, trip miles 689 Reset miles 68Indicator/warning lampsInstrument clusterThe indicator and warning lamps can light up ina variety of combinations and colors.Several of the lamps are checked for properfunctioni...
-
15 .message and the meaning o...message and the meaning of the indicator andwarning lamps.Supplementary text messagesAdditional information on the Control Display,e.g., on the cause of a malfunction or the re‐quired action, can be called up via Check Con‐trol, refer to page 74.The text ...
-
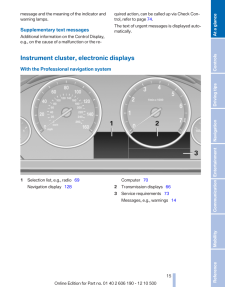
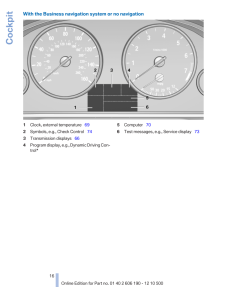
16 .With the Business navigat...With the Business navigation system or no navigation1 Clock, external temperature 692 Symbols, e.g., Check Control 743 Transmission displays 664 Program display, e.g., Dynamic Driving Con‐trol*5 Computer 706 Test messages, e.g., Service display 7...
-
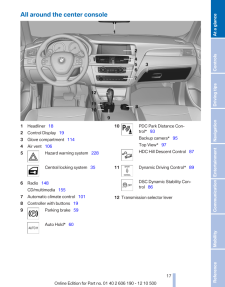
17 .All around the center con...All around the center console1 Headliner 182 Control Display 193 Glove compartment 1144 Air vent 1065 Hazard warning system 228Central locking system 356 Radio 148CD/multimedia 1557 Automatic climate control 1018 Controller with buttons ...
-
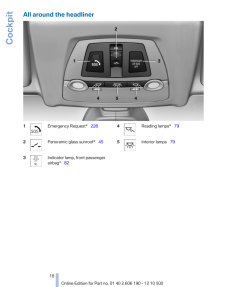
18 .All around the headliner1...All around the headliner1 Emergency Request* 2282 Panoramic glass sunroof* 453 Indicator lamp, front passengerairbag* 824 Reading lamps* 795 Interior lamps 79Seite 1818Online Edition for Part no. 01 40 2 606 190 - 12 10 500Cockpit
-
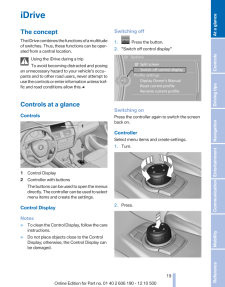
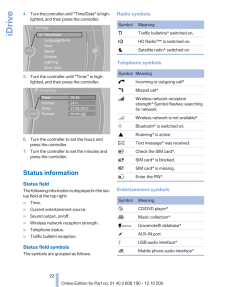
19 .iDriveThe conceptThe iDri...iDriveThe conceptThe iDrive combines the functions of a multitudeof switches. Thus, these functions can be oper‐ated from a central location.Using the iDrive during a tripTo avoid becoming distracted and posingan unnecessary hazard to your vehicle's occu‐p...
-
20 .3. Move in four direction...3. Move in four directions.Buttons on controllerPress the button FunctionMENU Open the main menu.RADIO Opens the Radio menu.CD Opens the CD/Multimediamenu.NAV Opens the Navigation mapview.TEL Opens the Telephonemenu.BACK Displays the previouspanel.OPTION O...
-
21 .White arrows pointing to ...White arrows pointing to the left or right indicatethat additional panels can be opened.View of an opened menuWhen a menu is opened, it generally opens withthe panel that was last selected in that menu. Todisplay the first panel of a menu:▷Move the control...
-
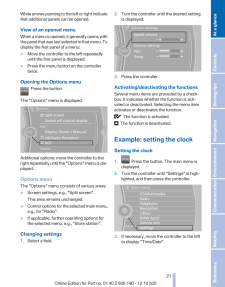
22 .4. Turn the controller un...4. Turn the controller until "Time/Date" is high‐lighted, and then press the controller.5. Turn the controller until "Time:" is high‐lighted, and then press the controller.6. Turn the controller to set the hours andpress the controller.7. Turn the contro...
-
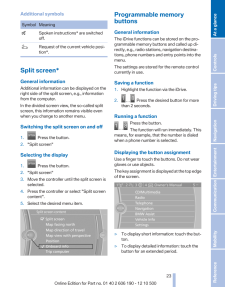
23 .Additional symbolsSymbol ...Additional symbolsSymbol Meaning Spoken instructions* are switchedoff. Request of the current vehicle posi‐tion*.Split screen*General informationAdditional information can be displayed on theright side of the split screen, e.g., informationfrom the compu...
-
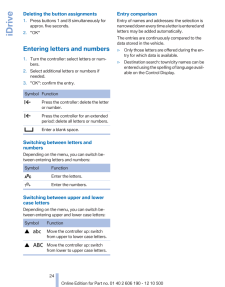
24 .Deleting the button assig...Deleting the button assignments1. Press buttons 1 and 8 simultaneously forapprox. five seconds.2. "OK"Entering letters and numbers1. Turn the controller: select letters or num‐bers.2. Select additional letters or numbers ifneeded.3. "OK": confirm the entry...
-
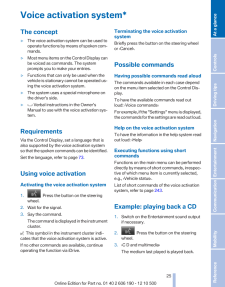
25 .Voice activation system*T...Voice activation system*The concept▷The voice activation system can be used tooperate functions by means of spoken com‐mands.▷Most menu items on the Control Display canbe voiced as commands. The systemprompts you to make your entries.▷Functions that can on...
-
26 .4. Press the button on ...4. Press the button on the steeringwheel.5. ›C D track ...‹ e.g., CD track 4.Setting the voice dialogYou can set whether the system should use thestandard dialog or a shorter version.In the shorter variant of the voice dialog, the an‐nouncements from the...
-
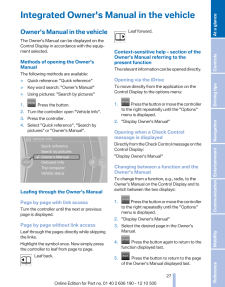
27 .Integrated Owner's Manual...Integrated Owner's Manual in the vehicleOwner's Manual in the vehicleThe Owner's Manual can be displayed on theControl Display in accordance with the equip‐ment selected.Methods of opening the Owner'sManualThe following methods are available:▷Quick referen...
-
28 .To switch back and forth ...To switch back and forth repeatedly betweenthe function displayed last and the page of theOwner's Manual displayed last, repeat steps 4and 5. This opens a new panel every time.Programmable memory buttonsGeneral informationThe Owner's Manual can be stored a...
-
29 .Seite 2929Online Edition ...Seite 2929Online Edition for Part no. 01 40 2 606 190 - 12 10 500 ReferenceMobilityCommunicationEntertainmentNavigationDriving tipsControlsAt a glance
-
31 .ControlsThis chapter is i...ControlsThis chapter is intended to provide you withinformation that will give you complete control ofyour vehicle. All features and accessories that areuseful for driving and your safety, comfort andconvenience are described here.Online Edition for Part n...
-
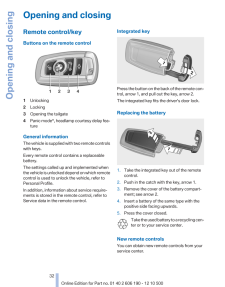
32 .Opening and closingRemote...Opening and closingRemote control/keyButtons on the remote control1 Unlocking2 Locking3 Opening the tailgate4 Panic mode*, headlamp courtesy delay fea‐tureGeneral informationThe vehicle is supplied with two remote controlswith keys.Every remote control con...
-
33 .Loss of the remote contro...Loss of the remote controlsLost remote controls can be blocked by yourservice center.Emergency detection of remote controlIt is possible to switch on the ignition or start theengine in situations such as the following:▷Interference of radio transmission to...
-
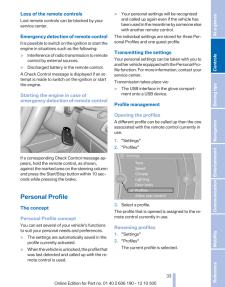
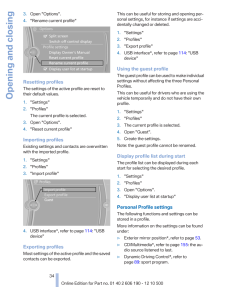
34 .3. Open "Options".4. "Ren...3. Open "Options".4. "Rename current profile"Resetting profilesThe settings of the active profile are reset totheir default values.1. "Settings"2. "Profiles"The current profile is selected.3. Open "Options".4. "Reset current profile"Importing profilesExist...
-
35 .▷Driver's seat position, ...▷Driver's seat position, refer to page 37: au‐tomatically retrieved after unlocking.▷Programmable memory buttons, refer topage 23: assignment.▷Head-up Display*, refer to page 99: selec‐tion, brightness and position of the display.▷Headlamp courtesy dela...
-
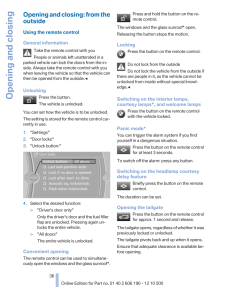
36 .Opening and closing: from...Opening and closing: from theoutsideUsing the remote controlGeneral informationTake the remote control with youPeople or animals left unattended in aparked vehicle can lock the doors from the in‐side. Always take the remote control with youwhen leaving the...
-
37 .In some vehicle equipment...In some vehicle equipment variants, the tailgatecan only be opened using the remote control ifthe vehicle was unlocked first.To avoid locking yourself out of the vehicle, donot place the remote control into the cargo area.The tailgate is locked again as so...
-
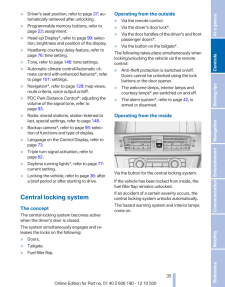
38 .Any unauthorized modifica...Any unauthorized modifications or changes tothese devices could void the user's authority tooperate this equipment.Using the door lockGeneral informationDo not lock from the outsideDo not lock the vehicle from the outside ifthere are people in it, as the v...
-
39 .2. "Door locks"3. Select ...2. "Door locks"3. Select the desired function:▷"Lock if no door is opened"The vehicle locks automatically after ashort period of time if a door is notopened.▷"Lock after start. to drive"The vehicle locks automatically afteryou drive away.TailgateOpeningThe...
-
40 .The vehicle is locked com...The vehicle is locked completely.Automatic trunk lid operation*Adjusting the opening heightYou can set how far the tailgate should open.Adjusting the opening heightWhen adjusting the opening height, en‐sure that there is a clearance of at least 4 in/10 cm ...
-
41 .The closing process is no...The closing process is not interrupted when thevehicle starts moving.Danger of pinchingMake sure that the closing path of the tail‐gate is clear; otherwise, injuries may result.◀Do not place the remote control in thecargo areaTake the remote control with y...
-
42 .This corresponds to press...This corresponds to pressing the button.Do not place the remote control in thecargo areaTake the remote control with you and do notleave it in the cargo area; otherwise, the remotecontrol may be locked inside the vehicle whenthe tailgate is closed.◀Ign...
-
43 .Indicator lamp on the int...Indicator lamp on the interior rearviewmirror▷The indicator lamp flashes briefly every2 seconds:The system is armed.▷The indicator lamp flashes after locking:The doors, hood or tailgate is not closedproperly, but the rest of the vehicle is se‐cured.After 1
-
44 .▷ Pull the switch beyon...▷ Pull the switch beyond the resistancepoint.The window closes automatically.Pressing the switch stops the motion.Convenient operation, refer to page 36, via theremote control.Convenient closing, refer to page 41, with Com‐fort Access*.Pinch protectio...
-
45 .Panoramic glass sunroof*G...Panoramic glass sunroof*General informationThe glass sunroof and the sliding visor can beoperated together or separately, using the sameswitch.The glass sunroof is operational when the igni‐tion is switched on.Danger of pinchingMonitor the closing process ...
-
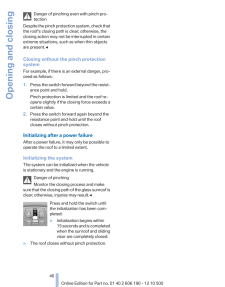
46 .Danger of pinching even w...Danger of pinching even with pinch pro‐tectionDespite the pinch protection system, check thatthe roof's closing path is clear; otherwise, theclosing action may not be interrupted in certainextreme situations, such as when thin objectsare present.◀Closing w...
-
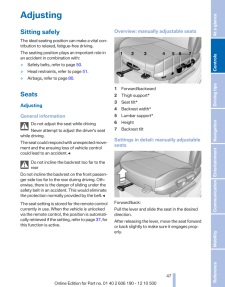
47 .AdjustingSitting safelyTh...AdjustingSitting safelyThe ideal seating position can make a vital con‐tribution to relaxed, fatigue-free driving.The seating position plays an important role inan accident in combination with:▷Safety belts, refer to page 50.▷Head restraints, refer to pag...
-
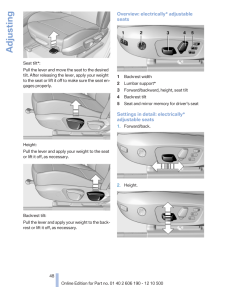
48 .Seat tilt*:Pull the lever...Seat tilt*:Pull the lever and move the seat to the desiredtilt. After releasing the lever, apply your weightto the seat or lift it off to make sure the seat en‐gages properly.Height:Pull the lever and apply your weight to the seator lift it off, as necessa...
-
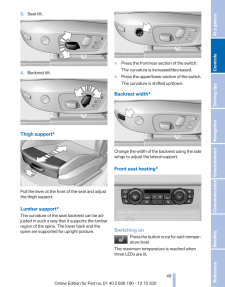
49 .3. Seat tilt.4. Backrest ...3. Seat tilt.4. Backrest tilt.Thigh support*Pull the lever at the front of the seat and adjustthe thigh support.Lumbar support*The curvature of the seat backrest can be ad‐justed in such a way that it supports the lumbarregion of the spine. The lower back ...
-
50 .Switching offPress the bu...Switching offPress the button longer.The LEDs go out.Rear seat heating*Switching onPress the button once for each temper‐ature level.The maximum temperature is reached whenthree LEDs are lit.Switching offPress the button longer.The LEDs go out.Safety belts...
-
51 .Unbuckling the belt1. Hol...Unbuckling the belt1. Hold the belt firmly.2. Press the red button in the belt buckle.3. Guide the belt back into its reel.Safety belt reminder for the driver's andfront passenger seatThe indicator lamp flashes or lights upand a signal sounds. Make sure th...
-
52 .Adjusting the height: out...Adjusting the height: outer headrestraints▷To raise: pull.▷To lower: press the button, arrow 1, andpush the head restraint down.RemovingOnly remove the head restraint if no one will besitting in the seat in question.1. Pull the head restraint upward as far...
-
53 .Safety mode1. Close the d...Safety mode1. Close the driver's door or switch on the ig‐nition.2. Press and hold the desired button 1 or 2 untilthe adjustment procedure is completed.Calling up of a seat positiondeactivatedAfter a brief period, the calling up of stored seatpositions is ...
-
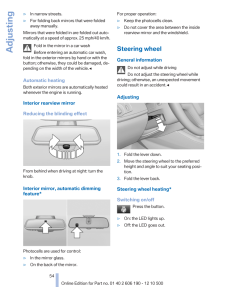
54 .▷In narrow streets.▷For f...▷In narrow streets.▷For folding back mirrors that were foldedaway manually.Mirrors that were folded in are folded out auto‐matically at a speed of approx. 25 mph/40 km/h.Fold in the mirror in a car washBefore entering an automatic car wash,fold in the exte...
-
55 .Transporting children saf...Transporting children safelyThe right place for childrenNoteChildren in the vehicleDo not leave children unattended in thevehicle; otherwise, they could endanger them‐selves and other persons, e.g., by opening thedoors.◀Children should always be in the rea...
-
56 .Backrest width*Before ins...Backrest width*Before installing a child restraint fixing system inthe front passenger seat, open the backrestwidth completely. Do not change the backrestwidth again and do not call up a memory posi‐tion.Backrest width for the child seatBefore installing a...
-
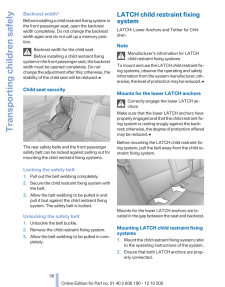
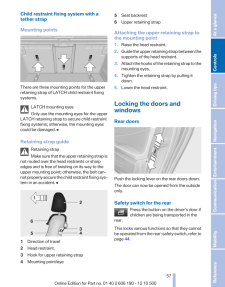
57 .Child restraint fixing sy...Child restraint fixing system with atether strapMounting pointsThere are three mounting points for the upperretaining strap of LATCH child restraint fixingsystems.LATCH mounting eyesOnly use the mounting eyes for the upperLATCH retaining strap to secure ch...
-
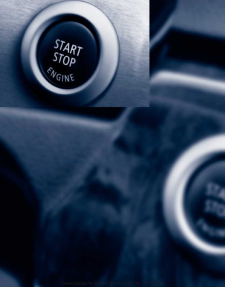
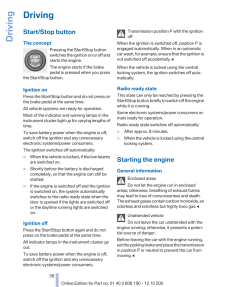
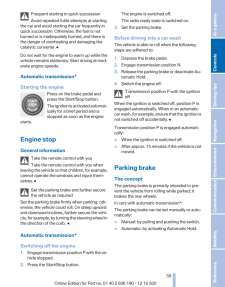
58 .DrivingStart/Stop buttonT...DrivingStart/Stop buttonThe conceptPressing the Start/Stop buttonswitches the ignition on or off andstarts the engine.The engine starts if the brakepedal is pressed when you pressthe Start/Stop button.Ignition onPress the Start/Stop button and do not press...
-
59 .Frequent starting in quic...Frequent starting in quick successionAvoid repeated futile attempts at startingthe car and avoid starting the car frequently inquick succession. Otherwise, the fuel is notburned or is inadequately burned, and there isthe danger of overheating and damaging ...
-
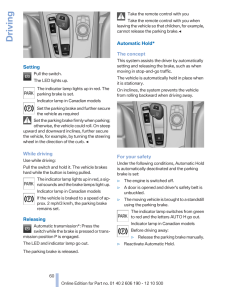
60 .SettingPull the switch.Th...SettingPull the switch.The LED lights up.The indicator lamp lights up in red. Theparking brake is set.Indicator lamp in Canadian modelsSet the parking brake and further securethe vehicle as requiredSet the parking brake firmly when parking;otherwise, the v...
-
61 .Leaving the vehicle with ...Leaving the vehicle with the engine run‐ningBefore leaving the vehicle with the engine run‐ning, engage position P of the automatic trans‐mission and ensure that the parking brake is set.Otherwise, the vehicle may begin to roll.◀ActivatingThis function can...
-
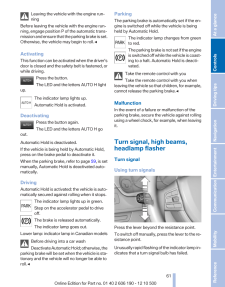
62 .Triple turn signal activa...Triple turn signal activationPress the lever to the resistance point.The turn signal flashes three times.The function can be activated or deactivated:1."Settings"2. "Lighting"3. "Triple turn signal"Signaling brieflyPress the lever to the resistance point a...
-
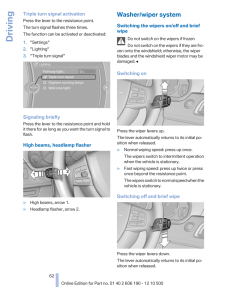
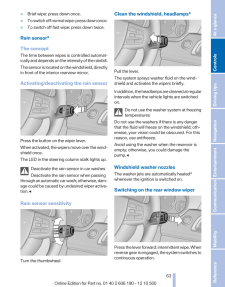
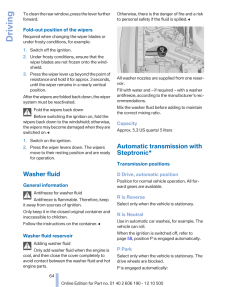
63 .▷Brief wipe: press down o...▷Brief wipe: press down once.▷To switch off normal wipe: press down once.▷To switch off fast wipe: press down twice.Rain sensor*The conceptThe time between wipes is controlled automat‐ically and depends on the intensity of the rainfall.The sensor is locate...
-
64 .To clean the rear window,...To clean the rear window, press the lever furtherforward.Fold-out position of the wipersRequired when changing the wiper blades orunder frosty conditions, for example.1. Switch off the ignition.2. Under frosty conditions, ensure that thewiper blades are no...
-
65 .▷After the engine is swit...▷After the engine is switched off, if the car isin radio ready state, refer to page 58, or if theignition is switched off, refer to page 58, andif position R or D is engaged.▷If the ignition is switched off and position Nis engaged.▷If the safety belt is...
-
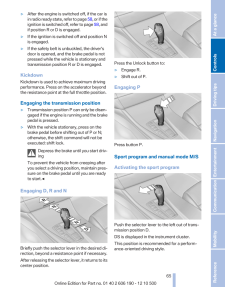
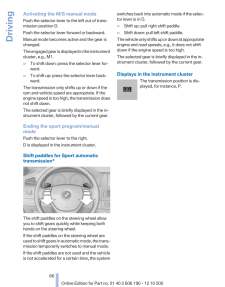
66 .Activating the M/S manual...Activating the M/S manual modePush the selector lever to the left out of trans‐mission position D.Push the selector lever forward or backward.Manual mode becomes active and the gear ischanged.The engaged gear is displayed in the instrumentcluster, e.g., M1...
-
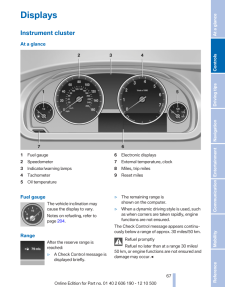
67 .DisplaysInstrument cluste...DisplaysInstrument clusterAt a glance1 Fuel gauge2 Speedometer3 Indicator/warning lamps4 Tachometer5 Oil temperature6 Electronic displays7 External temperature, clock8 Miles, trip miles9 Reset milesFuel gaugeThe vehicle inclination maycause the display to ...
-
68 .Displaying the cruising r...Displaying the cruising range1. "Settings"2. "Info display"3. "Additional indicators"TachometerAlways avoid engine speeds in the red warningfield. In this range, the fuel supply is interruptedto protect the engine.Current fuel consumptionDisplays the curre...
-
69 .Resetting the trip odomet...Resetting the trip odometerPress the knob.▷The odometer is displayedwhen the ignition is switchedoff.▷When the ignition is switchedon, the trip odometer is reset.External temperatureExternal temperature warningIf the display drops to +37 ℉/+3 ℃, a signal s...
-
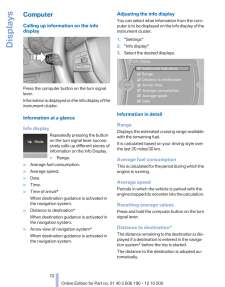
70 .ComputerCalling up inform...ComputerCalling up information on the infodisplayPress the computer button on the turn signallever.Information is displayed on the info display of theinstrument cluster.Information at a glanceInfo displayRepeatedly pressing the buttonon the turn signal lev...
-
71 .Time of arrival*The estim...Time of arrival*The estimated time of arrival isdisplayed if a destination is en‐tered in the navigation system*before the trip is started.The time must be correctly set.Speed limitDisplay of a speed limit which, when reached,should cause a warning to be i...
-
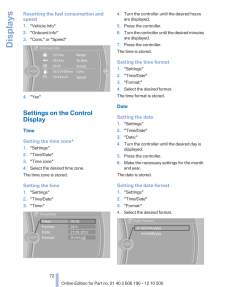
72 .Resetting the fuel consum...Resetting the fuel consumption andspeed1. "Vehicle Info"2. "Onboard info"3."Cons." or "Speed"4. "Yes"Settings on the ControlDisplayTimeSetting the time zone*1. "Settings"2. "Time/Date"3. "Time zone"4.Select the desired time zone.The time zone is stored.Set...
-
73 .The date format is stored...The date format is stored.LanguageSetting the languageTo set the language on the Control Display:1. "Settings"2. "Language/Units"3. "Language:"4. Select the desired language.The setting is stored for the remote control cur‐rently in use.Units of measureSet...
-
74 .Data regarding the mainte...Data regarding the maintenance status or legallymandated inspections of the vehicle are auto‐matically transmitted to your service center be‐fore a service due date, Automatic Service Re‐quest, refer to page 195 .Detailed information on servicerequirement...
-
75 .Several of the lamps are ...Several of the lamps are checked for properfunctioning and light up temporarily when theengine is started or the ignition is switched on.Text messagesText messages in combination with a symbol inthe instrument cluster explain a Check Controlmessage and the...
-
76 .LampsAt a glance1 Rear fo...LampsAt a glance1 Rear fog lamps*2 Front fog lamps*3 Automatic headlamp control/adaptive lightcontrol*/High-beam Assistant*/welcomelamps*/daytime running lights4 Lamps off/daytime running lights*5 Parking lamps/daytime running lights*6 Low beams/welcome la...
-
77 .The setting is stored for...The setting is stored for the remote control cur‐rently in use.Automatic headlamp controlSwitch position : the low beams are switchedon and off automatically, e.g., in tunnels, in twi‐light or if there is precipitation. The indicatorlamp in the instrume...
-
78 .To avoid blinding oncomin...To avoid blinding oncoming traffic, the adaptivelight control directs light towards the front pas‐senger side when the vehicle is at a standstill.When driving in reverse, only the turning lamp isactive.MalfunctionA Check Control message is displayed.Adapti...
-
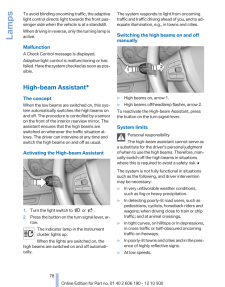
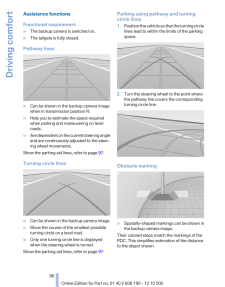
79 .▷When the windshield in f...▷When the windshield in front of the interiorrearview mirror is fogged over, dirty or cov‐ered with stickers, etc.CameraThe camera is located on the front of the interiorrearview mirror.Keep the area in front of the interior rearviewmirror clear.Fog lampsF...
-
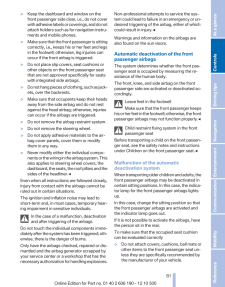
80 .SafetyAirbags1 Front airb...SafetyAirbags1 Front airbag, driver2 Front airbag, front passenger3 Head airbag4 Side airbag5 Knee airbagsFront airbagsFront airbags help protect the driver and frontpassenger by responding to frontal impacts inwhich safety belts alone cannot provide ade‐q...
-
81 .▷Keep the dashboard and w...▷Keep the dashboard and window on thefront passenger side clear, i.e., do not coverwith adhesive labels or coverings, and do notattach holders such as for navigation instru‐ments and mobile phones.▷Make sure that the front passenger is sittingcorrectly, i....
-
82 .▷Do not place objects und...▷Do not place objects under the seat thatcould press against the seat from below.Indicator lamp for the front passengerairbagsThe indicator lamp for the front passenger air‐bags indicates the operating state of the frontpassenger airbags.The lamp indicates...
-
83 .System limitsSudden tire ...System limitsSudden tire damageSudden serious tire damage caused byexternal influences cannot be indicated in ad‐vance.◀The system does not operate correctly if it hasnot been reset. For example, a flat tire may beindicated despite correct tire inflation p...
-
84 .the next opportunity and ...the next opportunity and have them re‐placed if necessary.Run-flat tires*You can continue driving with a damaged tire atspeeds up to 50 mph/80 km/h.Do not continue driving without run-flattiresDo not continue driving if the vehicle is notequipped with run-...
-
85 .the vehicle manufacturer ...the vehicle manufacturer on the vehicle placardor tire inflation pressure label. (If your vehicle hastires of a different size than the size indicated onthe vehicle placard or tire inflation pressure la‐bel, you should determine the proper tire infla‐tion ...
-
86 .Driving stability control...Driving stability control systemsAntilock Brake System ABSABS prevents locking of the wheels during brak‐ing.The vehicle remains steerable even during fullbrake applications, thus increasing activesafety.ABS is operational every time you start the en‐gine....
-
87 .The system ensures maximu...The system ensures maximum forward momen‐tum on special road conditions, e.g., unplowedsnowy roads, but driving stability is limited.It is therefore necessary to drive with appropri‐ate caution.You may find it useful to briefly activate DTC un‐der the foll...
-
88 .▷Press up the rocker swit...▷Press up the rocker switch to the point ofresistance: the speed increases gradually.▷Press up the rocker switch past the point ofresistance: the speed increases while therocker switch is pressed.▷Press down the rocker switch to the point ofresistance: the...
-
89 .It also varies the steeri...It also varies the steering force required to turnthe wheels in accordance with the vehiclespeed.This results in a sporty steering response. In ad‐dition, it becomes easier to steer during parkingand maneuvering.Dynamic Driving Control*The conceptDynamic D...
-
90 .2. "SPORT mode"3. Configu...2. "SPORT mode"3. Configure the program.This configuration is retrieved when the sportprogram is activated.NORMALFor a balanced tuning with maximum driving sta‐bilization.Activating NORMALPress the button. NORMAL is activatedwhen the program display disapp...
-
91 .Driving comfortCruise con...Driving comfortCruise controlThe conceptThe system is functional at speeds beginning atapprox. 20 mph/30 km/h.It maintains the speed that was set using thecontrol elements on the steering wheel.The system brakes on downhill gradients if en‐gine braking act...
-
92 .Press the rocker switch w...Press the rocker switch while the system is in‐terrupted.When the system is switched on, the currentspeed is maintained and stored as the desiredspeed.It is displayed in the speedometer and brieflydisplayed in the instrument cluster, Displays inthe speedom...
-
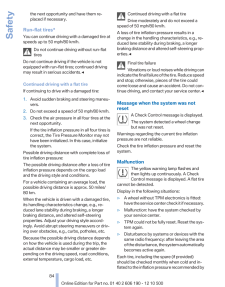
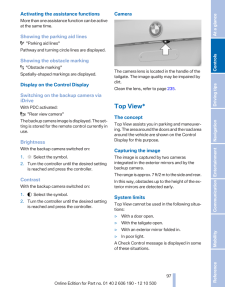
93 .Brief status displayBrief...Brief status displayBrief display in the speedometer:Selected desired speedIf --- appears briefly, conditions may not be ad‐equate to operate the system.PDC Park Distance Control*The conceptIn addition to the PDC Park Distance Control, thebackup camera*, r...
-
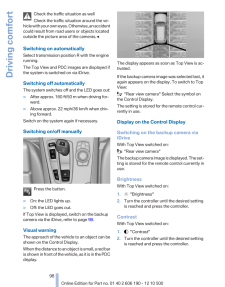
94 .▷After approx. 160 ft/50 ...▷After approx. 160 ft/50 m when driving for‐ward.▷Above approx. 22 mph/36 km/h when driv‐ing forward.Switch on the system again if necessary.Switching on/off manuallyPress the button.▷On: the LED lights up.▷Off: the LED goes out.Signal tonesWhen approachin...
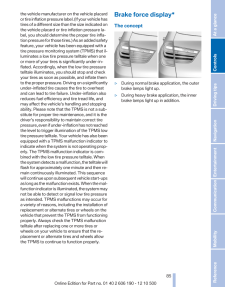
-
95 .Display on the Control Di...Display on the Control DisplaySwitching on the backup camera viaiDriveWith PDC activated: "Rear view camera"The backup camera image is displayed. The set‐ting is stored for the remote control currently inuse.MalfunctionA Check Control message, refer to pa...
-
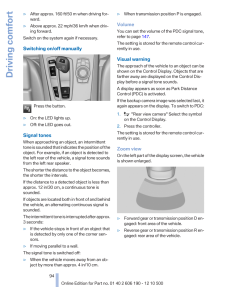
96 .Assistance functionsFunct...Assistance functionsFunctional requirement▷The backup camera is switched on.▷The tailgate is fully closed.Pathway lines▷Can be shown in the backup camera imagewhen in transmission position R.▷Help you to estimate the space requiredwhen parking and maneuver...
-
97 .Activating the assistance...Activating the assistance functionsMore than one assistance function can be activeat the same time.Showing the parking aid lines "Parking aid lines"Pathway and turning circle lines are displayed.Showing the obstacle marking "Obstacle marking"Spatially-sh...
-
98 .Check the traffic situati...Check the traffic situation as wellCheck the traffic situation around the ve‐hicle with your own eyes. Otherwise, an accidentcould result from road users or objects locatedoutside the picture area of the cameras.◀Switching on automaticallySelect transmissi...
-
99 .Displaying the turning ci...Displaying the turning circle andpathway lines▷The static, red turning circle line shows thespace needed to the side of the vehiclewhen the steering wheel is turned all theway.▷The variable, green pathway line assists youin assessing the amount of space ac...
-
100 .The brightness is adjuste...The brightness is adjusted.When the low beams are switched on, thebrightness of the Head-up Display can be addi‐tionally influenced using the instrument lighting,refer to page 79.The setting is stored for the remote control cur‐rently in use.Adjusting the...
