Z4の取扱説明書・マニュアル [全247ページ 11.67MB]


8


129 / 247 ページ
129 / 247 ページ


現在のページURL
4. Select an intermediate destination.5. "Reposition dest. in the trip"Deleting an intermediate destination1. "Map"2. "Guidance"3. "Display all trip destinations"4. Select an intermediate destination.5. "Delete dest. in the trip"Deleting a trip1. "Navigation"2. "Stored trips"3. Select the desired trip.4. Open "Options".5. "Delete all trips" or "Delete trip"Seite 129129Online Edition for Part no. 01 41 2 604 231 - 03 10 500 ReferenceMobilityCommunicationEntertainmentNavigationDriving tipsControlsAt a glance
参考になったと評価  11人が参考になったと評価しています。


このマニュアルの目次
-
1 .Owner's Manual forVehicle...Owner's Manual forVehicleThe Ultimate DrivingMachineContentsA-ZOnline Edition for Part no. 01 41 2 604 231 - 03 10 500
-
2 .2 ページ目のマニュアル
-
3 .Z4 sDrive30iZ4 sDrive35iZ...Z4 sDrive30iZ4 sDrive35iZ4 sDrive35isOwner's Manual for VehicleThank you for choosing a BMW.The more familiar you are with your vehicle, the better control youwill have on the road. We therefore strongly suggest:Read this Owner's Manual before starting off...
-
4 .© 2010 Bayerische Motoren...© 2010 Bayerische Motoren WerkeAktiengesellschaftMunich, GermanyReprinting, including excerpts, only with the writtenconsent of BMW AG, Munich.US English II/10, 03 10 500Printed on environmentally friendly paper, bleachedwithout chlorine, suitable for recy...
-
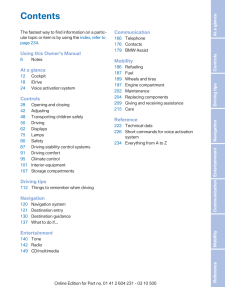
5 .ContentsThe fastest way t...ContentsThe fastest way to find information on a partic‐ular topic or item is by using the index, refer topage 234 .Using this Owner's Manual6 NotesAt a glance12 Cockpit18 iDrive24 Voice activation systemControls28 Opening and closing42 Adjusting48 Transp...
-
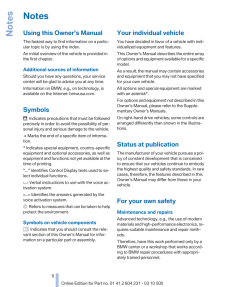
6 .NotesUsing this Owner's M...NotesUsing this Owner's ManualThe fastest way to find information on a partic‐ular topic is by using the index.An initial overview of the vehicle is provided inthe first chapter.Additional sources of informationShould you have any questions, your servicece...
-
7 .If this work is not carri...If this work is not carried out properly, there isthe danger of subsequent damage and relatedsafety hazards.Parts and accessoriesBMW recommends using parts and accessoriesapproved by BMW for this purpose.Your BMW center is the right contact for genu‐ine BM...
-
8 .▷Federal Emissions Perfor...▷Federal Emissions Performance Warranty▷California Emission Control System LimitedWarrantyDetailed information about these warranties islisted in the Service and Warranty InformationBooklet for US models or in the Warranty andService Guide Booklet for Cana...
-
9 .Seite 99Online Edition fo...Seite 99Online Edition for Part no. 01 41 2 604 231 - 03 10 500 ReferenceMobilityCommunicationEntertainmentNavigationDriving tipsControlsAt a glance
-
11 .At a glanceThese overview...At a glanceThese overviews of buttons, switches anddisplays are intended to familiarize you with yourvehicle. You will also become quickly acquaintedwith the available control concepts and options.11Online Edition for Part no. 01 41 2 604 231 - 03 10 500
-
12 .CockpitAll around the ste...CockpitAll around the steering wheel1 Opening and closing windowsjointly 382 Opening and closing rear win‐dows 383 Opening and closing front win‐dows 384 Exterior mirrors, folding in and out* 455 Adjust the exterior mirrors, Automatic CurbMonitor* 456...
-
13 .7 Turn signal 53High bea...7 Turn signal 53High beams, head‐lamp flasher 77High-beam Assistant* 77Roadside parking lamps* 77Computer 63Settings and information aboutthe vehicle 658 Instrument cluster 149 Buttons* on the steering wheelChange the radio stationSelect a music tra...
-
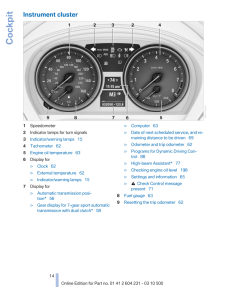
14 .Instrument cluster1 Speed...Instrument cluster1 Speedometer2 Indicator lamps for turn signals3 Indicator/warning lamps 154 Tachometer 625 Engine oil temperature 636 Display for▷Clock 62▷External temperature 62▷Indicator/warning lamps 157 Display for▷Automatic transmission posi‐...
-
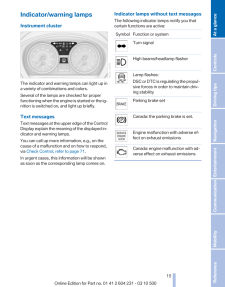
15 .Indicator/warning lampsIn...Indicator/warning lampsInstrument clusterThe indicator and warning lamps can light up ina variety of combinations and colors.Several of the lamps are checked for properfunctioning when the engine is started or the ig‐nition is switched on, and light up bri...
-
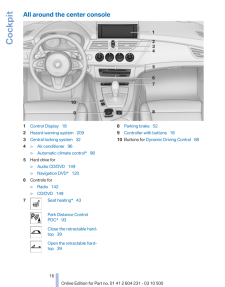
16 .All around the center con...All around the center console1 Control Display 182 Hazard warning system 2093 Central locking system 324 ▷Air conditioner 96▷Automatic climate control* 985 Hard drive for▷Audio CD/DVD 149▷Navigation DVD* 1206 Controls for▷Radio 142▷CD/DVD 1497 Sea...
-
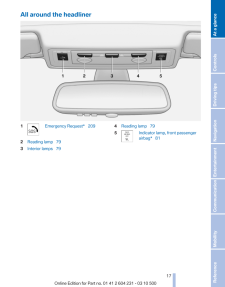
17 .All around the headliner1...All around the headliner1 Emergency Request* 2092 Reading lamp 793 Interior lamps 794 Reading lamp 795 Indicator lamp, front passengerairbag* 81Seite 1717Online Edition for Part no. 01 41 2 604 231 - 03 10 500 ReferenceMobilityCommunicationEntertainme...
-
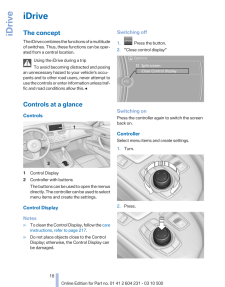
18 .iDriveThe conceptThe iDri...iDriveThe conceptThe iDrive combines the functions of a multitudeof switches. Thus, these functions can be oper‐ated from a central location.Using the iDrive during a tripTo avoid becoming distracted and posingan unnecessary hazard to your vehicle's occu‐p...
-
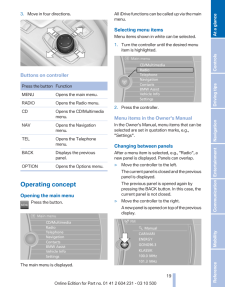
19 .3. Move in four direction...3. Move in four directions.Buttons on controllerPress the button FunctionMENU Opens the main menu.RADIO Opens the Radio menu.CD Opens the CD/Multimediamenu.NAV Opens the Navigationmenu.TEL Opens the Telephonemenu.BACK Displays the previouspanel.OPTION Open...
-
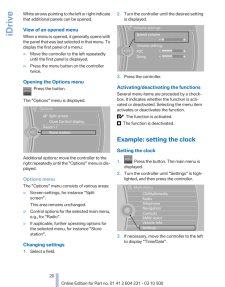
20 .White arrows pointing to ...White arrows pointing to the left or right indicatethat additional panels can be opened.View of an opened menuWhen a menu is opened, it generally opens withthe panel that was last selected in that menu. Todisplay the first panel of a menu:▷Move the control...
-
21 .4. Turn the controller un...4. Turn the controller until "Time/Date" is high‐lighted, and then press the controller.5. Turn the controller until "Time:" is high‐lighted, and then press the controller.6. Turn the controller to set the hours andpress the controller.7. Turn the contro...
-
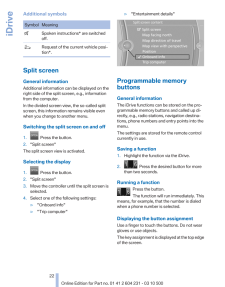
22 .Additional symbolsSymbol ...Additional symbolsSymbol Meaning Spoken instructions* are switchedoff. Request of the current vehicle posi‐tion*.Split screenGeneral informationAdditional information can be displayed on theright side of the split screen, e.g., informationfrom the comput...
-
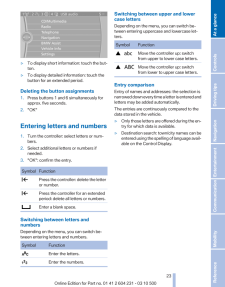
23 .▷To display short informa...▷To display short information: touch the but‐ton.▷To display detailed information: touch thebutton for an extended period.Deleting the button assignments1. Press buttons 1 and 6 simultaneously forapprox. five seconds.2. "OK"Entering letters and numbers1. T...
-
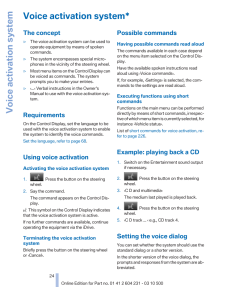
24 .Voice activation system*T...Voice activation system*The concept▷The voice activation system can be used tooperate equipment by means of spokencommands.▷The system encompasses special micro‐phones in the vicinity of the steering wheel.▷Most menu items on the Control Display canbe voic...
-
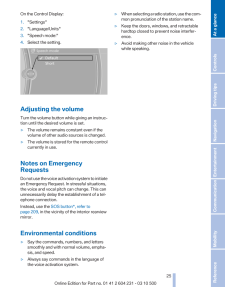
25 .On the Control Display:1....On the Control Display:1. "Settings"2. "Language/Units"3. "Speech mode:"4.Select the setting.Adjusting the volumeTurn the volume button while giving an instruc‐tion until the desired volume is set.▷The volume remains constant even if thevolume of other aud...
-
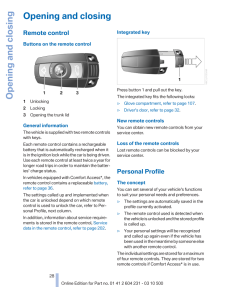
27 .ControlsThis chapter is i...ControlsThis chapter is intended to provide you withinformation that will give you complete control ofyour vehicle. All features and accessories that areuseful for driving and your safety, comfort andconvenience are described here.27Online Edition for Part...
-
28 .Opening and closingRemote...Opening and closingRemote controlButtons on the remote control1 Unlocking2 Locking3 Opening the trunk lidGeneral informationThe vehicle is supplied with two remote controlswith keys.Each remote control contains a rechargeablebattery that is automatically r...
-
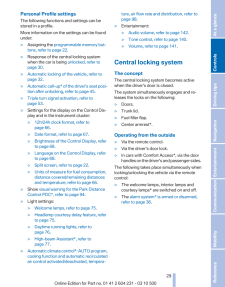
29 .Personal Profile settings...Personal Profile settingsThe following functions and settings can bestored in a profile.More information on the settings can be foundunder:▷Assigning the programmable memory but‐tons, refer to page 22 .▷Response of the central locking systemwhen the car i...
-
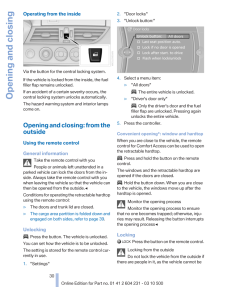
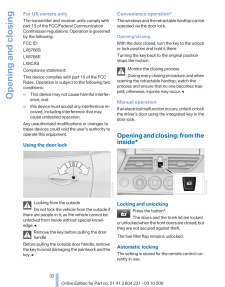
30 .Operating from the inside...Operating from the insideVia the button for the central locking system.If the vehicle is locked from the inside, the fuelfiller flap remains unlocked.If an accident of a certain severity occurs, thecentral locking system unlocks automatically.The hazard wa...
-
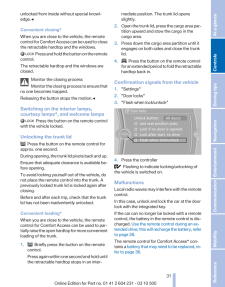
31 .unlocked from inside with...unlocked from inside without special knowl‐edge.◀Convenient closing*When you are close to the vehicle, the remotecontrol for Comfort Access can be used to closethe retractable hardtop and the windows. Press and hold the button on the remotecontrol.The ret...
-
32 .For US owners onlyThe tra...For US owners onlyThe transmitter and receiver units comply withpart 15 of the FCC/Federal CommunicationCommission regulations. Operation is governedby the following:FCC ID:LX8766SLX8766ELX8CASCompliance statement:This device complies with part 15 of the F...
-
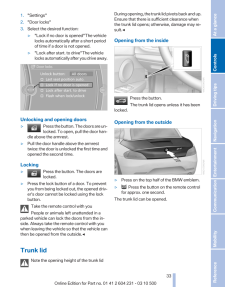
33 .1. "Settings"2. "Door loc...1. "Settings"2. "Door locks"3. Select the desired function:▷"Lock if no door is opened"The vehiclelocks automatically after a short periodof time if a door is not opened.▷"Lock after start. to drive"The vehiclelocks automatically after you drive away.Unloc...
-
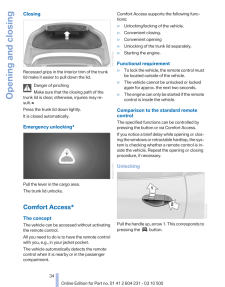
34 .ClosingRecessed grips in ...ClosingRecessed grips in the interior trim of the trunklid make it easier to pull down the lid.Danger of pinchingMake sure that the closing path of thetrunk lid is clear; otherwise, injuries may re‐sult.◀Press the trunk lid down lightly.It is closed automa...
-
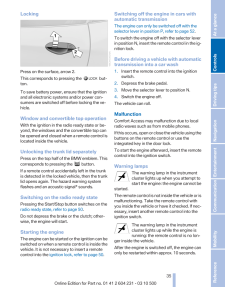
35 .LockingPress on the surfa...LockingPress on the surface, arrow 2.This corresponds to pressing the but‐ton.To save battery power, ensure that the ignitionand all electronic systems and/or power con‐sumers are switched off before locking the ve‐hicle.Window and convertible top opera...
-
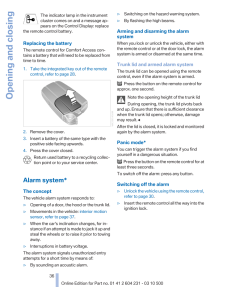
36 .The indicator lamp in the...The indicator lamp in the instrumentcluster comes on and a message ap‐pears on the Control Display: replacethe remote control battery.Replacing the batteryThe remote control for Comfort Access con‐tains a battery that will need to be replaced fromtime to t...
-
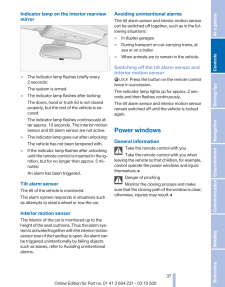
37 .Indicator lamp on the int...Indicator lamp on the interior rearviewmirror▷The indicator lamp flashes briefly every2 seconds:The system is armed.▷The indicator lamp flashes after locking:The doors, hood or trunk lid is not closedproperly, but the rest of the vehicle is se‐cured.The in...
-
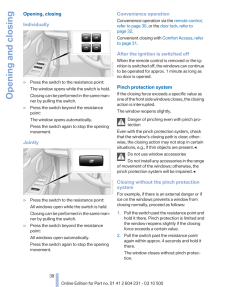
38 .Opening, closingIndividua...Opening, closingIndividually▷Press the switch to the resistance point:The window opens while the switch is held.Closing can be performed in the same man‐ner by pulling the switch.▷Press the switch beyond the resistancepoint:The window opens automatically.P...
-
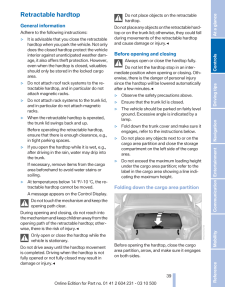
39 .Retractable hardtopGenera...Retractable hardtopGeneral informationAdhere to the following instructions:▷It is advisable that you close the retractablehardtop when you park the vehicle. Not onlydoes the closed hardtop protect the vehicleinterior against unanticipated weather dam‐age, ...
-
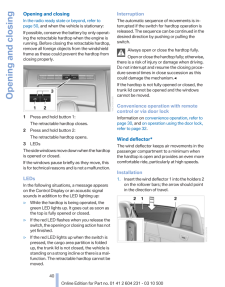
40 .Opening and closingIn the...Opening and closingIn the radio ready state or beyond, refer topage 50, and when the vehicle is stationary:If possible, conserve the battery by only operat‐ing the retractable hardtop when the engine isrunning. Before closing the retractable hardtop,remov...
-
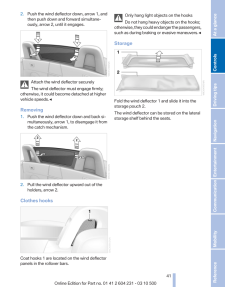
41 .2. Push the wind deflecto...2. Push the wind deflector down, arrow 1, andthen push down and forward simultane‐ously, arrow 2, until it engages.Attach the wind deflector securelyThe wind deflector must engage firmly;otherwise, it could become detached at highervehicle speeds.◀Removing...
-
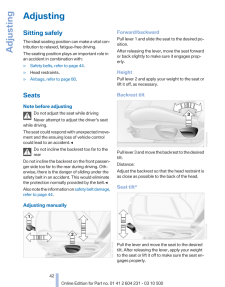
42 .AdjustingSitting safelyTh...AdjustingSitting safelyThe ideal seating position can make a vital con‐tribution to relaxed, fatigue-free driving.The seating position plays an important role inan accident in combination with:▷Safety belts, refer to page 44 .▷Head restraints.▷Airbags, ref...
-
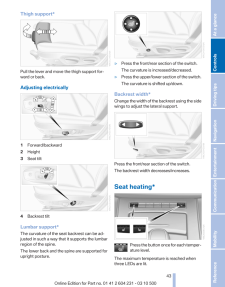
43 .Thigh support*Pull the le...Thigh support*Pull the lever and move the thigh support for‐ward or back.Adjusting electrically1 Forward/backward2 Height3 Seat tilt4 Backrest tiltLumbar support*The curvature of the seat backrest can be ad‐justed in such a way that it supports the lumbarr...
-
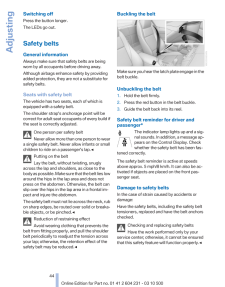
44 .Switching offPress the bu...Switching offPress the button longer.The LEDs go out.Safety beltsGeneral informationAlways make sure that safety belts are beingworn by all occupants before driving away.Although airbags enhance safety by providingadded protection, they are not a substitut...
-
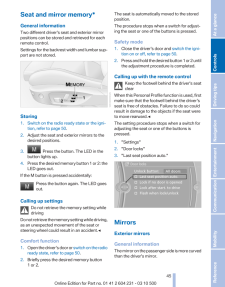
45 .Seat and mirror memory*Ge...Seat and mirror memory*General informationTwo different driver's seat and exterior mirrorpositions can be stored and retrieved for eachremote control.Settings for the backrest width and lumbar sup‐port are not stored.Storing1. Switch on the radio ready sta...
-
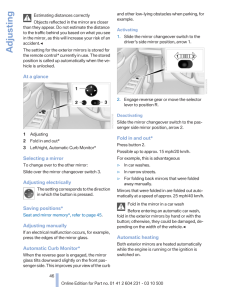
46 .Estimating distances corr...Estimating distances correctlyObjects reflected in the mirror are closerthan they appear. Do not estimate the distanceto the traffic behind you based on what you seein the mirror, as this will increase your risk of anaccident.◀The setting for the exterior ...
-
47 .Interior rearview mirrorR...Interior rearview mirrorReducing the blinding effectBlinding effect from behind when driving atnight: turn the knob.Interior rearview and exterior mirrors,automatic dimming feature*The automatic dimming feature of the interiorrearview and exterior mirrors*...
-
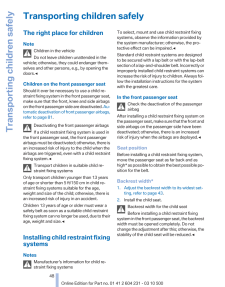
48 .Transporting children saf...Transporting children safelyThe right place for childrenNoteChildren in the vehicleDo not leave children unattended in thevehicle; otherwise, they could endanger them‐selves and other persons, e.g., by opening thedoors.◀Children on the front passenger seat...
-
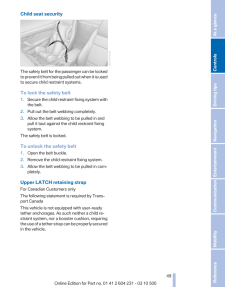
49 .Child seat securityThe sa...Child seat securityThe safety belt for the passenger can be lockedto prevent it from being pulled out when it is usedto secure child restraint systems.To lock the safety belt1. Secure the child restraint fixing system withthe belt.2. Pull out the belt webb...
-
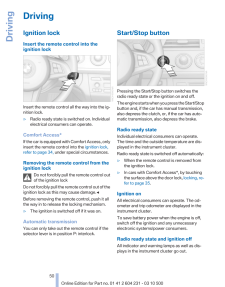
50 .DrivingIgnition lockInser...DrivingIgnition lockInsert the remote control into theignition lockInsert the remote control all the way into the ig‐nition lock.▷Radio ready state is switched on. Individualelectrical consumers can operate.Comfort Access*If the car is equipped with Comfor...
-
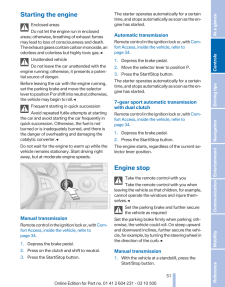
51 .Starting the engineEnclos...Starting the engineEnclosed areasDo not let the engine run in enclosedareas; otherwise, breathing of exhaust fumesmay lead to loss of consciousness and death.The exhaust gases contain carbon monoxide, anodorless and colorless but highly toxic gas.◀Unattend...
-
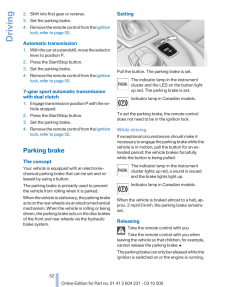
52 .2. Shift into first gear ...2. Shift into first gear or reverse.3. Set the parking brake.4. Remove the remote control from the ignitionlock, refer to page 50 .Automatic transmission1. With the car at a standstill, move the selectorlever to position P.2. Press the Start/Stop button.3...
-
53 .With manual transmissionP...With manual transmissionPress the button of the parking brake. Depressthe brake and clutch pedals while doing so.With automatic transmission or 7-gearsport automatic transmission with dualclutchPress the parking brake button while the brakeis depressed or ...
-
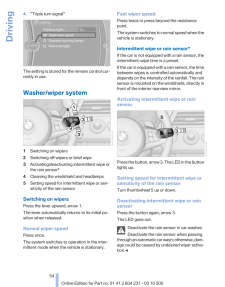
54 .4. "Triple turn signal"Th...4. "Triple turn signal"The setting is stored for the remote control cur‐rently in use.Washer/wiper system1 Switching on wipers2 Switching off wipers or brief wipe3 Activating/deactivating intermittent wipe orthe rain sensor*4 Cleaning the windshield and he...
-
55 .Cleaning the windshield a...Cleaning the windshield andheadlamps*Pull the lever, arrow 4.The system sprays washer fluid on the wind‐shield and activates the wipers briefly.When the vehicle lighting system is switched on,the headlamps are cleaned at regular and ap‐propriate intervals....
-
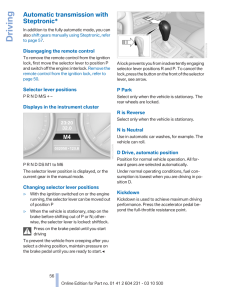
56 .Automatic transmission wi...Automatic transmission withSteptronic*In addition to the fully automatic mode, you canalso shift gears manually using Steptronic, referto page 57 .Disengaging the remote controlTo remove the remote control from the ignitionlock, first move the selector le...
-
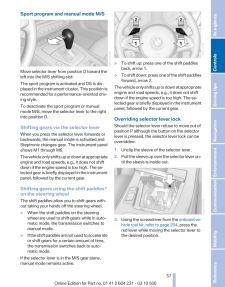
57 .Sport program and manual ...Sport program and manual mode M/SMove selector lever from position D toward theleft into the M/S shifting slot:The sport program is activated and DS is dis‐played in the instrument cluster. This position isrecommended for a performance-oriented driv‐ing st...
-
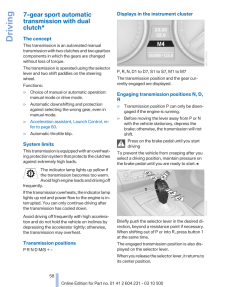
58 .7-gear sport automatictra...7-gear sport automatictransmission with dualclutch*The conceptThis transmission is an automated manualtransmission with two clutches and two gearboxcomponents in which the gears are changedwithout loss of torque.The transmission is operated using the selec...
-
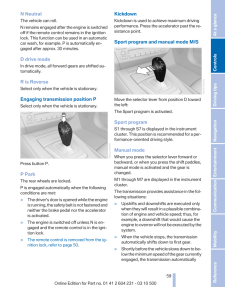
59 .N NeutralThe vehicle can ...N NeutralThe vehicle can roll.N remains engaged after the engine is switchedoff if the remote control remains in the ignitionlock. This function can be used in an automaticcar wash, for example. P is automatically en‐gaged after approx. 30 minutes.D drive ...
-
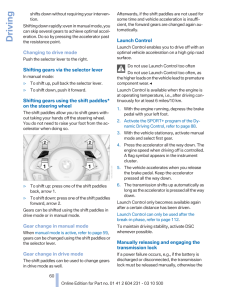
60 .shifts down without requi...shifts down without requiring your interven‐tion.Shifting down rapidly: even in manual mode, youcan skip several gears to achieve optimal accel‐eration. Do so by pressing the accelerator pastthe resistance point.Changing to drive modePush the selector leve...
-
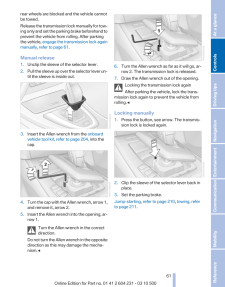
61 .rear wheels are blocked a...rear wheels are blocked and the vehicle cannotbe towed.Release the transmission lock manually for tow‐ing only and set the parking brake beforehand toprevent the vehicle from rolling. After parkingthe vehicle, engage the transmission lock againmanually, r...
-
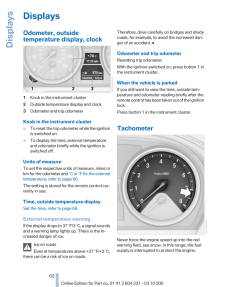
62 .DisplaysOdometer, outside...DisplaysOdometer, outsidetemperature display, clock1 Knob in the instrument cluster2 Outside temperature display and clock3 Odometer and trip odometerKnob in the instrument cluster▷To reset the trip odometer while the ignitionis switched on.▷To display the...
-
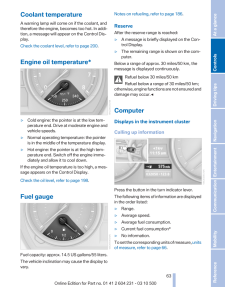
63 .Coolant temperatureA warn...Coolant temperatureA warning lamp will come on if the coolant, andtherefore the engine, becomes too hot. In addi‐tion, a message will appear on the Control Dis‐play.Check the coolant level, refer to page 200 .Engine oil temperature*▷Cold engine: the pointe...
-
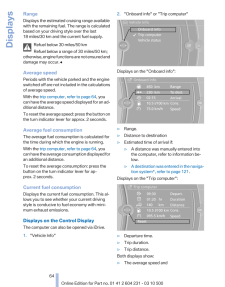
64 .RangeDisplays the estimat...RangeDisplays the estimated cruising range availablewith the remaining fuel. The range is calculatedbased on your driving style over the last18 miles/30 km and the current fuel supply.Refuel below 30 miles/50 kmRefuel below a range of 30 miles/50 km;otherw...
-
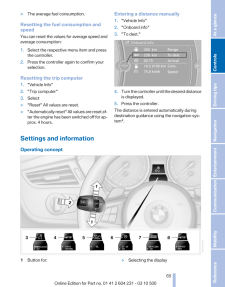
65 .▷The average fuel consump...▷The average fuel consumption.Resetting the fuel consumption andspeedYou can reset the values for average speed andaverage consumption:1. Select the respective menu item and pressthe controller.2. Press the controller again to confirm yourselection.Resetti...
-
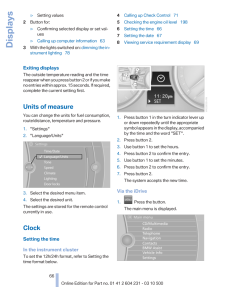
66 .▷Setting values2 Button f...▷Setting values2 Button for:▷Confirming selected display or set val‐ues▷Calling up computer information 633 With the lights switched on: dimming the in‐strument lighting 784 Calling up Check Control 715 Checking the engine oil level 1986 Setting the t...
-
67 .2. "Settings"Setting the ...2. "Settings"Setting the time1. "Settings"2. "Time/Date"3. "Time:"4. Turn the controller until the desired hoursare displayed, and then press the controller.5.Turn the controller until the desired minutesare displayed, and then press the controller.The tim...
-
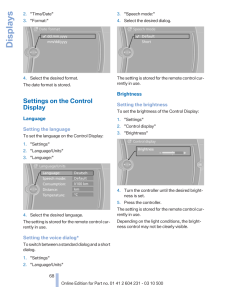
68 .2. "Time/Date"3. "Format:...2. "Time/Date"3. "Format:"4. Select the desired format.The date format is stored.Settings on the ControlDisplayLanguageSetting the languageTo set the language on the Control Display:1. "Settings"2. "Language/Units"3. "Language:"4.Select the desired languag...
-
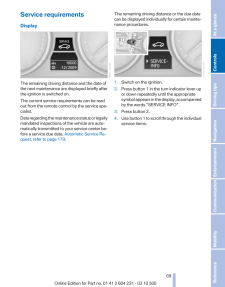
69 .Service requirementsDispl...Service requirementsDisplayThe remaining driving distance and the date ofthe next maintenance are displayed briefly afterthe ignition is switched on.The current service requirements can be readout from the remote control by the service spe‐cialist.Data reg...
-
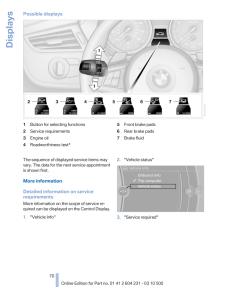
70 .Possible displays1 Button...Possible displays1 Button for selecting functions2 Service requirements3 Engine oil4 Roadworthiness test*5 Front brake pads6 Rear brake pads7 Brake fluidThe sequence of displayed service items mayvary. The data for the next service appointmentis shown firs...
-
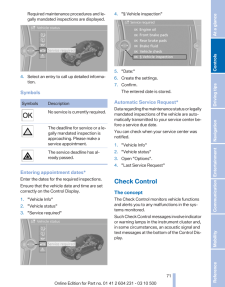
71 .Required maintenance proc...Required maintenance procedures and le‐gally mandated inspections are displayed.4. Select an entry to call up detailed informa‐tion.SymbolsSymbols DescriptionNo service is currently required.The deadline for service or a le‐gally mandated inspection isappr...
-
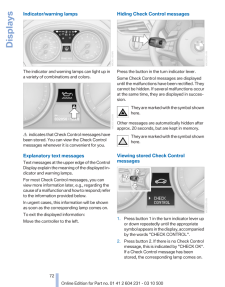
72 .Indicator/warning lampsTh...Indicator/warning lampsThe indicator and warning lamps can light up ina variety of combinations and colors. indicates that Check Control messages havebeen stored. You can view the Check Controlmessages whenever it is convenient for you.Explanatory text me...
-
73 .It is accompanied by a te...It is accompanied by a text message on theControl Display.3. Push button 1 to check for other messages.4. Press button 2.The display again shows the outside tem‐perature and the time.Displaying stored Check Controlmessages1. Press the button.2. "Vehicle ...
-
74 .3. "Warning"4. Press the ...3. "Warning"4. Press the controller. The limit warning is switched on.Seite 7474Online Edition for Part no. 01 41 2 604 231 - 03 10 500Displays
-
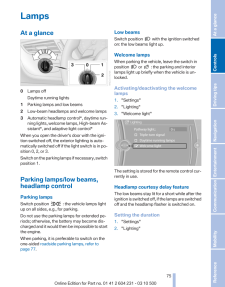
75 .LampsAt a glance0 Lamps o...LampsAt a glance0 Lamps offDaytime running lights1 Parking lamps and low beams2 Low-beam headlamps and welcome lamps3 Automatic headlamp control*, daytime run‐ning lights, welcome lamps, High-beam As‐sistant*, and adaptive light control*When you open the d...
-
76 .3. "Pathway light.: s"4. ...3. "Pathway light.: s"4. Set the duration.The setting is stored for the remote control cur‐rently in use.Automatic headlamp controlSwitch position : the low beams are switchedon and off automatically depending on the am‐bient light, e.g., in tunnels, in...
-
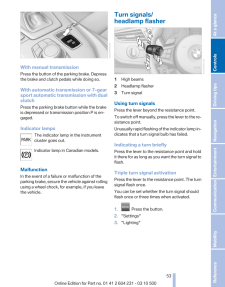
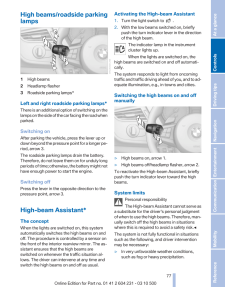
77 .High beams/roadside parki...High beams/roadside parkinglamps1 High beams2 Headlamp flasher3 Roadside parking lamps*Left and right roadside parking lamps*There is an additional option of switching on thelamps on the side of the car facing the road whenparked.Switching onAfter parking ...
-
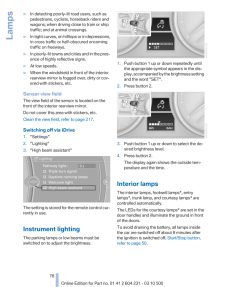
78 .▷In detecting poorly-lit ...▷In detecting poorly-lit road users, such aspedestrians, cyclists, horseback riders andwagons; when driving close to train or shiptraffic; and at animal crossings.▷In tight curves, on hilltops or in depressions,in cross traffic or half-obscured oncomingtra...
-
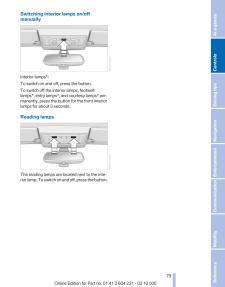
79 .Switching interior lamps ...Switching interior lamps on/offmanuallyInterior lamps*:To switch on and off, press the button.To switch off the interior lamps, footwelllamps *, entry lamps*, and courtesy lamps* per‐manently, press the button for the front interiorlamps for about 3 second...
-
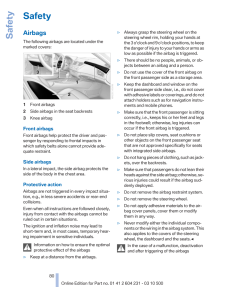
80 .SafetyAirbagsThe followin...SafetyAirbagsThe following airbags are located under themarked covers:1 Front airbags2 Side airbags in the seat backrests3 Knee airbagFront airbagsFront airbags help protect the driver and pas‐senger by responding to frontal impacts inwhich safety belts al...
-
81 .Do not touch the individu...Do not touch the individual components imme‐diately after the system has been triggered; oth‐erwise, there is the danger of burns.Only have the airbags checked, repaired or dis‐mantled and the airbag generator scrapped byyour service center or a workshop t...
-
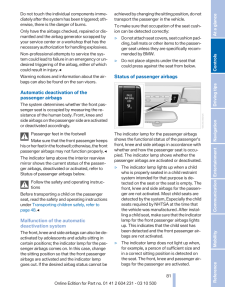
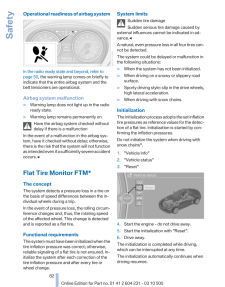
82 .Operational readiness of ...Operational readiness of airbag systemIn the radio ready state and beyond, refer topage 50 , the warning lamp comes on briefly toindicate that the entire airbag system and thebelt tensioners are operational.Airbag system malfunction▷Warning lamp does not l...
-
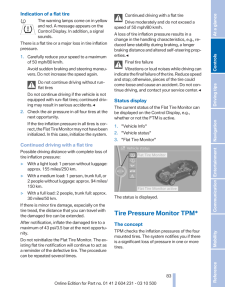
83 .Indication of a flat tire...Indication of a flat tireThe warning lamps come on in yellowand red. A message appears on theControl Display. In addition, a signalsounds.There is a flat tire or a major loss in tire inflationpressure.1. Carefully reduce your speed to a maximumof 50 mph/80...
-
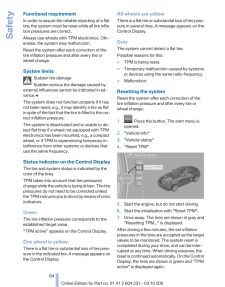
84 .Functional requirementIn ...Functional requirementIn order to assure the reliable reporting of a flattire, the system must be reset while all tire infla‐tion pressures are correct.Always use wheels with TPM electronics. Oth‐erwise, the system may malfunction.Reset the system after ea...
-
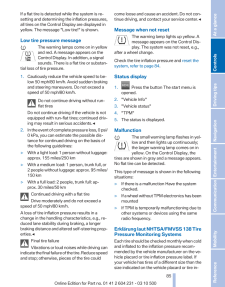
85 .If a flat tire is detecte...If a flat tire is detected while the system is re‐setting and determining the inflation pressures,all tires on the Control Display are displayed inyellow. The message "Low tire!" is shown.Low tire pressure messageThe warning lamps come on in yellowand red....
-
86 .flation pressure label, y...flation pressure label, you should determine theproper tire inflation pressure for those tires. Asan added safety feature, your vehicle has beenequipped with a tire pressure monitoring sys‐tem, TPMS, that illuminates a low tire pressuretelltale when one or...
-
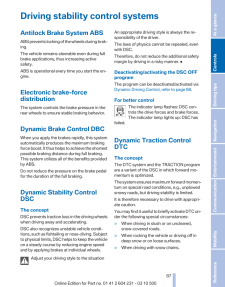
87 .Driving stability control...Driving stability control systemsAntilock Brake System ABSABS prevents locking of the wheels during brak‐ing.The vehicle remains steerable even during fullbrake applications, thus increasing activesafety.ABS is operational every time you start the en‐gine....
-
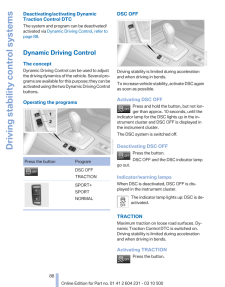
88 .Deactivating/activating D...Deactivating/activating DynamicTraction Control DTCThe system and program can be deactivated/activated via Dynamic Driving Control, refer topage 88 .Dynamic Driving ControlThe conceptDynamic Driving Control can be used to adjustthe driving dynamics of the...
-
89 .TRACTION is displayed in ...TRACTION is displayed in the instrument clus‐ter.The DSC indicator lamp in the instrument clus‐ter lights up.Deactivating TRACTIONPress the button again.TRACTION and the DSC indicator lampgo out.Indicator/warning lampsWhen DTC is activated, TRACTION is dis...
-
90 .Driving off without delay...Driving off without delayAfter releasing the foot brake, start drivingwithout delay, since the drive-off assistant willnot hold the vehicle in place for more than ap‐prox. 2 seconds and the vehicle will begin rollingback.◀Servotronic*The conceptThe Servotr...
-
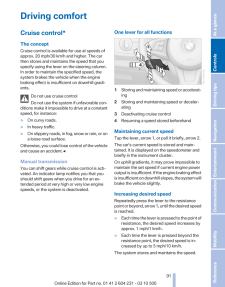
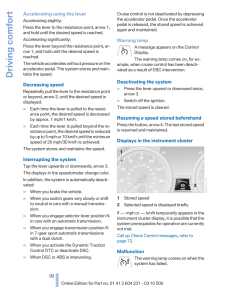
91 .Driving comfortCruise con...Driving comfortCruise control*The conceptCruise control is available for use at speeds ofapprox. 20 mph/30 km/h and higher. The carthen stores and maintains the speed that youspecify using the lever on the steering column.In order to maintain the specified...
-
92 .Accelerating using the le...Accelerating using the leverAccelerating slightly:Press the lever to the resistance point, arrow 1,and hold until the desired speed is reached.Accelerating significantly:Press the lever beyond the resistance point, ar‐row 1, and hold until the desired spee...
-
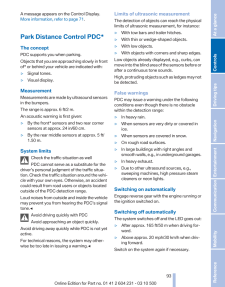
93 .A message appears on the ...A message appears on the Control Display.More information, refer to page 71 .Park Distance Control PDC*The conceptPDC supports you when parking.Objects that you are approaching slowly in frontof* or behind your vehicle are indicated with:▷Signal tones.▷Vis...
-
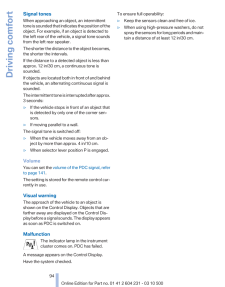
94 .Signal tonesWhen approach...Signal tonesWhen approaching an object, an intermittenttone is sounded that indicates the position of theobject. For example, if an object is detected tothe left rear of the vehicle, a signal tone soundsfrom the left rear speaker.The shorter the distance t...
-
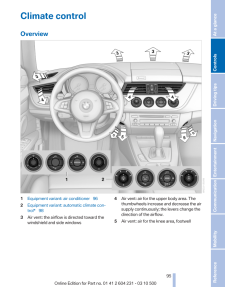
95 .Climate controlOverview1 ...Climate controlOverview1 Equipment variant: air conditioner 962 Equipment variant: automatic climate con‐trol* 983 Air vent: the airflow is directed toward thewindshield and side windows4 Air vent: air for the upper body area. Thethumbwheels increase and...
-
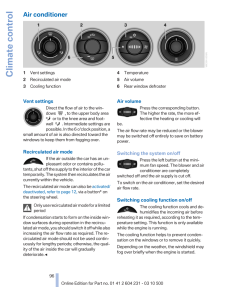
96 .Air conditioner1 Vent set...Air conditioner1 Vent settings2 Recirculated air mode3 Cooling function4 Temperature5 Air volume6 Rear window defrosterVent settingsDirect the flow of air to the win‐dows , to the upper body area or to the knee area and foot‐well . Intermediate set...
-
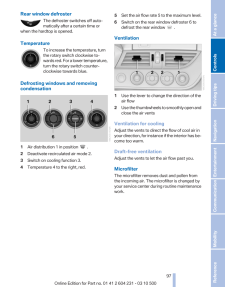
97 .Rear window defrosterThe ...Rear window defrosterThe defroster switches off auto‐matically after a certain time orwhen the hardtop is opened.TemperatureTo increase the temperature, turnthe rotary switch clockwise to‐wards red. For a lower temperature,turn the rotary switch counter‐cl...
-
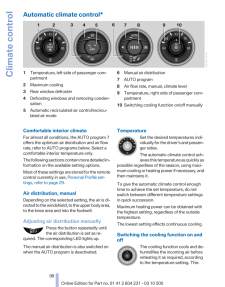
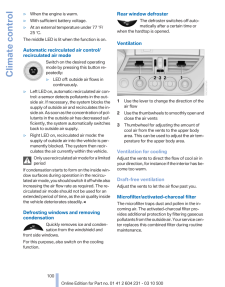
98 .Automatic climate control...Automatic climate control*1 Temperature, left side of passenger com‐partment2 Maximum cooling3 Rear window defroster4 Defrosting windows and removing conden‐sation5 Automatic recirculated air control/recircu‐lated air mode6 Manual air distribution7 AUTO pr...
-
99 .function is only availabl...function is only available while the engine is run‐ning.The cooling function helps to prevent conden‐sation on the windows or to remove it quickly.Depending on the weather, the windshield mayfog over briefly when the engine is started.The cooling function ...
-
100 .▷When the engine is warm....▷When the engine is warm.▷With sufficient battery voltage.▷At an external temperature under 77 ℉/25 ℃.The middle LED is lit when the function is on.Automatic recirculated air control/recirculated air modeSwitch on the desired operatingmode by pressing this...
