MINIの取扱説明書・マニュアル [全292ページ 7.05MB]


4


17 / 292 ページ
17 / 292 ページ


現在のページURL
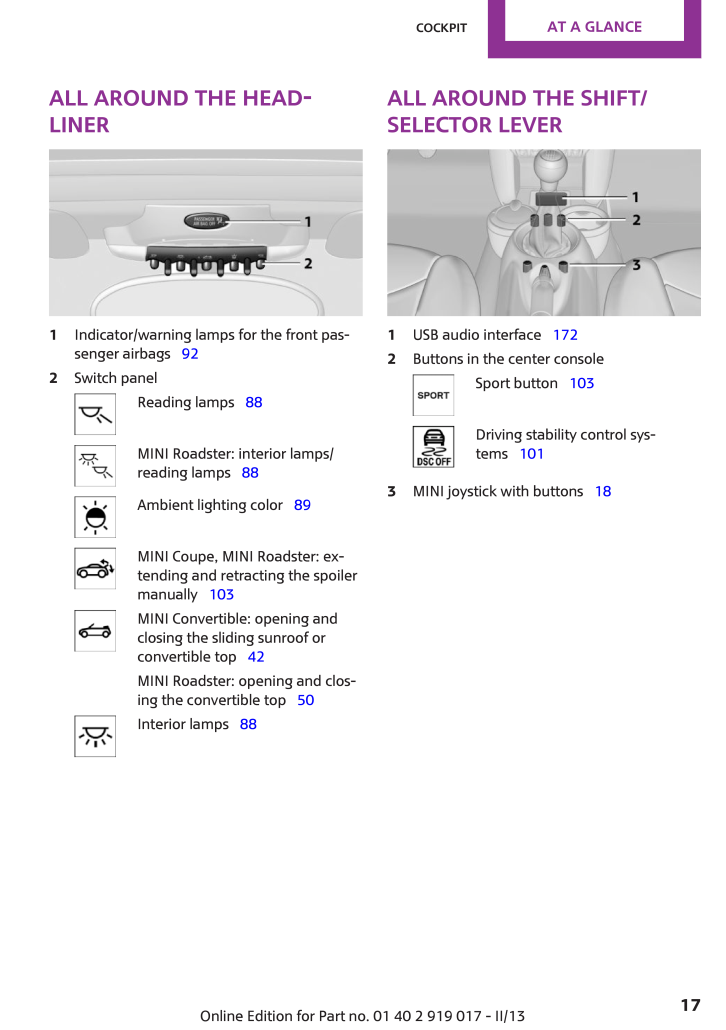
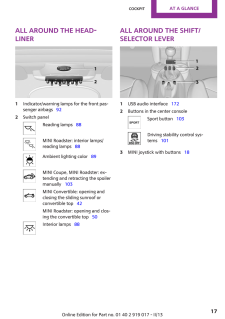
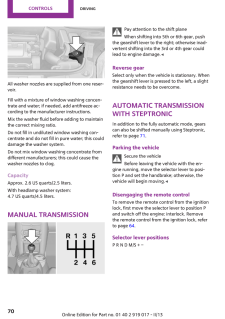
All around the head‐liner1 Indicator/warning lamps for the front pas‐senger airbags 922 Switch panelReading lamps 88MINI Roadster: interior lamps/reading lamps 88Ambient lighting color 89MINI Coupe, MINI Roadster: ex‐tending and retracting the spoilermanually 103MINI Convertible: opening andclosing the sliding sunroof orconvertible top 42MINI Roadster: opening and clos‐ing the convertible top 50Interior lamps 88All around the shift/selector lever1 USB audio interface 1722 Buttons in the center consoleSport button 103Driving stability control sys‐tems 1013 MINI joystick with buttons 18Seite 17CockpitAt a glance17Online Edition for Part no. 01 40 2 919 017 - II/13
参考になったと評価  8人が参考になったと評価しています。


このマニュアルの目次
-
1 .Owner's Manual.MINI Coupe...Owner's Manual.MINI Coupe.MINI Roadster.MINI Convertible.ContentsA-ZOnline Edition for Part no. 01 40 2 919 017 - II/13
-
2 .2 ページ目のマニュアル
-
3 .COOPERCOOPER SJOHN COOPER...COOPERCOOPER SJOHN COOPERWORKSOwner's Manual for VehicleThank you for choosing a MINI.The more familiar you are with your vehicle, the better controlyou will have on the road. We therefore strongly suggest:Read this Owner's Manual before starting off in yo...
-
4 .© 2012 Bayerische Motoren...© 2012 Bayerische Motoren WerkeAktiengesellschaftMunich, GermanyReprinting, including excerpts, only with the writtenconsent of BMW AG, Munich.US English II/13, 03 13 500Printed on environmentally friendly paper, bleachedwithout chlorine, suitable for recy...
-
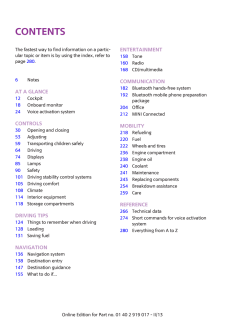
5 .ContentsThe fastest way t...ContentsThe fastest way to find information on a partic‐ular topic or item is by using the index, refer topage 280 .6 NotesAt a glance12 Cockpit18 Onboard monitor24 Voice activation systemControls30 Opening and closing53 Adjusting59 Transporting children ...
-
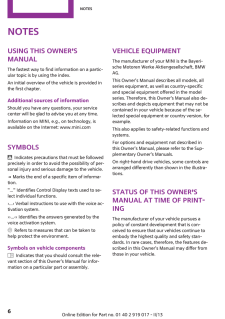
6 .NotesUsing this Owner'sMa...NotesUsing this Owner'sManualThe fastest way to find information on a partic‐ular topic is by using the index.An initial overview of the vehicle is provided inthe first chapter.Additional sources of informationShould you have any questions, your servicecen...
-
7 .For your own safetyMainte...For your own safetyMaintenance and repairsAdvanced technology, e.g., the use of modernmaterials and high-performance electronics,requires suitable maintenance and repairmethods.Therefore, have this work performed only by aMINI service center or a workshop ...
-
8 .Detailed information abou...Detailed information about these warranties islisted in the Service and Warranty InformationBooklet for US models or in the Warranty andService Guide Booklet for Canadian models.Your vehicle has been specifically adapted anddesigned to meet the particular ...
-
9 .Reporting safety defectsF...Reporting safety defectsFor US customersThe following only applies to vehicles ownedand operated in the US.If you believe that your vehicle has a defectwhich could cause a crash or could cause injuryor death, you should immediately inform theNational Highw...
-
11 .At a glanceControlsDrivin...At a glanceControlsDriving tipsNavigationEntertainmentCommunicationMobilityReferenceOnline Edition for Part no. 01 40 2 919 017 - II/13
-
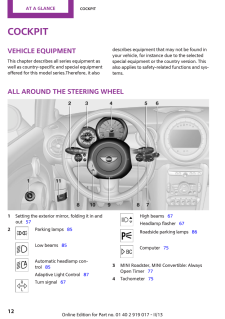
12 .CockpitVehicle equipmentT...CockpitVehicle equipmentThis chapter describes all series equipment aswell as country-specific and special equipmentoffered for this model series.Therefore, it alsodescribes equipment that may not be found inyour vehicle, for instance due to the selectedsp...
-
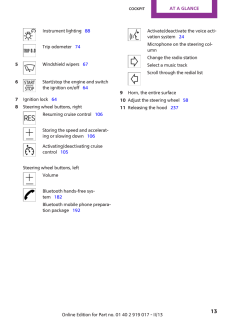
13 .Instrument lighting 88T...Instrument lighting 88Trip odometer 745 Windshield wipers 676 Start/stop the engine and switchthe ignition on/off 647 Ignition lock 648 Steering wheel buttons, rightResuming cruise control 106Storing the speed and accelerat‐ing or slowing down ...
-
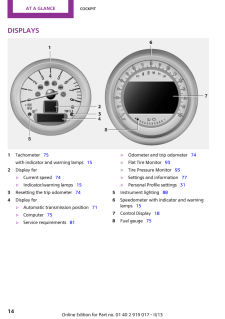
14 .Displays1 Tachometer 75...Displays1 Tachometer 75with indicator and warning lamps 152 Display for▷Current speed 74▷Indicator/warning lamps 153 Resetting the trip odometer 744 Display for▷Automatic transmission position 71▷Computer 75▷Service requirements 81▷Odometer...
-
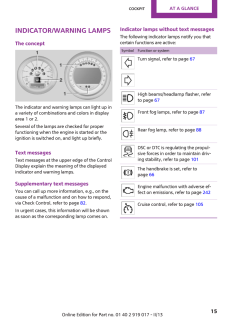
15 .Indicator/warning lampsTh...Indicator/warning lampsThe conceptThe indicator and warning lamps can light up ina variety of combinations and colors in displayarea 1 or 2.Several of the lamps are checked for properfunctioning when the engine is started or theignition is switched on, and...
-
16 .All around the center con...All around the center console1 Hazard warning system2 Speedometer with Control Display 143 Radio 160CD/multimedia 1604 Air conditioning, automatic climate con‐trol 1085 Buttons on the center consoleSeat heating 55Power windows 41Rear fog lamp ...
-
17 .All around the head‐liner...All around the head‐liner1 Indicator/warning lamps for the front pas‐senger airbags 922 Switch panelReading lamps 88MINI Roadster: interior lamps/reading lamps 88Ambient lighting color 89MINI Coupe, MINI Roadster: ex‐tending and retracting the spoi...
-
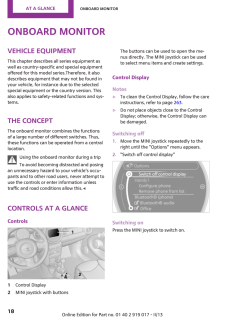
18 .Onboard monitorVehicle eq...Onboard monitorVehicle equipmentThis chapter describes all series equipment aswell as country-specific and special equipmentoffered for this model series.Therefore, it alsodescribes equipment that may not be found inyour vehicle, for instance due to the se...
-
19 .MINI joystick with button...MINI joystick with buttonsSelect menu items and create settings.1.Turn, arrow 1.2. Press, arrow 2.3. Move in four directions.Buttons on the MINI joystickPress the button Function Opens the main menu. Changes to another menu.Operating conceptStart screenIn ...
-
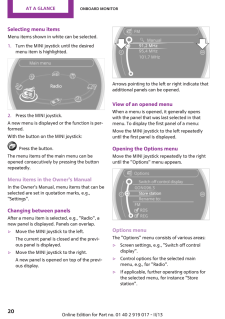
20 .Selecting menu itemsMenu ...Selecting menu itemsMenu items shown in white can be selected.1.Turn the MINI joystick until the desiredmenu item is highlighted.2. Press the MINI joystick.A new menu is displayed or the function is per‐formed.With the button on the MINI joystick: Press t...
-
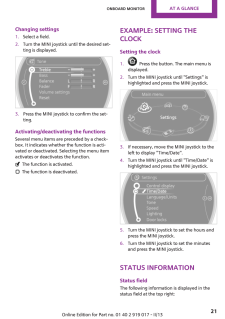
21 .Changing settings1. Selec...Changing settings1. Select a field.2.Turn the MINI joystick until the desired set‐ting is displayed.3. Press the MINI joystick to confirm the set‐ting.Activating/deactivating the functionsSeveral menu items are preceded by a check‐box. It indicates whether...
-
22 .▷Time.▷Current entertainm...▷Time.▷Current entertainment source.▷Sound output, on/off.▷Wireless network reception strength.▷Telephone status.▷Traffic bulletin reception.Check Control messages and entries using thevoice activation system temporarily hide thestatus information.Status f...
-
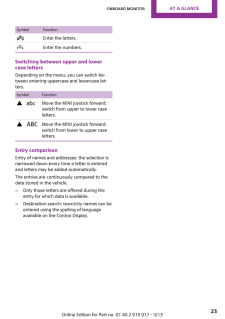
23 .Symbol Function Enter th...Symbol Function Enter the letters. Enter the numbers.Switching between upper and lowercase lettersDepending on the menu, you can switch be‐tween entering uppercase and lowercase let‐ters.Symbol Function Move the MINI joystick forward:switch from upp...
-
24 .Voice activation systemVe...Voice activation systemVehicle equipmentThis chapter describes all series equipment aswell as country-specific and special equipmentoffered for this model series.Therefore, it alsodescribes equipment that may not be found inyour vehicle, for instance due t...
-
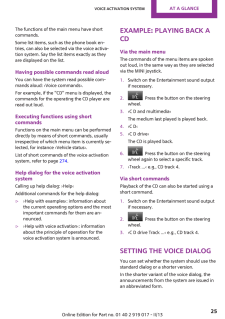
25 .The functions of the main...The functions of the main menu have shortcommands.Some list items, such as the phone book en‐tries, can also be selected via the voice activa‐tion system. Say the list items exactly as theyare displayed on the list.Having possible commands read aloudYou ca...
-
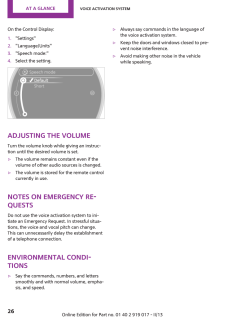
26 .On the Control Display:1....On the Control Display:1. "Settings"2."Language/Units"3. "Speech mode:"4. Select the setting.Adjusting the volumeTurn the volume knob while giving an instruc‐tion until the desired volume is set.▷The volume remains constant even if thevolume of other audio...
-
27 .Seite 27Voice activation ...Seite 27Voice activation systemAt a glance27Online Edition for Part no. 01 40 2 919 017 - II/13
-
29 .At a glanceControlsDrivin...At a glanceControlsDriving tipsNavigationEntertainmentCommunicationMobilityReferenceOnline Edition for Part no. 01 40 2 919 017 - II/13
-
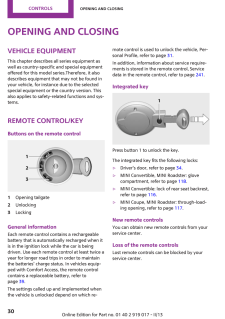
30 .Opening and closingVehicl...Opening and closingVehicle equipmentThis chapter describes all series equipment aswell as country-specific and special equipmentoffered for this model series.Therefore, it alsodescribes equipment that may not be found inyour vehicle, for instance due to th...
-
31 .Personal ProfileThe conce...Personal ProfileThe conceptYou can set several of your vehicle's functionsto suit your personal needs and preferences.▷Through Personal Profile, most of these set‐tings are stored for the remote control cur‐rently in use.▷While the vehicle is being unlocke...
-
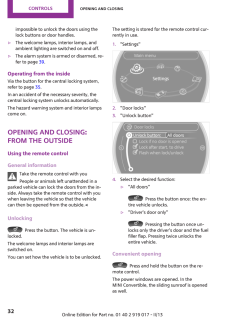
32 .impossible to unlock the ...impossible to unlock the doors using thelock buttons or door handles.▷The welcome lamps, interior lamps, andambient lighting are switched on and off.▷The alarm system is armed or disarmed, re‐fer to page 39.Operating from the insideVia the button for the ...
-
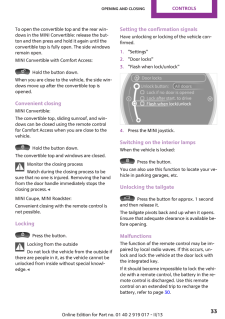
33 .To open the convertible t...To open the convertible top and the rear win‐dows in the MINI Convertible: release the but‐ton and then press and hold it again until theconvertible top is fully open. The side windowsremain open.MINI Convertible with Comfort Access: Hold the button down....
-
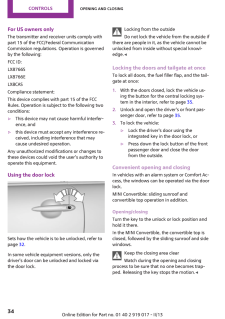
34 .For US owners onlyThe tra...For US owners onlyThe transmitter and receiver units comply withpart 15 of the FCC/Federal CommunicationCommission regulations. Operation is governedby the following:FCC ID:LX8766SLX8766ELX8CASCompliance statement:This device complies with part 15 of the F...
-
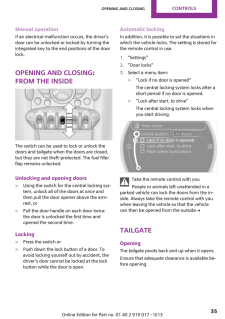
35 .Manual operationIf an ele...Manual operationIf an electrical malfunction occurs, the driver'sdoor can be unlocked or locked by turning theintegrated key to the end positions of the doorlock.Opening and closing:from the insideThe switch can be used to lock or unlock thedoors and tailg...
-
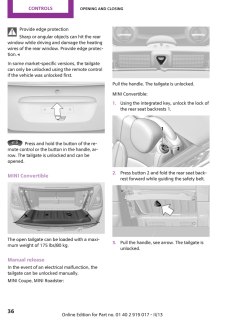
36 .Provide edge protectionSh...Provide edge protectionSharp or angular objects can hit the rearwindow while driving and damage the heatingwires of the rear window. Provide edge protec‐tion. ◀In some market-specific versions, the tailgatecan only be unlocked using the remote controlif th...
-
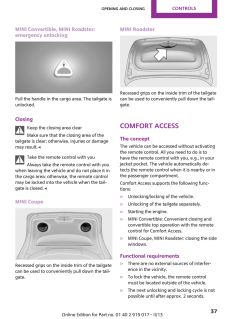
37 .MINI Convertible, MINI Ro...MINI Convertible, MINI Roadster:emergency unlockingPull the handle in the cargo area. The tailgate isunlocked.ClosingKeep the closing area clearMake sure that the closing area of thetailgate is clear; otherwise, injuries or damagemay result. ◀Take the remo...
-
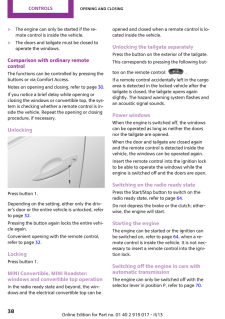
38 .▷The engine can only be s...▷The engine can only be started if the re‐mote control is inside the vehicle.▷The doors and tailgate must be closed tooperate the windows.Comparison with ordinary remotecontrolThe functions can be controlled by pressing thebuttons or via Comfort Access.Not...
-
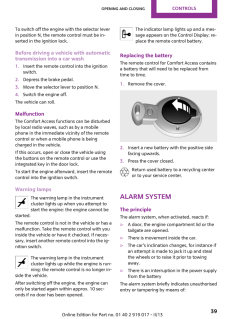
39 .To switch off the engine ...To switch off the engine with the selector leverin position N, the remote control must be in‐serted in the ignition lock.Before driving a vehicle with automatictransmission into a car wash1. Insert the remote control into the ignitionswitch.2. Depress the ...
-
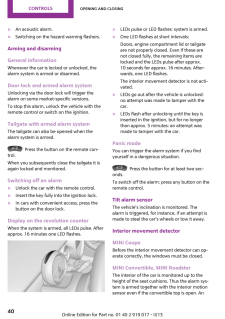
40 .▷An acoustic alarm.▷Switc...▷An acoustic alarm.▷Switching on the hazard warning flashers.Arming and disarmingGeneral informationWhenever the car is locked or unlocked, thealarm system is armed or disarmed.Door lock and armed alarm systemUnlocking via the door lock will trigger theala...
-
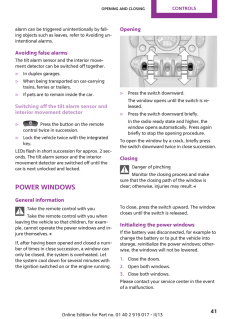
41 .alarm can be triggered un...alarm can be triggered unintentionally by fall‐ing objects such as leaves, refer to Avoiding un‐intentional alarms.Avoiding false alarmsThe tilt alarm sensor and the interior move‐ment detector can be switched off together.▷In duplex garages.▷When being tr...
-
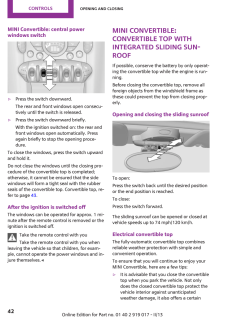
42 .MINI Convertible: central...MINI Convertible: central powerwindows switch▷Press the switch downward.The rear and front windows open consecu‐tively until the switch is released.▷Press the switch downward briefly.With the ignition switched on: the rear andfront windows open automatical...
-
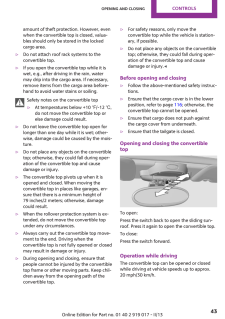
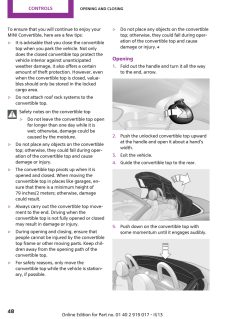
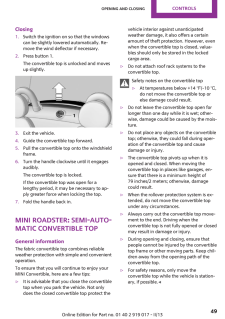
43 .amount of theft protectio...amount of theft protection. However, evenwhen the convertible top is closed, valua‐bles should only be stored in the lockedcargo area.▷Do not attach roof rack systems to theconvertible top.▷If you open the convertible top while it iswet, e.g., after drivin...
-
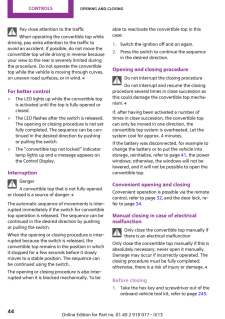
44 .Pay close attention to th...Pay close attention to the trafficWhen operating the convertible top whiledriving, pay extra attention to the traffic toavoid an accident. If possible, do not move theconvertible top while driving in reverse becauseyour view to the rear is severely limited...
-
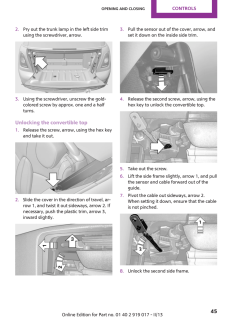
45 .2. Pry out the trunk lamp...2. Pry out the trunk lamp in the left side trimusing the screwdriver, arrow.3. Using the screwdriver, unscrew the gold-colored screw by approx. one and a halfturns.Unlocking the convertible top1. Release the screw, arrow, using the hex keyand take it out.2...
-
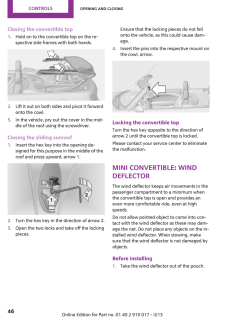
46 .Closing the convertible t...Closing the convertible top1. Hold on to the convertible top on the re‐spective side frames with both hands.2. Lift it out on both sides and pivot it forwardonto the cowl.3. In the vehicle, pry out the cover in the mid‐dle of the roof using the screwdriver...
-
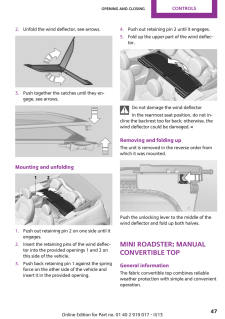
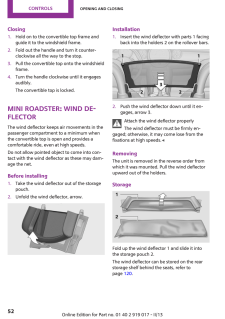
47 .2. Unfold the wind deflec...2. Unfold the wind deflector, see arrows.3. Push together the catches until they en‐gage, see arrows.Mounting and unfolding1. Push out retaining pin 2 on one side until itengages.2.Insert the retaining pins of the wind deflec‐tor into the provided openings...
-
48 .To ensure that you will c...To ensure that you will continue to enjoy yourMINI Convertible, here are a few tips:▷It is advisable that you close the convertibletop when you park the vehicle. Not onlydoes the closed convertible top protect thevehicle interior against unanticipatedweath...
-
49 .Closing1. Switch the igni...Closing1. Switch the ignition on so that the windowscan be slightly lowered automatically. Re‐move the wind deflector if necessary.2. Press button 1.The convertible top is unlocked and movesup slightly.3. Exit the vehicle.4. Guide the convertible top forwa...
-
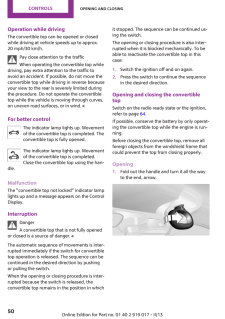
50 .Operation while drivingTh...Operation while drivingThe convertible top can be opened or closedwhile driving at vehicle speeds up to approx.20 mph/30 km/h.Pay close attention to the trafficWhen operating the convertible top whiledriving, pay extra attention to the traffic toavoid an a...
-
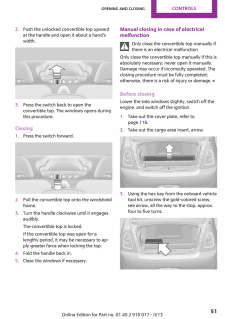
51 .2. Push the unlocked conv...2. Push the unlocked convertible top upwardat the handle and open it about a hand'swidth.3. Press the switch back to open theconvertible top. The windows opens duringthis procedure.Closing1. Press the switch forward.2.Pull the convertible top onto the wind...
-
52 .Closing1. Hold on to the ...Closing1. Hold on to the convertible top frame andguide it to the windshield frame.2. Fold out the handle and turn it counter‐clockwise all the way to the stop.3. Pull the convertible top onto the windshieldframe.4. Turn the handle clockwise until it engag...
-
53 .AdjustingVehicle equipmen...AdjustingVehicle equipmentThis chapter describes all series equipment aswell as country-specific and special equipmentoffered for this model series.Therefore, it alsodescribes equipment that may not be found inyour vehicle, for instance due to the selected...
-
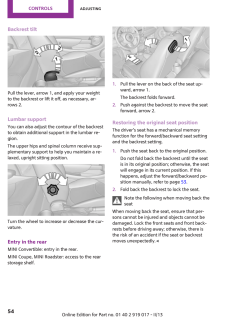
54 .Backrest tiltPull the lev...Backrest tiltPull the lever, arrow 1, and apply your weightto the backrest or lift it off, as necessary, ar‐rows 2.Lumbar supportYou can also adjust the contour of the backrestto obtain additional support in the lumbar re‐gion.The upper hips and spinal col...
-
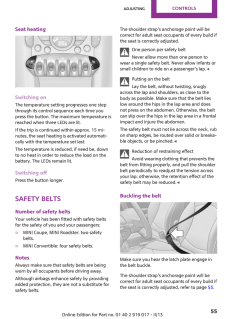
55 .Seat heatingSwitching onT...Seat heatingSwitching onThe temperature setting progresses one stepthrough its control sequence each time youpress the button. The maximum temperature isreached when three LEDs are lit.If the trip is continued within approx. 15 mi‐nutes, the seat heating i...
-
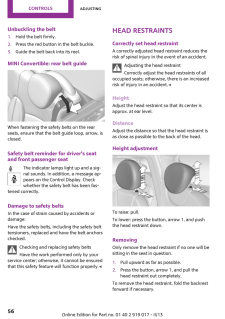
56 .Unbuckling the belt1. Hol...Unbuckling the belt1. Hold the belt firmly.2.Press the red button in the belt buckle.3. Guide the belt back into its reel.MINI Convertible: rear belt guideWhen fastening the safety belts on the rearseats, ensure that the belt guide loop, arrow, isclosed.Sa...
-
57 .Before transporting passe...Before transporting passengersReinstall the head restraint before trans‐porting anyone in the seat; otherwise, the pro‐tective function of the head restraint is unavail‐able. ◀MirrorsExterior mirrorsGeneral informationThe mirror on the passenger side is mo...
-
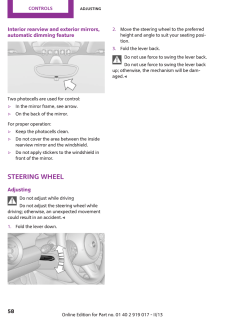
58 .Interior rearview and ext...Interior rearview and exterior mirrors,automatic dimming featureTwo photocells are used for control:▷In the mirror frame, see arrow.▷On the back of the mirror.For proper operation:▷Keep the photocells clean.▷Do not cover the area between the insiderearview...
-
59 .Transporting children saf...Transporting children safelyVehicle equipmentThis chapter describes all series equipment aswell as country-specific and special equipmentoffered for this model series.Therefore, it alsodescribes equipment that may not be found inyour vehicle, for instance ...
-
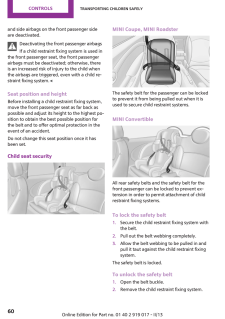
60 .and side airbags on the f...and side airbags on the front passenger sideare deactivated.Deactivating the front passenger airbagsIf a child restraint fixing system is used inthe front passenger seat, the front passengerairbags must be deactivated; otherwise, thereis an increased risk ...
-
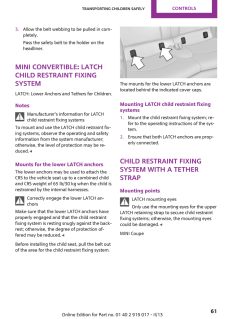
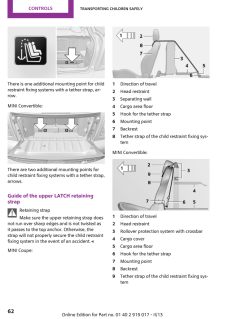
61 .3. Allow the belt webbing...3. Allow the belt webbing to be pulled in com‐pletely.Pass the safety belt to the holder on theheadliner.MINI Convertible: LATCHchild restraint fixingsystemLATCH: Lower Anchors and Tethers for Children.NotesManufacturer's information for LATCHchild restrai...
-
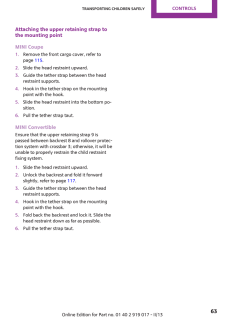
62 .There is one additional m...There is one additional mounting point for childrestraint fixing systems with a tether strap, ar‐row.MINI Convertible:There are two additional mounting points forchild restraint fixing systems with a tether strap,arrows.Guide of the upper LATCH retainingst...
-
63 .Attaching the upper retai...Attaching the upper retaining strap tothe mounting pointMINI Coupe1. Remove the front cargo cover, refer topage 115 .2. Slide the head restraint upward.3. Guide the tether strap between the headrestraint supports.4. Hook in the tether strap on the mountin...
-
64 .DrivingVehicle equipmentT...DrivingVehicle equipmentThis chapter describes all series equipment aswell as country-specific and special equipmentoffered for this model series.Therefore, it alsodescribes equipment that may not be found inyour vehicle, for instance due to the selectedsp...
-
65 .To save battery power whe...To save battery power when the engine is off,switch off the ignition and any unnecessaryelectronic systems/power consumers.Radio ready state and ignition offAll indicator and warning lamps in the displaysgo out.The ignition switches off automatically whent...
-
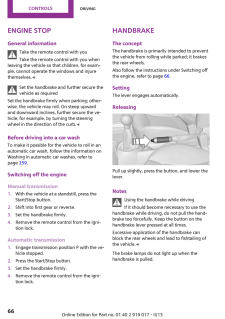
66 .Engine stopGeneral inform...Engine stopGeneral informationTake the remote control with youTake the remote control with you whenleaving the vehicle so that children, for exam‐ple, cannot operate the windows and injurethemselves. ◀Set the handbrake and further secure thevehicle as requ...
-
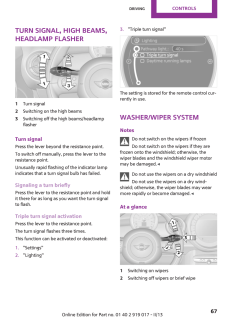
67 .Turn signal, high beams,h...Turn signal, high beams,headlamp flasher1 Turn signal2 Switching on the high beams3 Switching off the high beams/headlampflasherTurn signalPress the lever beyond the resistance point.To switch off manually, press the lever to theresistance point.Unusually ...
-
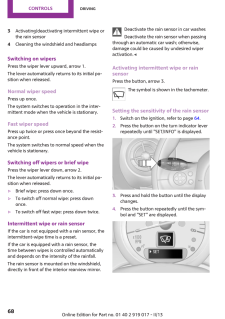
68 .3 Activating/deactivating...3 Activating/deactivating intermittent wipe orthe rain sensor4 Cleaning the windshield and headlampsSwitching on wipersPress the wiper lever upward, arrow 1.The lever automatically returns to its initial po‐sition when released.Normal wiper speedPress up o...
-
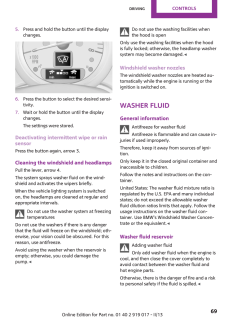
69 .5. Press and hold the but...5. Press and hold the button until the displaychanges.6. Press the button to select the desired sensi‐tivity.7. Wait or hold the button until the displaychanges.The settings were stored.Deactivating intermittent wipe or rainsensorPress the button again, ar...
-
70 .All washer nozzles are su...All washer nozzles are supplied from one reser‐voir.Fill with a mixture of window washing concen‐trate and water; if needed, add antifreeze ac‐cording to the manufacturer instructions.Mix the washer fluid before adding to maintainthe correct mixing ratio.D...
-
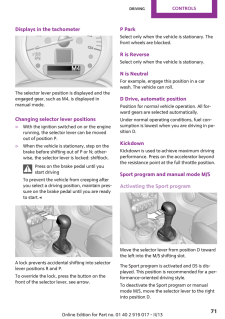
71 .Displays in the tachomete...Displays in the tachometerThe selector lever position is displayed and theengaged gear, such as M4, is displayed inmanual mode.Changing selector lever positions▷With the ignition switched on or the enginerunning, the selector lever can be movedout of posit...
-
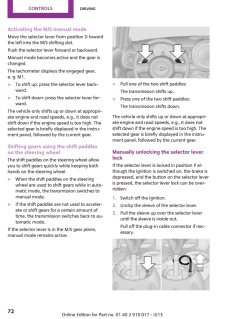
72 .Activating the M/S manual...Activating the M/S manual modeMove the selector lever from position D towardthe left into the M/S shifting slot.Push the selector lever forward or backward.Manual mode becomes active and the gear ischanged.The tachometer displays the engaged gear,e. g. M1....
-
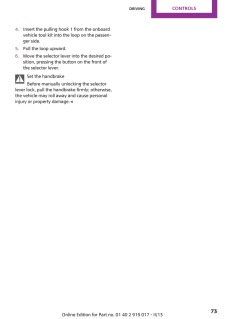
73 .4. Insert the pulling hoo...4. Insert the pulling hook 1 from the onboardvehicle tool kit into the loop on the passen‐ger side.5. Pull the loop upward.6. Move the selector lever into the desired po‐sition, pressing the button on the front ofthe selector lever.Set the handbrakeBefore ...
-
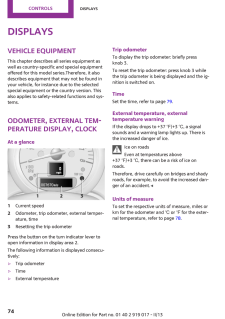
74 .DisplaysVehicle equipment...DisplaysVehicle equipmentThis chapter describes all series equipment aswell as country-specific and special equipmentoffered for this model series.Therefore, it alsodescribes equipment that may not be found inyour vehicle, for instance due to the selecteds...
-
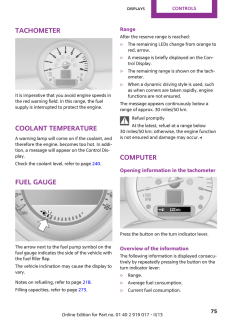
75 .TachometerIt is imperativ...TachometerIt is imperative that you avoid engine speeds inthe red warning field. In this range, the fuelsupply is interrupted to protect the engine.Coolant temperatureA warning lamp will come on if the coolant, andtherefore the engine, becomes too hot. In ...
-
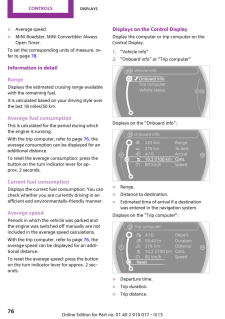
76 .▷Average speed.▷MINI Road...▷Average speed.▷MINI Roadster, MINI Convertible: AlwaysOpen Timer.To set the corresponding units of measure, re‐fer to page 78.Information in detailRangeDisplays the estimated cruising range availablewith the remaining fuel.It is calculated based on your ...
-
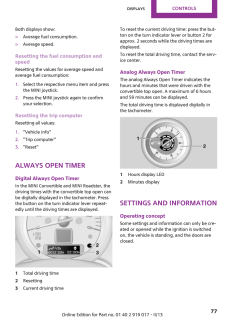
77 .Both displays show:▷Avera...Both displays show:▷Average fuel consumption.▷Average speed.Resetting the fuel consumption andspeedResetting the values for average speed andaverage fuel consumption:1. Select the respective menu item and pressthe MINI joystick.2. Press the MINI joystick a...
-
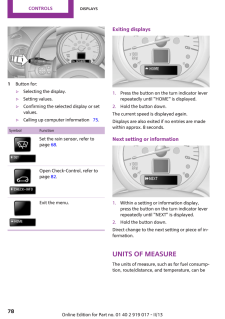
78 .1 Button for:▷Selecting t...1 Button for:▷Selecting the display.▷Setting values.▷Confirming the selected display or setvalues.▷Calling up computer information 75.Symbol FunctionSet the rain sensor, refer topage 68.Open Check-Control, refer topage 82.Exit the menu.Exiting displays...
-
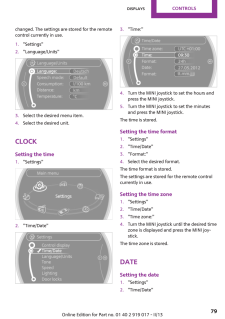
79 .changed. The settings are...changed. The settings are stored for the remotecontrol currently in use.1."Settings"2. "Language/Units"3. Select the desired menu item.4. Select the desired unit.ClockSetting the time1. "Settings"2."Time/Date"3. "Time:"4. Turn the MINI joystick to set the ...
-
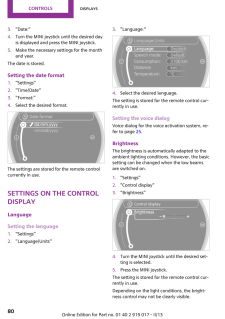
80 .3. "Date:"4. Turn the MIN...3. "Date:"4. Turn the MINI joystick until the desired dayis displayed and press the MINI joystick.5. Make the necessary settings for the monthand year.The date is stored.Setting the date format1. "Settings"2. "Time/Date"3. "Format:"4. Select the desired fo...
-
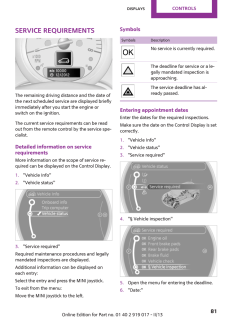
81 .Service requirementsThe r...Service requirementsThe remaining driving distance and the date ofthe next scheduled service are displayed brieflyimmediately after you start the engine orswitch on the ignition.The current service requirements can be readout from the remote control by the...
-
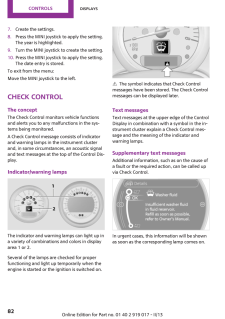
82 .7. Create the settings.8....7. Create the settings.8. Press the MINI joystick to apply the setting.The year is highlighted.9. Turn the MINI joystick to create the setting.10. Press the MINI joystick to apply the setting.The date entry is stored.To exit from the menu:Move the MINI joy...
-
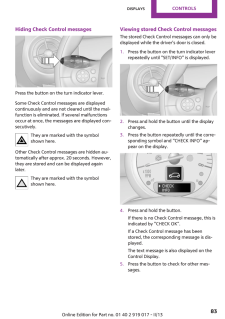
83 .Hiding Check Control mess...Hiding Check Control messagesPress the button on the turn indicator lever.Some Check Control messages are displayedcontinuously and are not cleared until the mal‐function is eliminated. If several malfunctionsoccur at once, the messages are displayed con‐s...
-
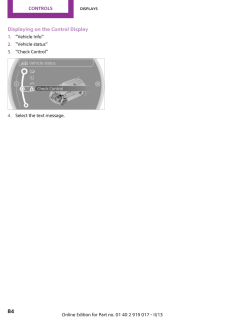
84 .Displaying on the Control...Displaying on the Control Display1. "Vehicle Info"2."Vehicle status"3. "Check Control"4. Select the text message.Seite 84ControlsDisplays84Online Edition for Part no. 01 40 2 919 017 - II/13
-
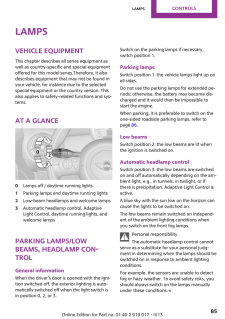
85 .LampsVehicle equipmentThi...LampsVehicle equipmentThis chapter describes all series equipment aswell as country-specific and special equipmentoffered for this model series.Therefore, it alsodescribes equipment that may not be found inyour vehicle, for instance due to the selectedspec...
-
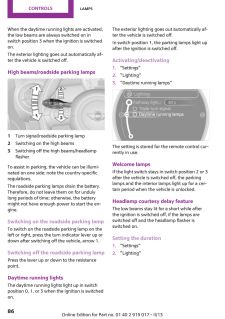
86 .When the daytime running ...When the daytime running lights are activated,the low beams are always switched on inswitch position 3 when the ignition is switchedon.The exterior lighting goes out automatically af‐ter the vehicle is switched off.High beams/roadside parking lamps1 Turn s...
-
87 .3. "Pathway light.: s"4. ...3. "Pathway light.: s"4. Set the duration.The setting is stored for the remote control cur‐rently in use.Adaptive Light ControlThe conceptAdaptive Light Control is a variable headlampcontrol system that enables dynamic illumina‐tion of the road surface.Dep...
-
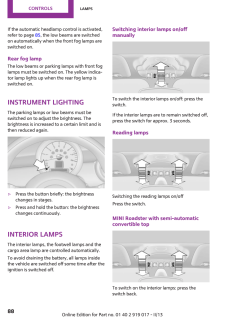
88 .If the automatic headlamp...If the automatic headlamp control is activated,refer to page 85, the low beams are switchedon automatically when the front fog lamps areswitched on.Rear fog lampThe low beams or parking lamps with front foglamps must be switched on. The yellow indica‐tor ...
-
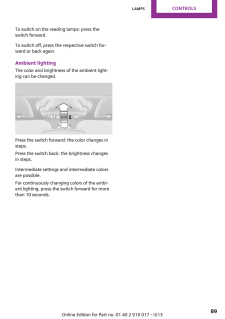
89 .To switch on the reading ...To switch on the reading lamps: press theswitch forward.To switch off, press the respective switch for‐ward or back again.Ambient lightingThe color and brightness of the ambient light‐ing can be changed.Press the switch forward: the color changes insteps.P...
-
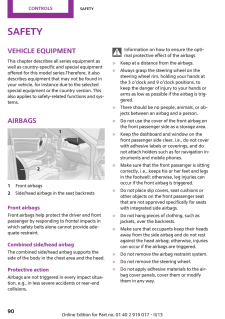
90 .SafetyVehicle equipmentTh...SafetyVehicle equipmentThis chapter describes all series equipment aswell as country-specific and special equipmentoffered for this model series.Therefore, it alsodescribes equipment that may not be found inyour vehicle, for instance due to the selectedspe...
-
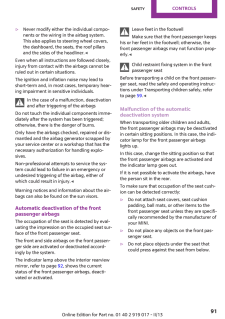
91 .▷Never modify either the ...▷Never modify either the individual compo‐nents or the wiring in the airbag system.This also applies to steering wheel covers,the dashboard, the seats, the roof pillarsand the sides of the headliner. ◀Even when all instructions are followed closely,injury ...
-
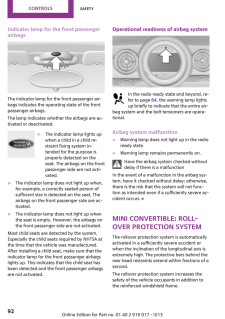
92 .Indicator lamp for the fr...Indicator lamp for the front passengerairbagsThe indicator lamp for the front passenger air‐bags indicates the operating state of the frontpassenger airbags.The lamp indicates whether the airbags are ac‐tivated or deactivated.▷The indicator lamp lights upw...
-
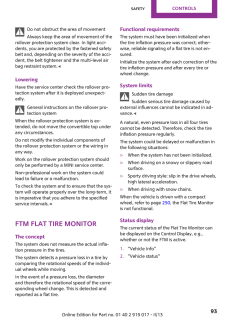
93 .Do not obstruct the area ...Do not obstruct the area of movementAlways keep the area of movement of therollover protection system clear. In light acci‐dents, you are protected by the fastened safetybelt and, depending on the severity of the acci‐dent, the belt tightener and the multi...
-
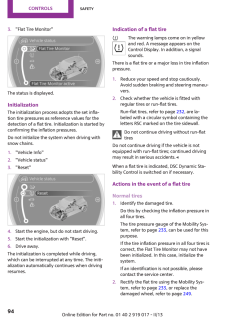
94 .3. "Flat Tire Monitor"The...3. "Flat Tire Monitor"The status is displayed.InitializationThe initialization process adopts the set infla‐tion tire pressures as reference values for thedetection of a flat tire. Initialization is started byconfirming the inflation pressures.Do not initi...
-
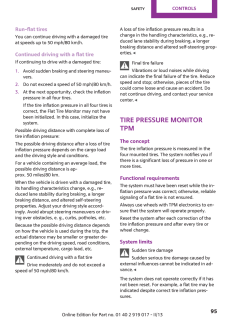
95 .Run-flat tiresYou can con...Run-flat tiresYou can continue driving with a damaged tireat speeds up to 50 mph/80 km/h.Continued driving with a flat tireIf continuing to drive with a damaged tire:1. Avoid sudden braking and steering maneu‐vers.2. Do not exceed a speed of 50 mph/80 km/h...
-
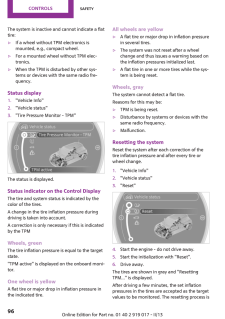
96 .The system is inactive an...The system is inactive and cannot indicate a flattire:▷If a wheel without TPM electronics ismounted, e.g., compact wheel.▷For a mounted wheel without TPM elec‐tronics.▷When the TPM is disturbed by other sys‐tems or devices with the same radio fre‐quency.St...
-
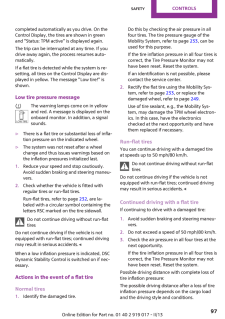
97 .completed automatically a...completed automatically as you drive. On theControl Display, the tires are shown in greenand "Status: TPM active" is displayed again.The trip can be interrupted at any time. If youdrive away again, the process resumes auto‐matically.If a flat tire is detec...
-
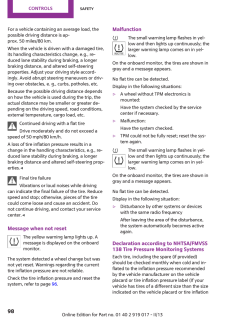
98 .For a vehicle containing ...For a vehicle containing an average load, thepossible driving distance is ap‐prox. 50 miles/80 km.When the vehicle is driven with a damaged tire,its handling characteristics change, e.g., re‐duced lane stability during braking, a longerbraking distance, an...
-
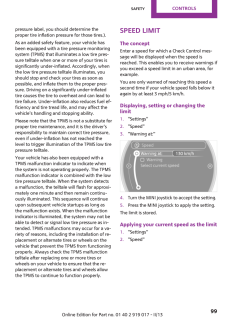
99 .pressure label, you shoul...pressure label, you should determine theproper tire inflation pressure for those tires.).As an added safety feature, your vehicle hasbeen equipped with a tire pressure monitoringsystem (TPMS) that illuminates a low tire pres‐sure telltale when one or more ...
-
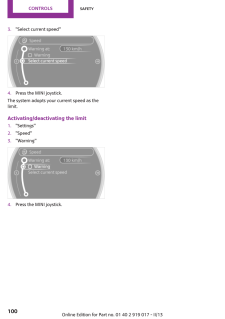
100 .3. "Select current speed"...3. "Select current speed"4. Press the MINI joystick.The system adopts your current speed as thelimit.Activating/deactivating the limit1. "Settings"2. "Speed"3. "Warning"4.Press the MINI joystick.Seite 100ControlsSafety100Online Edition for Part no. 01 40 2...
