Z4の取扱説明書・マニュアル [全220ページ 9.90MB]


7


70 / 220 ページ

70 / 220 ページ


現在のページURL
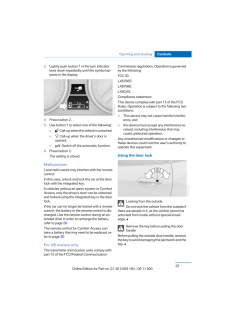
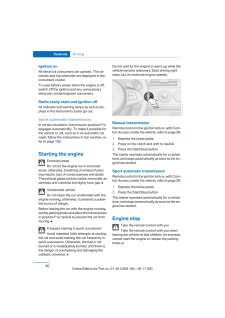
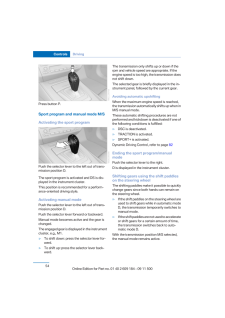
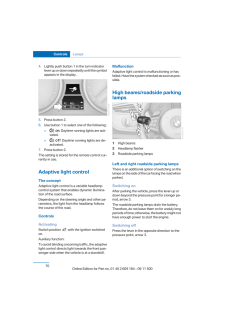
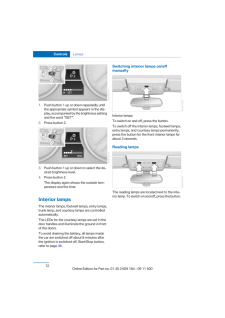
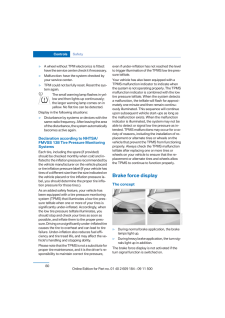
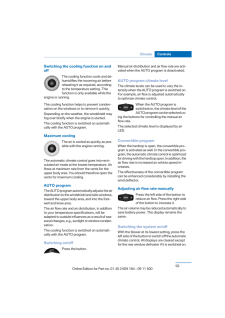
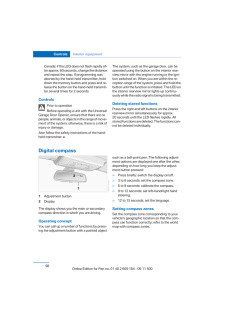
4. Lightly push button 1 in the turn indicatorlever up or down repeatedly until the symbolappears in the display.5. Press button 2.6. Use button 1 to select one of the following:▷ Daytime running lights are acti‐vated.▷ Daytime running lights are de‐activated.7. Press button 2.The setting is stored for the remote control cur‐rently in use.Adaptive light controlThe conceptAdaptive light control is a variable headlampcontrol system that enables dynamic illumina‐tion of the road surface.Depending on the steering angle and other pa‐rameters, the light from the headlamp followsthe course of the road.ControlsActivatingSwitch position with the ignition switchedon.Auxiliary function:To avoid blinding oncoming traffic, the adaptivelight control directs light towards the front pas‐senger side when the vehicle is at a standstill.MalfunctionAdaptive light control is malfunctioning or hasfailed. Have the system checked as soon as pos‐sible.High beams/roadside parkinglamps1 High beams2 Headlamp flasher3 Roadside parking lampsLeft and right roadside parking lampsThere is an additional option of switching on thelamps on the side of the car facing the road whenparked.Switching onAfter parking the vehicle, press the lever up ordown beyond the pressure point for a longer pe‐riod, arrow 3.The roadside parking lamps drain the battery.Therefore, do not leave them on for unduly longperiods of time; otherwise, the battery might nothave enough power to start the engine.Switching offPress the lever in the opposite direction to thepressure point, arrow 3.Seite 70Controls Lamps70Online Edition for Part no. 01 40 2 609 184 - 09 11 500
参考になったと評価  11人が参考になったと評価しています。


このマニュアルの目次
-
1 .Owner's Manual forVehicle...Owner's Manual forVehicleTHE BMW Z4.OWNER'S MANUAL.The Ultimate DrivingMachineTHE BMW Z4.OWNER'S MANUAL.ContentsA-ZOnline Edition for Part no. 01 40 2 609 184 - 09 11 500
-
2 .2 ページ目のマニュアル
-
3 .Z4 sDrive28iZ4 sDrive35iZ...Z4 sDrive28iZ4 sDrive35iZ4 sDrive35isOwner's Manual for VehicleThank you for choosing a BMW.The more familiar you are with your vehicle, the better control youwill have on the road. We therefore strongly suggest:Read this Owner's Manual before starting off...
-
4 .© 2011 Bayerische Motoren...© 2011 Bayerische Motoren WerkeAktiengesellschaftMunich, GermanyReprinting, including excerpts, only with the writtenconsent of BMW AG, Munich.US English VIII/11, 09 11 500Printed on environmentally friendly paper, bleachedwithout chlorine, suitable for re...
-
5 .ContentsThe fastest way t...ContentsThe fastest way to find information on a partic‐ular topic or item is by using the index, refer topage 208 .6 NotesAt a glance12 CockpitControls20 Opening and closing36 Adjusting43 Transporting children safely45 Driving60 Displays68 Lamps73 Safety...
-
6 .NotesUsing this Owner's M...NotesUsing this Owner's ManualThe fastest way to find information on a partic‐ular topic is by using the index.An initial overview of the vehicle is provided inthe first chapter.Additional sources of informationShould you have any questions, your servicece...
-
7 .ing to BMW repair procedu...ing to BMW repair procedures with appropri‐ately trained personnel.If this work is not carried out properly, there isthe danger of subsequent damage and relatedsafety hazards.Parts and accessoriesFor your own safety, use genuine parts and ac‐cessories appr...
-
8 .also be aware of any appl...also be aware of any applicable warranty limita‐tions or exclusions for such country or region. Insuch case, please contact Customer Relationsfor further information.MaintenanceMaintain the vehicle regularly to sustain the roadsafety, operational reliabili...
-
9 .Seite 9Notes9Online Editi...Seite 9Notes9Online Edition for Part no. 01 40 2 609 184 - 09 11 500
-
11 .At a glanceThese overview...At a glanceThese overviews of buttons, switches anddisplays are intended to familiarize you with yourvehicle. You will also become quickly acquaintedwith the available control concepts and options.Online Edition for Part no. 01 40 2 609 184 - 09 11 500
-
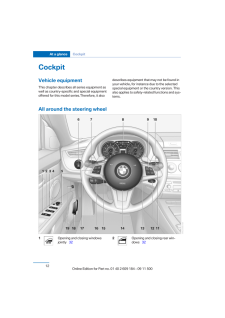
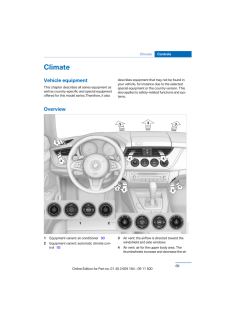
12 .CockpitVehicle equipmentT...CockpitVehicle equipmentThis chapter describes all series equipment aswell as country-specific and special equipmentoffered for this model series.Therefore, it alsodescribes equipment that may not be found inyour vehicle, for instance due to the selectedsp...
-
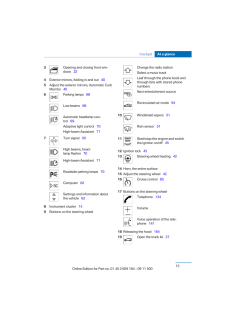
13 .3 Opening and closing fro...3 Opening and closing front win‐dows 324 Exterior mirrors, folding in and out 405 Adjust the exterior mirrors, Automatic CurbMonitor 406 Parking lamps 68Low beams 68Automatic headlamp con‐trol 69Adaptive light control 70High-beam Assistant ...
-
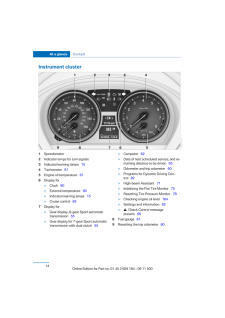
14 .Instrument cluster1 Speed...Instrument cluster1 Speedometer2 Indicator lamps for turn signals3 Indicator/warning lamps 154 Tachometer 615 Engine oil temperature 616 Display for▷Clock 60▷External temperature 60▷Indicator/warning lamps 15▷Cruise control 857 Display for▷Ge...
-
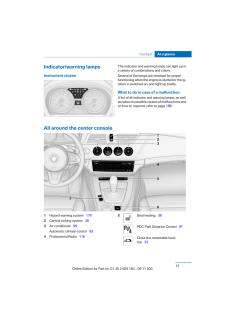
15 .Indicator/warning lampsIn...Indicator/warning lampsInstrument clusterThe indicator and warning lamps can light up ina variety of combinations and colors.Several of the lamps are checked for properfunctioning when the engine is started or the ig‐nition is switched on, and light up bri...
-
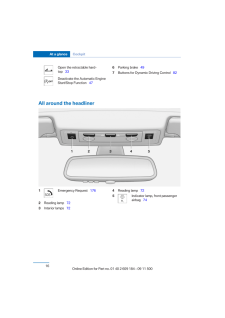
16 .Open the retractable hard...Open the retractable hard‐top 33Deactivate the Automatic EngineStart/Stop Function 476 Parking brake 497 Buttons for Dynamic Driving Control 82All around the headliner1 Emergency Request 1762 Reading lamp 723 Interior lamps 724 Reading lamp ...
-
17 .Seite 17Cockpit At a glan...Seite 17Cockpit At a glance17Online Edition for Part no. 01 40 2 609 184 - 09 11 500
-
19 .ControlsThis chapter is i...ControlsThis chapter is intended to provide you withinformation that will give you complete control ofyour vehicle. All features and accessories that areuseful for driving and your safety, comfort andconvenience are described here.Online Edition for Part n...
-
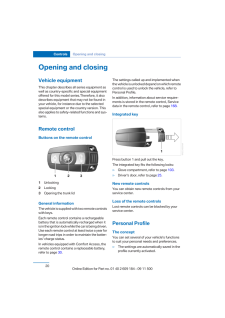
20 .Opening and closingVehicl...Opening and closingVehicle equipmentThis chapter describes all series equipment aswell as country-specific and special equipmentoffered for this model series.Therefore, it alsodescribes equipment that may not be found inyour vehicle, for instance due to th...
-
21 .▷The remote control used ...▷The remote control used is detected whenthe vehicle is unlocked and the stored profileis called up.▷Your personal settings will be recognizedand called up again even if the vehicle hasbeen used in the meantime by someone elsewith another remote control.Th...
-
22 .Operating from the inside...Operating from the insideVia the button for the central locking system.If the vehicle is locked from the inside, the fuelfiller flap remains unlocked.If an accident of a certain severity occurs, thecentral locking system unlocks automatically.The hazard wa...
-
23 .Convenient opening: Windo...Convenient opening: Windows and hardtopWhen you are close to the vehicle, the remotecontrol for Comfort Access can be used to openthe retractable hardtop. Press and hold the button on the remotecontrol.The windows and the retractable hardtop areopened if ...
-
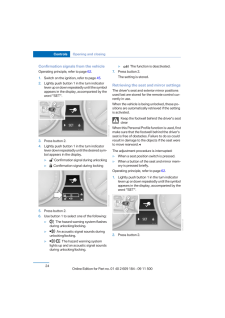
24 .Confirmation signals from...Confirmation signals from the vehicleOperating principle, refer to page 62.1.Switch on the ignition, refer to page 45.2. Lightly push button 1 in the turn indicatorlever up or down repeatedly until the symbolappears in the display, accompanied by theword...
-
25 .3. Lightly push button 1 ...3. Lightly push button 1 in the turn indicatorlever down repeatedly until the symbol ap‐pears in the display.4. Press button 2.5. Use button 1 to select one of the following:▷ Call-up when the vehicle is unlocked.▷ Call-up when the driver's door isopen...
-
26 .Convenient operationIn ve...Convenient operationIn vehicles with an alarm system or Comfort Ac‐cess, the windows and retractable hardtop canalso be operated via the door lock.Opening/closingWith the door closed, turn the key to the unlockor lock position and hold it there.Turning the...
-
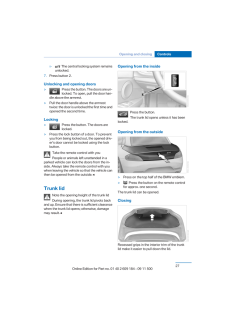
27 .▷ The central locking s...▷ The central locking system remainsunlocked.7. Press button 2.Unlocking and opening doors▷ Press the button. The doors are un‐locked. To open, pull the door han‐dle above the armrest.▷Pull the door handle above the armresttwice: the door is unlocked the...
-
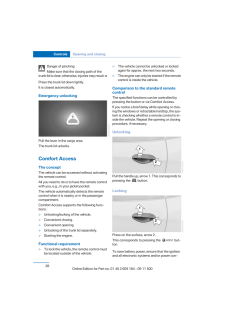
28 .Danger of pinchingMake su...Danger of pinchingMake sure that the closing path of thetrunk lid is clear; otherwise, injuries may result. ◀Press the trunk lid down lightly.It is closed automatically.Emergency unlockingPull the lever in the cargo area.The trunk lid unlocks.Comfort Acces...
-
29 .sumers are switched off b...sumers are switched off before locking the ve‐hicle.Window and convertible top operationWith the ignition in the radio ready state or be‐yond, the windows and the convertible top canbe opened and closed when a remote control islocated inside the vehicle.Un...
-
30 .Replacing the batteryThe ...Replacing the batteryThe remote control for Comfort Access con‐tains a battery that will need to be replaced fromtime to time.1. Take the integrated key out of the remotecontrol, refer to page 20.2. Remove the cover.3. Insert a battery of the same type wi...
-
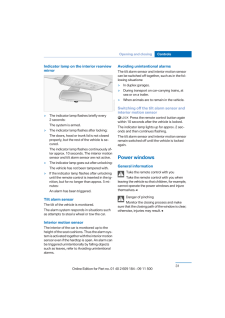
31 .Indicator lamp on the int...Indicator lamp on the interior rearviewmirror▷The indicator lamp flashes briefly every2 seconds:The system is armed.▷The indicator lamp flashes after locking:The doors, hood or trunk lid is not closedproperly, but the rest of the vehicle is se‐cured.The in...
-
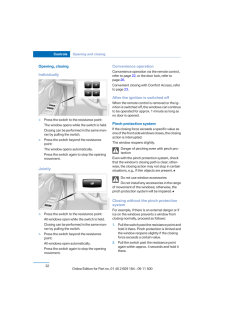
32 .Opening, closingIndividua...Opening, closingIndividually▷Press the switch to the resistance point:The window opens while the switch is held.Closing can be performed in the same man‐ner by pulling the switch.▷Press the switch beyond the resistancepoint:The window opens automatically.P...
-
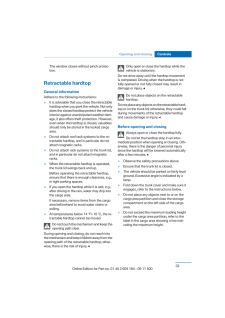
33 .The window closes without...The window closes without pinch protec‐tion.Retractable hardtopGeneral informationAdhere to the following instructions:▷It is advisable that you close the retractablehardtop when you park the vehicle. Not onlydoes the closed hardtop protect the vehicleinte...
-
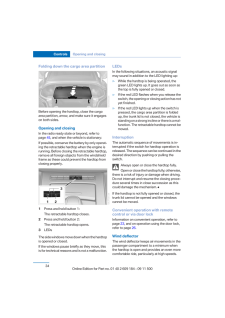
34 .Folding down the cargo ar...Folding down the cargo area partitionBefore opening the hardtop, close the cargoarea partition, arrow, and make sure it engageson both sides.Opening and closingIn the radio ready state or beyond, refer topage 45, and when the vehicle is stationary:If poss...
-
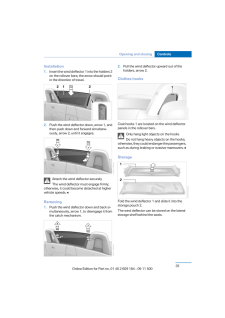
35 .Installation1. Insert the...Installation1. Insert the wind deflector 1 into the holders 2on the rollover bars; the arrow should pointin the direction of travel.2. Push the wind deflector down, arrow 1, andthen push down and forward simultane‐ously, arrow 2, until it engages.Attach th...
-
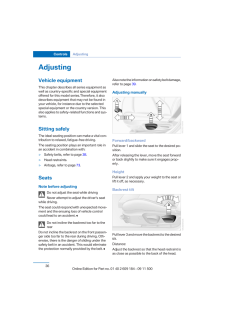
36 .AdjustingVehicle equipmen...AdjustingVehicle equipmentThis chapter describes all series equipment aswell as country-specific and special equipmentoffered for this model series.Therefore, it alsodescribes equipment that may not be found inyour vehicle, for instance due to the selected...
-
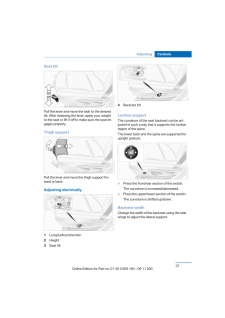
37 .Seat tiltPull the lever a...Seat tiltPull the lever and move the seat to the desiredtilt. After releasing the lever, apply your weightto the seat or lift it off to make sure the seat en‐gages properly.Thigh supportPull the lever and move the thigh support for‐ward or back.Adjusting e...
-
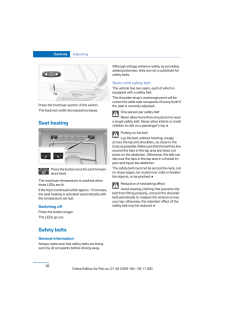
38 .Press the front/rear sect...Press the front/rear section of the switch.The backrest width decreases/increases.Seat heatingPress the button once for each temper‐ature level.The maximum temperature is reached whenthree LEDs are lit.If the trip is continued within approx. 15 minutes,the...
-
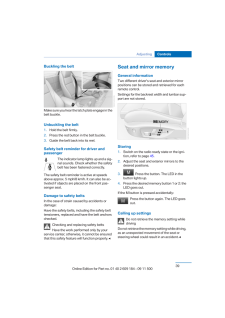
39 .Buckling the beltMake sur...Buckling the beltMake sure you hear the latch plate engage in thebelt buckle.Unbuckling the belt1. Hold the belt firmly.2. Press the red button in the belt buckle.3. Guide the belt back into its reel.Safety belt reminder for driver andpassengerThe indicato...
-
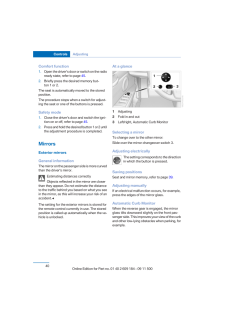
40 .Comfort function1. Open t...Comfort function1. Open the driver's door or switch on the radioready state, refer to page 45.2. Briefly press the desired memory but‐ton 1 or 2.The seat is automatically moved to the storedposition.The procedure stops when a switch for adjust‐ing the sea...
-
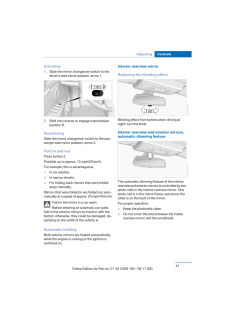
41 .Activating1. Slide the mi...Activating1. Slide the mirror changeover switch to thedriver's side mirror position, arrow 1.2. Shift into reverse or engage transmissionposition R.DeactivatingSlide the mirror changeover switch to the pas‐senger side mirror position, arrow 2.Fold in and o...
-
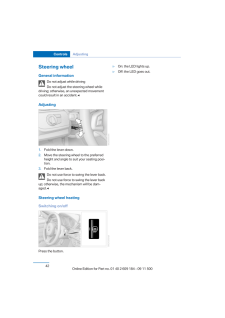
42 .Steering wheelGeneral inf...Steering wheelGeneral informationDo not adjust while drivingDo not adjust the steering wheel whiledriving; otherwise, an unexpected movementcould result in an accident.◀Adjusting1. Fold the lever down.2. Move the steering wheel to the preferredheight and a...
-
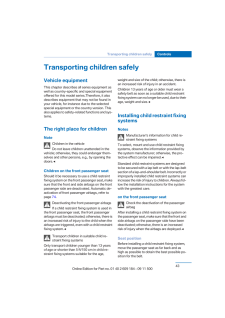
43 .Transporting children saf...Transporting children safelyVehicle equipmentThis chapter describes all series equipment aswell as country-specific and special equipmentoffered for this model series.Therefore, it alsodescribes equipment that may not be found inyour vehicle, for instance ...
-
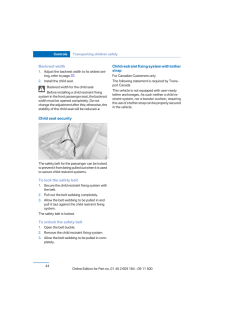
44 .Backrest width1. Adjust t...Backrest width1. Adjust the backrest width to its widest set‐ting, refer to page 37.2. Install the child seat.Backrest width for the child seatBefore installing a child restraint fixingsystem in the front passenger seat, the backrestwidth must be opened c...
-
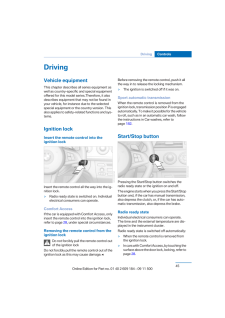
45 .DrivingVehicle equipmentT...DrivingVehicle equipmentThis chapter describes all series equipment aswell as country-specific and special equipmentoffered for this model series.Therefore, it alsodescribes equipment that may not be found inyour vehicle, for instance due to the selectedsp...
-
46 .Ignition onAll electrical...Ignition onAll electrical consumers can operate. The od‐ometer and trip odometer are displayed in theinstrument cluster.To save battery power when the engine is off,switch off the ignition and any unnecessaryelectronic systems/power consumers.Radio ready s...
-
47 .Set the parking brake and...Set the parking brake and further securethe vehicle as requiredSet the parking brake firmly when parking; oth‐erwise, the vehicle could roll. On steep upwardand downward inclines, further secure the vehi‐cle, for example, by turning the steering wheel inth...
-
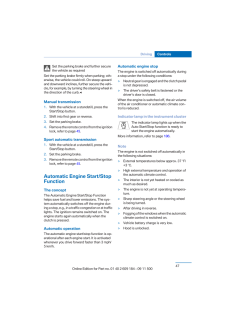
48 .Parking the vehicle durin...Parking the vehicle during anautomatic engine stopThe vehicle can be parked safely during an au‐tomatic engine stop, such as when you wish toleave the vehicle.1. Press the Start/Stop button. The ignition isswitched off. The Auto Start/Stop functionis deact...
-
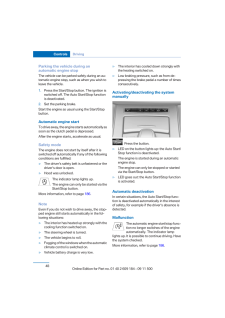
49 .Parking brakeThe conceptY...Parking brakeThe conceptYour vehicle is equipped with an electrome‐chanical parking brake that can be set and re‐leased by using a button.The parking brake is primarily used to preventthe vehicle from rolling when it is parked.When the vehicle is stationar...
-
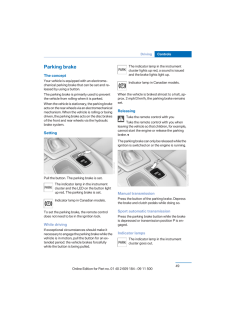
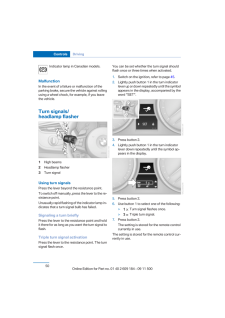
50 .Indicator lamp in Canadia...Indicator lamp in Canadian models.MalfunctionIn the event of a failure or malfunction of theparking brake, secure the vehicle against rollingusing a wheel chock, for example, if you leavethe vehicle.Turn signals/headlamp flasher1 High beams2 Headlamp flash...
-
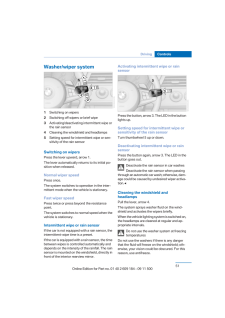
51 .Washer/wiper system1 Swit...Washer/wiper system1 Switching on wipers2 Switching off wipers or brief wipe3 Activating/deactivating intermittent wipe orthe rain sensor4 Cleaning the windshield and headlamps5 Setting speed for intermittent wipe or sen‐sitivity of the rain sensorSwitchin...
-
52 .Avoid using the washer wh...Avoid using the washer when the reservoir isempty; otherwise, you could damage thepump.◀Windshield washer nozzlesThe windshield washer nozzles are heated au‐tomatically while the engine is running or the ig‐nition is switched on.Washer fluidGeneral informa...
-
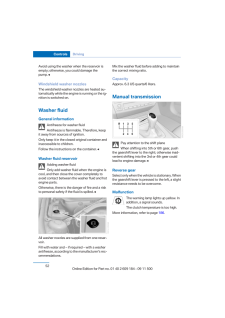
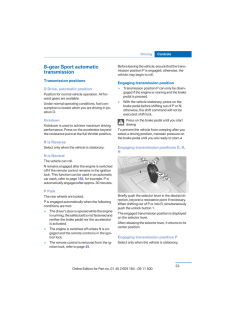
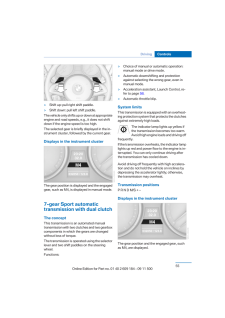
53 .8-gear Sport automatictra...8-gear Sport automatictransmissionTransmission positionsD Drive, automatic positionPosition for normal vehicle operation. All for‐ward gears are available.Under normal operating conditions, fuel con‐sumption is lowest when you are driving in po‐sition D.Ki...
-
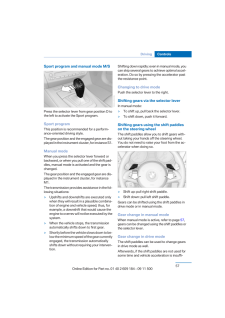
54 .Press button P.Sport prog...Press button P.Sport program and manual mode M/SActivating the sport programPush the selector lever to the left out of trans‐mission position D.The sport program is activated and DS is dis‐played in the instrument cluster.This position is recommended for a...
-
55 .▷Shift up: pull right shi...▷Shift up: pull right shift paddle.▷Shift down: pull left shift paddle.The vehicle only shifts up or down at appropriateengine and road speeds, e.g., it does not shiftdown if the engine speed is too high.The selected gear is briefly displayed in the in‐str...
-
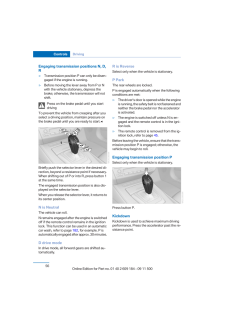
56 .Engaging transmission pos...Engaging transmission positions N, D,R▷Transmission position P can only be disen‐gaged if the engine is running.▷Before moving the lever away from P or Nwith the vehicle stationary, depress thebrake; otherwise, the transmission will notshift.Press on the b...
-
57 .Sport program and manual ...Sport program and manual mode M/SPress the selector lever from gear position D tothe left to activate the Sport program.Sport programThis position is recommended for a perform‐ance-oriented driving style.The gear position and the engaged gear are dis‐playe...
-
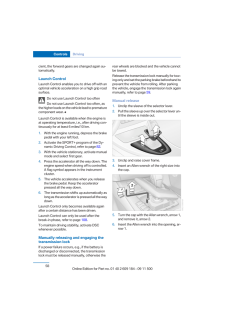
58 .cient, the forward gears ...cient, the forward gears are changed again au‐tomatically.Launch ControlLaunch Control enables you to drive off with anoptimal vehicle acceleration on a high grip roadsurface.Do not use Launch Control too oftenDo not use Launch Control too often, asthe hig...
-
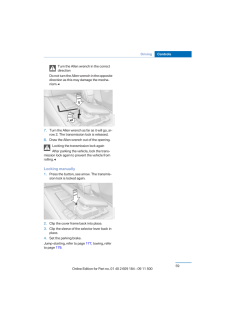
59 .Turn the Allen wrench in ...Turn the Allen wrench in the correctdirectionDo not turn the Allen wrench in the oppositedirection as this may damage the mecha‐nism.◀7. Turn the Allen wrench as far as it will go, ar‐row 2. The transmission lock is released.8. Draw the Allen wrench out of...
-
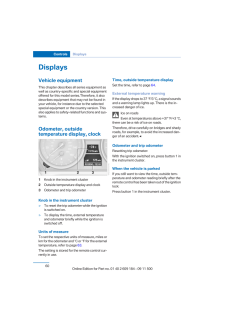
60 .DisplaysVehicle equipment...DisplaysVehicle equipmentThis chapter describes all series equipment aswell as country-specific and special equipmentoffered for this model series.Therefore, it alsodescribes equipment that may not be found inyour vehicle, for instance due to the selecteds...
-
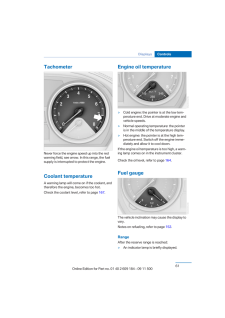
61 .TachometerNever force the...TachometerNever force the engine speed up into the redwarning field, see arrow. In this range, the fuelsupply is interrupted to protect the engine.Coolant temperatureA warning lamp will come on if the coolant, andtherefore the engine, becomes too hot.Check...
-
62 .▷The remaining range is s...▷The remaining range is shown on the com‐puter.▷When a dynamic driving style is used, suchas when corners are taken rapidly, enginefunctions are not ensured.Below a range of approx. 30 miles/50 km, theindicator lamp is displayed continuously.Refuel promptl...
-
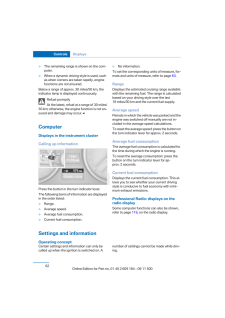
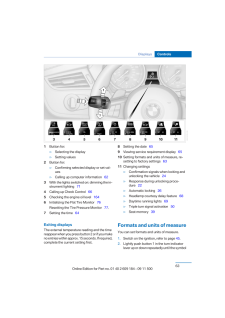
63 .1 Button for:▷Selecting t...1 Button for:▷Selecting the display▷Setting values2 Button for:▷Confirming selected display or set val‐ues▷Calling up computer information 623 With the lights switched on: dimming the in‐strument lighting 714 Calling up Check Control 665 Checking the...
-
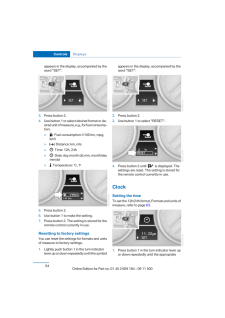
64 .appears in the display, a...appears in the display, accompanied by theword "SET".3. Press button 2.4. Use button 1 to select desired format or de‐sired unit of measure, e.g., for fuel consump‐tion.▷ Fuel consumption: l/100 km, mpg,km/l▷ Distance: km, mls▷ Time: 12h, 24h▷ Date...
-
65 .symbol appears in the dis...symbol appears in the display, accompaniedby the time and the word "SET".2. Press button 2.3. Use button 1 to set the hours.4. Press button 2 to confirm the entry.5. Use button 1 to set the minutes.6. Press button 2 to confirm the entry.7. Press button 2.T...
-
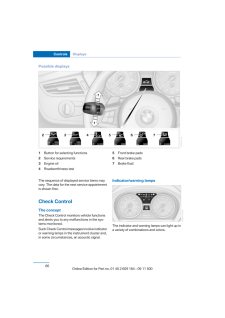
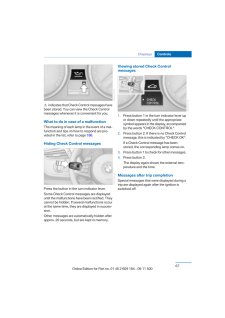
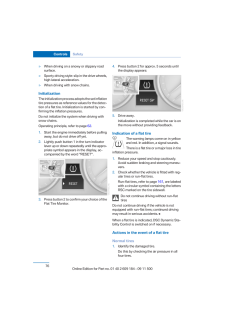
66 .Possible displays1 Button...Possible displays1 Button for selecting functions2 Service requirements3 Engine oil4 Roadworthiness test5 Front brake pads6 Rear brake pads7 Brake fluidThe sequence of displayed service items mayvary. The data for the next service appointmentis shown first...
-
67 .indicates that Check Co...indicates that Check Control messages havebeen stored. You can view the Check Controlmessages whenever it is convenient for you.What to do in case of a malfunctionThe meaning of each lamp in the event of a mal‐function and tips on how to respond are pro‐...
-
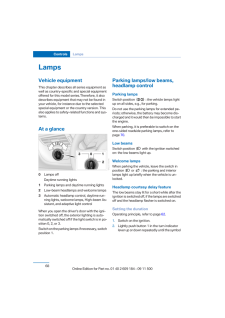
68 .LampsVehicle equipmentThi...LampsVehicle equipmentThis chapter describes all series equipment aswell as country-specific and special equipmentoffered for this model series.Therefore, it alsodescribes equipment that may not be found inyour vehicle, for instance due to the selectedspec...
-
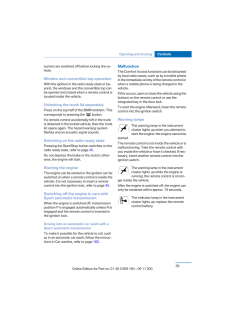
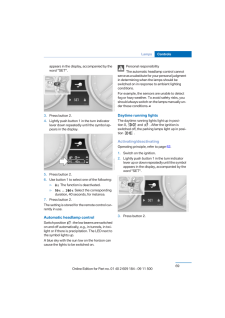
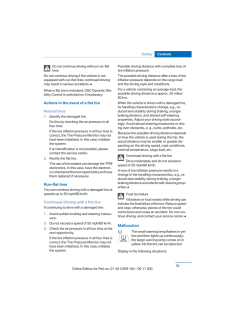
69 .appears in the display, a...appears in the display, accompanied by theword "SET".3. Press button 2.4. Lightly push button 1 in the turn indicatorlever down repeatedly until the symbol ap‐pears in the display.5.Press button 2.6.Use button 1 to select one of the following:▷ The funct...
-
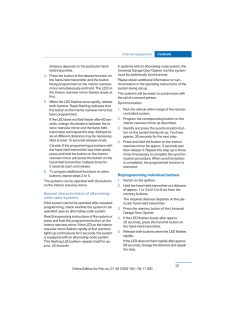
70 .4. Lightly push button 1 ...4. Lightly push button 1 in the turn indicatorlever up or down repeatedly until the symbolappears in the display.5. Press button 2.6. Use button 1 to select one of the following:▷ Daytime running lights are acti‐vated.▷ Daytime running lights are de‐ac...
-
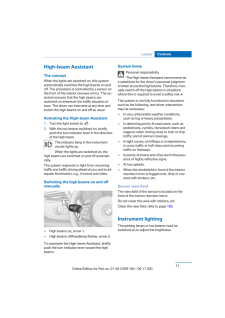
71 .High-beam AssistantThe co...High-beam AssistantThe conceptWhen the lights are switched on, this systemautomatically switches the high beams on andoff. The procedure is controlled by a sensor onthe front of the interior rearview mirror. The as‐sistant ensures that the high beams aresw...
-
72 .1. Push button 1 up or do...1. Push button 1 up or down repeatedly untilthe appropriate symbol appears in the dis‐play, accompanied by the brightness settingand the word "SET".2. Press button 2.3. Push button 1 up or down to select the de‐sired brightness level.4.Press button 2.The d...
-
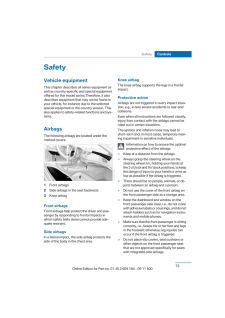
73 .SafetyVehicle equipmentTh...SafetyVehicle equipmentThis chapter describes all series equipment aswell as country-specific and special equipmentoffered for this model series.Therefore, it alsodescribes equipment that may not be found inyour vehicle, for instance due to the selectedspe...
-
74 .▷Do not hang pieces of cl...▷Do not hang pieces of clothing, such as jack‐ets, over the backrests.▷Make sure that passengers do not lean theirheads against the side airbag; otherwise, se‐rious injuries could result if the airbag sud‐denly deployed.▷Do not remove the airbag restraint ...
-
75 .The indicator lamp for th...The indicator lamp for the front passenger air‐bags indicates the operating status of the frontand side airbags on the front passenger side de‐pending on the seat occupation. The indicatorlamp shows whether the passenger airbags areactivated or deactivated...
-
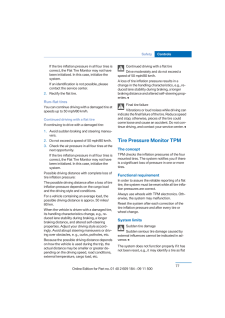
76 .▷When driving on a snowy ...▷When driving on a snowy or slippery roadsurface.▷Sporty driving style: slip in the drive wheels,high lateral acceleration.▷When driving with snow chains.InitializationThe initialization process adopts the set inflationtire pressures as reference values fo...
-
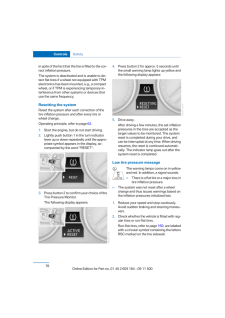
77 .If the tire inflation pre...If the tire inflation pressure in all four tires iscorrect, the Flat Tire Monitor may not havebeen initialized. In this case, initialize thesystem.If an identification is not possible, pleasecontact the service center.2. Rectify the flat tire.Run-flat tire...
-
78 .in spite of the fact that...in spite of the fact that the tire is filled to the cor‐rect inflation pressure.The system is deactivated and is unable to de‐tect flat tires if a wheel not equipped with TPMelectronics has been mounted, e.g., a compactwheel, or if TPM is experiencing temp...
-
79 .Do not continue driving w...Do not continue driving without run-flattiresDo not continue driving if the vehicle is notequipped with run-flat tires; continued drivingmay result in serious accidents.◀When a flat tire is indicated, DSC Dynamic Sta‐bility Control is switched on if necess...
-
80 .▷A wheel without TPM elec...▷A wheel without TPM electronics is fitted:have the service center check it if necessary.▷Malfunction: have the system checked byyour service center.▷TPM could not be fully reset. Reset the sys‐tem again.The small warning lamp flashes in yel‐low and then l...
-
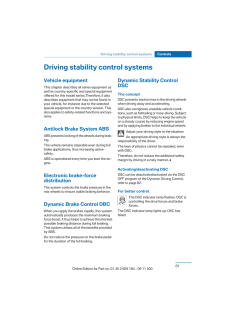
81 .Driving stability control...Driving stability control systemsVehicle equipmentThis chapter describes all series equipment aswell as country-specific and special equipmentoffered for this model series.Therefore, it alsodescribes equipment that may not be found inyour vehicle, for inst...
-
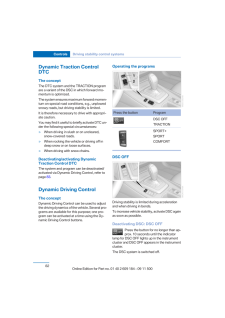
82 .Dynamic Traction ControlD...Dynamic Traction ControlDTCThe conceptThe DTC system and the TRACTION programare a variant of the DSC in which forward mo‐mentum is optimized.The system ensures maximum forward momen‐tum on special road conditions, e.g., unplowedsnowy roads, but driving st...
-
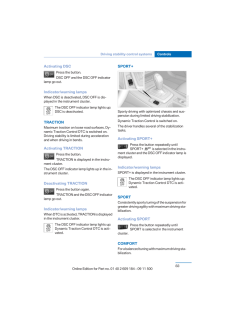
83 .Activating DSCPress the b...Activating DSCPress the button.DSC OFF and the DSC OFF indicatorlamp go out.Indicator/warning lampsWhen DSC is deactivated, DSC OFF is dis‐played in the instrument cluster.The DSC OFF indicator lamp lights up:DSC is deactivated.TRACTIONMaximum traction on ...
-
84 .Activating COMFORTPress t...Activating COMFORTPress the button repeatedly until COM‐FORT is selected in the instrumentcluster.Displays in the instrument clusterThe selected program is displayed in the instru‐ment cluster.Drive-off assistantThis system supports driving away on gradien...
-
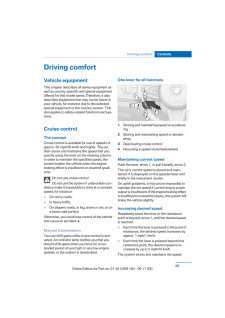
85 .Driving comfortVehicle eq...Driving comfortVehicle equipmentThis chapter describes all series equipment aswell as country-specific and special equipmentoffered for this model series.Therefore, it alsodescribes equipment that may not be found inyour vehicle, for instance due to the se...
-
86 .Accelerating using the le...Accelerating using the leverAccelerating slightly:Press the lever to the resistance point, arrow 1,and hold until the desired speed is reached.Accelerating significantly:Press the lever beyond the resistance point, ar‐row 1, and hold until the desired spee...
-
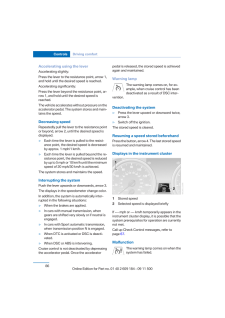
87 .More information, refer t...More information, refer to page 186 .Park Distance Control PDCThe conceptPDC supports you when parking.Objects in front of or behind your vehicle thatyou are approaching slowly are indicated byacoustic signals.MeasurementMeasurements are made by ultrasoun...
-
88 .Signal tonesWhen approach...Signal tonesWhen approaching an object, an intermittenttone is sounded that indicates the position of theobject. For example, if an object is detected tothe left rear of the vehicle, a signal tone soundsfrom the left rear speaker.The shorter the distance t...
-
89 .ClimateVehicle equipmentT...ClimateVehicle equipmentThis chapter describes all series equipment aswell as country-specific and special equipmentoffered for this model series.Therefore, it alsodescribes equipment that may not be found inyour vehicle, for instance due to the selectedsp...
-
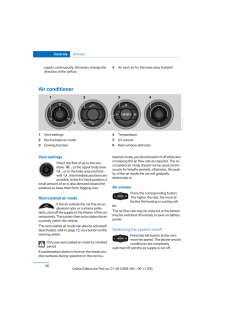
90 .supply continuously; the ...supply continuously; the levers change thedirection of the airflow.5 Air vent: air for the knee area, footwellAir conditioner1 Vent settings2 Recirculated air mode3 Cooling function4 Temperature5 Air volume6 Rear window defrosterVent settingsDirect the flo...
-
91 .To switch on the air cond...To switch on the air conditioner, set the desiredair flow rate.Switching cooling function on/offThe cooling function cools and de‐humidifies the incoming air beforereheating it as required, according to the tem‐perature setting. This function is only avail...
-
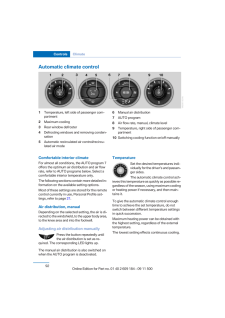
92 .Automatic climate control...Automatic climate control1 Temperature, left side of passenger com‐partment2 Maximum cooling3 Rear window defroster4 Defrosting windows and removing conden‐sation5 Automatic recirculated air control/recircu‐lated air mode6 Manual air distribution7 AUTO pro...
-
93 .Switching the cooling fun...Switching the cooling function on andoffThe cooling function cools and de‐humidifies the incoming air beforereheating it as required, accordingto the temperature setting. Thisfunction is only available while theengine is running.The cooling function helps ...
-
94 .Press any button except t...Press any button except the rear window de‐froster to reactivate the automatic climate con‐trol.Residual heatThe heat stored in the engine is used to heat theinterior.This function can be switched onusing the right-hand button underthe following conditions...
-
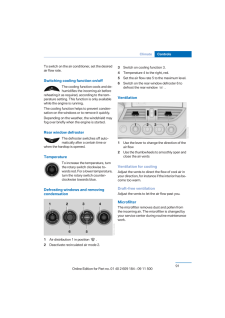
95 .Draft-free ventilationAdj...Draft-free ventilationAdjust the vents to let the air flow past you.Microfilter/activated-charcoal filterThe microfilter traps dust and pollen in the in‐coming air. The activated-charcoal filter pro‐vides additional protection by filtering gaseouspollutant...
-
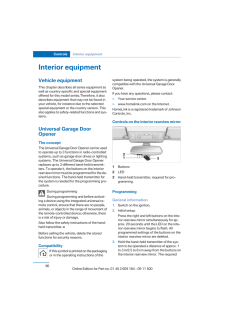
96 .Interior equipmentVehicle...Interior equipmentVehicle equipmentThis chapter describes all series equipment aswell as country-specific and special equipmentoffered for this model series.Therefore, it alsodescribes equipment that may not be found inyour vehicle, for instance due to the...
-
97 .distance depends on the p...distance depends on the particular hand-held transmitter.4. Press the button of the desired function onthe hand-held transmitter and the buttonbeing programmed on the interior rearviewmirror simultaneously and hold. The LED onthe interior rearview mirror f...
-
98 .Canada: if the LED does n...Canada: if the LED does not flash rapidly af‐ter approx. 60 seconds, change the distanceand repeat the step. If programming wasaborted by the hand-held transmitter, holddown the memory button and press and re‐lease the button on the hand-held transmit‐ter ...
-
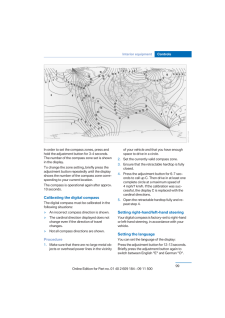
99 .In order to set the compa...In order to set the compass zones, press andhold the adjustment button for 3‑4 seconds.The number of the compass zone set is shownin the display.To change the zone setting, briefly press theadjustment button repeatedly until the displayshows the number of ...
-
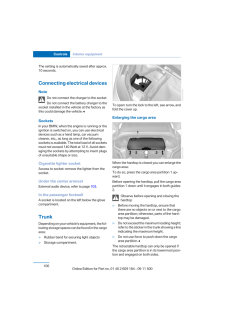
100 .The setting is automatica...The setting is automatically saved after approx.10 seconds.Connecting electrical devicesNoteDo not connect the charger to the socketDo not connect the battery charger to thesocket installed in the vehicle at the factory asthis could damage the vehicle.◀Soc...
